Pages

Thursday, July 19, 2012

Somedays You Need Courage

Good morning Globecraft friends, 

Pinky here today with a fun little project. 
I am SURE we all know someone who needs "courage" 
I know some days I need a little lift, so why not make a sweet
pin to remind your friends that you have their back?!

I have a full tutorial for making this pin step by step.
Step 1. Using craft adhesive, and Keys To My Heart embellishments
 coat heart thoroughly, using a pin removes excess glue from intricate cuts.
 Step 2. Apply foil as directed on photo. Clearsnap designer foils were used here. 
 There will be a little bit missed and that is what we are looking for. 
 Step 3. Using black ink tap onto heart gently. Not completely coating
just adding tarnish. 
 Step 4. Using liquid pearl pen in bronze color, carefully dab
tiny pearls around edges of heart. 
 Step 5. Set aside to dry for 30-45 minutes. 
Step 6. Lay down wax paper-coat generously with Glastique.
Or apply several thin coats. 
Step 7. Set aside for 4-6 hours to dry completely until clear.
 Step 8. Trim acrylic piece down to 2X2"- Clear Scraps acrylic sheet used here. 
 Step 9. Remove protective film on both sides, drip with alcohol inks. 
 Step 10. After alcohol inks dry, using StazOn ink, stamp word
courage onto bottom of acrylic,  stamp 3-4 times 
because of the alcohol ink. (Pink By Design stamp shown here).
Step 11. Turn acrylic piece over-using StazOn ink dab onto edges
and onto acrylic itself. It adds age. 
 Step 12. Flip piece over to front. Adhere heart to acrylic. 
 Step 13. Coat entire project with Glastique- set aside for 24 hours to dry. 
Careful in crevices, do not fill completely. 
Step 14. Using metal pin coat with same alcohol ink. 
 Step 15. Adhere pin to back of acrylic behind heart. 
I hope you are inspired to play with these amazing Piccolo pieces. 
Have a wonderfully crafty day~

Products Used:
Clearsnap Designer Foils
Pink By Design Stamps
Beacon Zip Dry Adhesive
Viva Decor Pearl Pen
Clear Scraps 12X12 acrylic sheet

Wednesday, July 18, 2012

Vintage Bronzed Baby Shoe

Hello, Charlotte here and I want to share my altered baby shoe using Piccolo Enamel  Powders and Piccolo Charms. I have been wanting to alter a baby shoe for a longtime, but I just needed to find the right shoes and the right products.  I came across this pair of baby shoes in a local thrift store.  I knew immediately the combination of the Piccolo Enamel Powders and these shoes would be make the perfect bronzed altered baby shoe.   

GlobeCraftMemories Products
Piccolo Copper Kettle Enamel Powder
Piccolo Enchaned Aubergine Enamel Powder
Piccolo Gilded Rose Enamel Powder
Piccolo Mermaid Tears Enamel Powder
Piccolo Vintage Copper Metallic Powder
Piccolo Mossy Glen Enamel Powder
Glastique
Piccolo Beautiful Horses Charm
Piccolo Heart Charm
Piccolo Enamel Powder Adhesive
Other Products
Creative Vintage Brad Charms
Tim Holtz Salvage Stickers
Close to My Heart Chocolate Distressing Ink Pad
ColorBox  Venetian Lace Graphics 45 Decades Ink Pad
Colorbox Leather Mix'd Media Inx
Bo Bunny Trinkets
Kaisercraft Paper Roses
Directions
  •  Spray paint a child's shoe with flat black enamel spray paint.


  • Apply a coat of the Piccolo Embossing Powder Adhesive to the front section of the shoe.  
  • Immediately after applying the adhesive, sprinkle Piccolo Copper Kettle Enamel Powder over the embossing adhesive on the shoe.  Using a heat gun, emboss the shoe.

  • After you have embossed the shoe, the shoe will look like a beautiful bronzed baby shoe. The Piccolo Copper Kettle is so stunning, I just wanted to leave the shoe alone but decided to continue to alter the shoe.

  • Distress a piece of ribbon by running an ink pad over the ribbon.  Using hot glue, adhere the ribbon the front of the shoe. Glue several paper blooms to the front of the shoe.

  •               Use a safety pin to attach a metal charm to the shoe strap.  

  • Apply a coat of the Piccolo Embossing Powder Adhesive to the front and back of the Piccolo Beautiful Horses Charm.  
  • Immediately after applying the adhesive, sprinkle Piccolo Enchanted Aubergine Enamel Powder over the entire surface of the charm. If you are using a tidy tray, gently tap the corner of the charm on the tray to remove all the excess embossing powder. 
  • Tap off excess enamel powder and melt powder with heat gun. 
  • After the Piccolo Enchanted Aubergine Enamel Powder has cooled, glue a photo to the charm.
  • Apply a heavy coat of Glastique to the charm, covering the entire photo.  Set the charm aside and allow the charm to dry for 24 hours.

Gently remove the Piccolo Heart Charm using tweezers, needle or toothpick.  After you have removed the filigree Heart Charm, coat the heart using  Piccolo Mossy Glen Enamel Powder. Tap off excess enamel powder. Use tweezers to keep the pieces in place and melt the powder with a heat gun. 
  • Using hot glue, attach a piece of ink distressed ribbon to both sides of the outer counter of the shoe. 
  • Glue a vintage brad to the glued ends of the ribbon on the shoe.  
  • String a piece of the ink distressed ribbon through the charm's hole and tie a bow. Glue the charm to the shoe's inner edge.
  • Adhere the embossed Filigree Piccolo Heart Charm inside the shoe with hot glue.
  • Fill the shoe with coordinating embellishments and secure the embellishments with hot glue.
Thanks for stopping by the GlobeCraftMemories Blog

                           A Pretty Pile of Paper Chaos   http://suepup.blogspot.com/

This shoe was inspired by Thespoena Mc Laughlin.  

Tuesday, July 17, 2012

Challenge #74 Christmas Parchment

Is it beginning to feel like Christmas? We have another great Christmas challenge this week...

Christmas Parchment
Put on your favorite Christmas tunes and create a Christmas parchment card to share with us. Remember to use a SweetStamps image on your creation to get an extra chance at winning $20 of rubber stamps from SweetStamps. Rules are listed in the sidebar and instructions can be found at the bottom of this post.

Don't forget to stop by SweetStamps.com's online store and shop for some Christmas goodies now, while they are on sale! Use coupon code JULY25 to get the 25% off discount on all things Christmas.

We also have a SAVE THE BUS sale going on now...get 20% off everything in stock at our warehouse when you use coupon code BUMMER (we're liquidating some inventory to help pay for a new engine for the bus so we can continue to travel to trade shows to bring the latest products and techniques to a city near you!) See where we're headed next, we'd love to see YOU at a show!


Check out these beautiful Christmas Parchment creations from our sweet & talented design team:


Tamara Morton


If you need instructions on this technique, click here to see a video demonstration.
* * * * * * * * * * * * * * * * * *
WIN FREE STAMPS! 
Join our weekly challenge
You can use any stamp on your challenge entry, but if you use a SweetStamps image, you will get two entries into the giveaway! To enter the challenge, please add the URL to your actual blog post or online gallery to the InLinkz at the end of this post. Please do not link to your main blog; we want to be able to find your post to leave you comments. Also, please link back to our blog.


Remember, you can only enter the challenge one time, use a SweetStamps image to get an extra entry in the challenge. Please limit the amount of challenges to 10 (including ours).  You must link back to us in your blog post.
 * * * * * * * * * * * * * * * * * *
Next week we've got another Christmas challenge theme, stop by to see Christmas Flap Cards.

Happy Stamping! Hope your day is super sweet!

:) stacey

Victorian Christmas Winner

Using Random.org, a winner from last week's challenge was chosen.

And the winner is....#1

 Congratulations
 Anita

Please contact me for your winning prize of a $20 shopping spree for rubber stamps at SweetStamps.com.

Thank you to everyone who joined in on the challenge, we hope you had fun and will join us again — we have a new challenge every Tuesday!

Friday, July 13, 2012

Sledding Ornament *NEW at CHA*

Here's another peek at one of our new products being released at CHA!! This ornament is easy to make and includes the sledder inside the globe. Available on our website soon!


The decoration on this ornament features a mixture of paint, flocking, and enamel powders and the effect is a really authentic looking vintage ornament.  The "texture" was pressed into
the chipboard in an embossing technique to create the effect of a patterned paper.

Want to see more sneak peeks? Stay tuned here on our blog!!

Thursday, July 12, 2012

Thinking of You

Good morning,Steph here with another awesome Globecraft Memories product.   Did you know that Globecraft Memories created awesome easel cards?   I love easel cards and was thrilled to be able to work with them today.


The easel card lays flat for mailing, then the recipient can easily stand the card up and admire it. I initially traced the outline of the oval easel on brown cardstock so I would have a base to work on. My next 3 layers were cut with Spellbinders dies. Each was adhered to the previous layer with foam adhesives for dimension.


I wrapped twine around the pink layer, knotting it on the left side. Then I stamped the image and colored it with Copic Markers. The stentiment was stamped with Clearsnap Chestnut Roan Ink and also die cut.


The image and sentiment were then adhered to the top most layer which had been embossed with a Cuttlebug Embossing Folder.


I used 2 flowers from the Globecraft Memories Piccolo Card Decor Set # and added Brown Stone Powder and then heat set. I added adhered them to the image and inserted a clear rhinestone in the middle. The flowers added some nice depth to my card.

Thanks for stopping by today.

Supplies:


Card, Chipboard, Powders: Globecraft Memories
Stamps, Rhinestone: Hero Arts
Ink: Clearsnap
Markers: Copic Markers
Embossing Folder: Cuttlebug
Dies: Sizzix, Spellbinders

Wednesday, July 11, 2012

Beautiful Boy

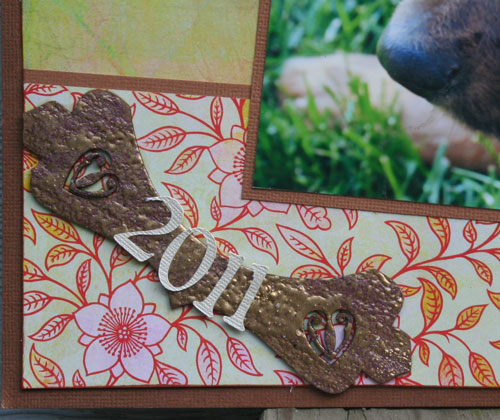
Piccolo Card Decor - It's not just for cards!  I know the packaging says Card Decor, but it is so much more than that! 

Hi, Steph here with a layout I created about our puppy, whom we truly adore (and who loves us to no end).  He's such a sweet creature and deserves to be documented as part of our family.


I used Card Decor Set #2 placing the larger element in the lower left corner to use as the anchor for my date.  I used Enchanting Aubergine and Victorian Bronze Powders and heat set it, adding some additional powders as a second layer, to be sure I had just the right color combination.


The heart is from Heart Flourishes Set #2 and looks awesome covered in Enchanted Aubergine and Mermaid Tears.  I also used 2 coats for the best coverage.  I love the two-toned effect I was able to achieve.  I was even able to staple it to my layout.


Thanks for stopping by today.

Supplies:

Piccolo Card Decore Set #2
Piccolo Hearth Flourishes Set #2
Powders:  Enchanted Aubergine, Mermaid Tears, Victorian Bronze
Cardstock:  Bazzill
Pattern paper: Prima
Die cuts: Cricut Expression