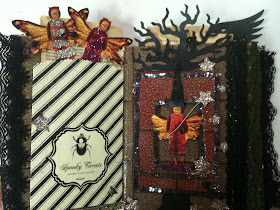
Book of Spells
Materials
-1 Little Fancy Oval Bubble Frame's
-Piccolo's: Card Decor Set # 4
-Piccolo's: Card Decor Set #11
-Piccolo's: Key Charm Set
-Powders: Mermaid Tears, 24K Gold, Victorian Bronze
-Glitters: Pure Sparkle Gold
-Glastique Gloss Finishing Glaze
-Glue: Hot Glue, Decoupage Medium, Acid Free Glue Stick
-Mixed Media Inks, Emboss/Pigment Inks, Clearsnap
-Acrylic Paints: Expresso, White, Black, (gothic colors)
-Air Dry Clay
-Discarded Book
-Chipboard
-Scrapbook Papers, Ephemera, Paper Treat Bags: Lisa Kettell Designs
-Collage Images: Fairytale Follies Collage CD, Lisa Kettell Designs
-Ribbon, Trims, Lace, Fabric Scraps
-Tools: Scissors, Glue Gun, Paint Brushes, Heat Gun, Sand Paper
-Other: Mica Flakes, 3D Embellishments, Dresden Trims, Ephemera/Coin Wrappers, Paper Rosettes, Tiny Bottles, Keys and Charms, Oval Candy Frame Mold
1. Re-size and print fairy and gothic style images from collage cd, cut, glue to chipboard with glue stick and cut out again. This will give durability to the image, set aside, repeat with images from the scrapbook paper and ephemera.
2. Open one package of the Little Fancy Oval Bubble Frame's, paint the 2 bottom frames with brown acrylic paint, next using an clear emboss ink pad coat the top thin frame in the Little Fancy Rectangle Bubble Frame pack, sprinkle 24K gold emboss powder on it, shake off excess and heat set.
3. Press air dry clay into an oval candy frame mold, remove, let air dry. Once the clay frame is dry, paint with expresso color paint, let dry, then coat with gold ink pad and sprinkle with 24K Gold, Victorian Bronze powders, heat set with heat tool.
4. Cover a discarded book with plain scrapbook paper using decoupage medium, ad more layers of paper, distress using sand paper, acrylic paint, mixed media paints and ink.
5. Place fancy oval bubble on the mid center of the book cover, trace with a pencil, this will mark your decorating area for the inside of the bubble. Begin Layering your bubble assemblage inside the traced area, using vintage images, ephemera, glitters, powders and other embellishments. Next attach 2 small 1/2 inch wood blocks to the back of the cutout chipboard image of choice using hot glue then attach to the center of book base
( See project pictures )
6. Add extra embellishments and layer parts of your assemblage with glastique finishing gloss glaze for an enamel shiny look. Finish off the images with mixed media inks, glitter and mica flakes.
7. Attach the clear plastic bubble over the top of the assemblage you just created followed by the air dry frame made in the candy mold, glue in place.
8. Begin gluing together pages inside the book to form a ½ inch thickness then cover with sturdy scrapbook paper, repeat until the inside of the book has been covered in scrapbook paper.
9. Start layering your pages with images, piccolos and embellishments, try using some of the left over chipboard bubble frames to surround images inside the book, add party favor bags and trinkets as well.
10. Finally add more inks, powders and glitters to complete the book.
Tips/Tricks
-Use party favor paper bags inside the book to fill with quote, spell or fun print outs, try printing your wording onto parchment paper, then age with mixed media inks.
-Try tearing out all the pages inside the book and just full with scrapbook paper or fabrics.
-Make your book a full bubble assemblage, creating a mini vignette/scene on each page and attaching a bubble frame to each, enclose and enjoy an assemblage on each section inside the book.
I hope this project inspires you to create an altered assemblage book of your own, I bet you'll find a plethora of new ways to incorporate the Globecraft bubbles and frames through the book, I'm already thinking of some new possibilities myself!Have a magical day,
xoxo
Lisa


This is beautiful!
ReplyDeletethis is awesome!
ReplyDeleteJust gorgeous! So much detail - Love the way you created that beautiful frame around the globe!
ReplyDelete