 | ||
| Tracy Alden Art Resurrected |
- G&P Vintage Holiday Flourishes
- G&P Piccolo Easy Grip Tweezers
- G&P Piccolo Enamel/Embossing Powder Adhesive
- G&P Glastique Gloss Finishing Glaze
- G&P Avocado 3D Enamel Gel
- G&P Pure Sparkle Silver Glitter
- G&P Girls Night Out Enamel Powder
- G&P Mermaid Tears Enamel Powder
- G&P Micro Silver Enamel Powder
- Heat Gun
- 3 Long Stemmed Silk Flowers
- Vase
- Silver Ribbon
- Blank card
- Embossing Machine
- Swirls Sizzix Texture Fades Embossing Folder
- Sakura Pigma Micron Pen
I started with applying the Piccolo Enamel Adhesive to the edges of the petals of a silk flower stem.
I then sprinkled Mermaid Tears Enamel Powder onto the petals, shook off excess and heat set with heat gun.
Following the areas I applied the enamel powder to I added little droplets of Glastique Gloss Finishing Glaze.
Before the Glastique dried I sprinkled on Pure Sparkle Silver Glitter. Repeat with all three stems and let dry.
I carefully removed the Vintage Holiday Flourishes from the bookboard frame with the tweezers. I used Girls Night Out Enamel Powder for the outer frame and Micro Silver Enamel Powder for the swirls.
I then applied Avocado 3D Enamel Gel to the tiny leaves. The tiny nozzle tip on the applicator bottle makes this easy! Let dry.
Run the front of the blank card through an embossing machine with the Swirls Embossing Folder.
Apply Piccolo Enamel Adhesive to the raised edges and sprinkle on Mermaid Tears Enamel powder, shake off excess. Heat enamel powder with heat gun to set embossing powder.
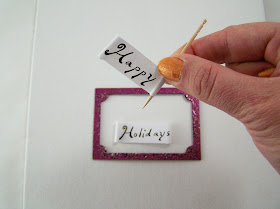
Now I wanted to add a Happy Holidays sentiment. While I just used an ink pen to write it out you can easily replace it with your favorite Holiday stamp! I cut each word out with and left an inch of blank paper on each side.
Using a toothpick I tightly curled each side with blank paper. I roll the inner portion of the strip of paper over a tiny brush handle to get a wave. With one side curled up and one side curled down it looks like a mini scroll.
I applied a thin layer of Glastique Gloss Finishing Glaze to both mini scrolls, using a small brush to cover the curled sections.
Now a second layer of small Glastique Gloss Finishing Glaze droplets is added to the mini scrolls. While the glaze was still wet I applied Pure Sparkle Silver Glitter and let dry.
Carefully I added the completed elements to the front of the card using Glastique Gloss Finishing Glaze as an adhesive. Place the flowers in the vase, add ribbon and place card in with the flowers.
Jump on over to my blog Art Resurrected today for a Piccolo Snowflake Jewelry tutorial!
Until next time, Safe Travels!


This is beautiful!
ReplyDeleteGorgeous piece. I love all the techniques on the gift card.
ReplyDeleteWow!!! This looks BEAUTIFUL! I love the tag and I never thought to add glitter to silk flowers. Brilliant!
ReplyDeleteThis is amazing! I love it.
ReplyDeleteThank you Candy. BTW congrats on your card being on the package of G&P Vintage Holiday Flourishes used in the tutorial. :)
DeleteLove the color! What a beautiful deep red :)
ReplyDelete