Hello! Tracy here again with another tutorial! For this project I am using the awesome Globecraft and Piccolo Steampunk Watch Ornament designed by the talented Terri Sproul. I was inspired by photos of nature reclaiming abandoned building and industrial sites. The clock is stopped at tea time and the butterfly is fanciful, reminding one always to take time to relax and enjoy nature.
Supplies:
- G&P Steampunk Watch Ornament
- G&P Butterfly Charm Set
- G&P Vintage Dress Forms Accents
- G&P Glastique Matte Finishing Glaze
- G&P 3D Enamel Mars Black
- G&P Copper Kettle Embossing Powder
- G&P Vintage Black Embossing Powder
- G&P 24K Gold Embossing Powder
- G&P Real Rust Embossing Powder
- G&P Siam Silver Embossing Powder
- G&P Piccolo Embossing Powder Adhesive
- G&P Pure Sparkle Gold Glitter
- Piccolo Easy Grip Tweezers
- Black ink stamp pad
- Cotton Swabs
- Mini Adhesive Foam squares
- Green crystal stickers
- Heat gun
- Reindeer Moss
- Gear stamps
Taking the black dye ink pads, rub it on the back plate section of the clock. This will be the face of the clock so you want it to look old and worn.
Stamp the back plate with the gears stamps.
Carefully separate the bottom and top frame pieces, gears, winding key, clock hands and the large butterfly charm from the G&P Butterfly Charm Set. Place all of the other pieces to the side for the Vintage Copper Tag tutorial, check out my blog for that project.
Apply Piccolo Enamel Adhesive to the bottom and top frame pieces, gears, winding key, clock hands and the large butterfly charm. Coat the butterfly with 24K Gold Embossing Powder, the gears and winding key with Siam Silver Embossing Powder, bottom frame piece with Copper Kettle Embossing Powder and the top frame piece with Vintage Black Embossing Powder; heat to set.
Using Glastique Matte Finishing Glaze as an adhesive glue one spacer circle to the middle of the clock face. Glue the small hand on top of that, the second spacer and then glue the big hand on top. In this photo the bottom frame piece is use as a guide to glue the hands in place for the desired time.
Smear some Glastique Matte Finishing Glaze on the wings of the butterfly and sprinkle the wings with G&P Pure Sparkle Gold Glitter. Let dry.
Carefully cut the stand from the swirl dress form the Vintage Dress Forms Accents set. Save the dress form piece for the Vintage Copper Tag tutorial. The stand will be used as antenna for the butterfly.
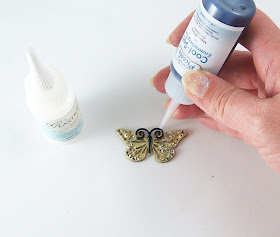
Glue the stand upside down on the butterfly with Matte Glastique, now the butterfly has antenna and coat the antenna G&P 3D Enamel Mars Black. Let dry.
Glue the winding key to the clock face with Matte Glastique and place foam squares around the edges.
Apply Piccolo Enamel Adhesive on the edges of the bottom and top frame pieces, gears and winding key. Coat with Real Rust Embossing Powder and heat to set. Glue the gears to the clock face and let dry.
Apply a thin bead of Glastique on the underside of the top ring and using office clips, clip in place until dry.
Apply a thin bead of Glastique on the underside of the top ring and globe clip in place on the bottom frame piece until dry.
Attach the frame section to the clock face with the adhesive squares. Apply the green sticker gems to the frame with Matte Glastique and let dry.
Apply Matte Glastique to the outside edges of the globe and let dry. Once dry it gives the globe a vintage look.
Apply Matte Glastique to edges of the ornament and place the reindeer moss on top of the Glastique. The butterfly can be glued on top of the moss in the same manner.
Jump on over to my blog Art Resurrected for an Vintage Copper Tag tutorial!
Until next time, safe travels!


Lovely piece!
ReplyDeleteThis is so beautiful!
ReplyDeleteLove this!
ReplyDelete