Pages

Friday, January 31, 2014

Vintage Birdcage Necklace


Hello, hello, hello!
Aimee here with an adorable jewelry piece for your enjoyment.


This little sweetie was pretty easy to create and I think it's
just so dang cute!!
Wanna make it?
YAY!

What you need:
Tiny hole-less beads, bird charm (this one is from prima), toothpicks, jump ring, heat gun


What to do:

1. Coat the base piece for the bird cage with enamel adhesive fluid and Turquoise Lagoon enamel powder. Heat until thoroughly melted.


2. Get out a piece of chipboard, or an old plastic lid, or something, an put a little bit of each enamel gel on it (that is, if you don't have the super fine tips. If you DO have them, disregard this part).


3. Use the toothpicks (or super fine tips) and color the detail part of your bird cage. I did gold on the base/legs and loop, silver on the bars, and copper on the door. PS-- when you punch out all of the little bits from the cage, DO NOT throw out the heart...we will use it next week.


4. Once the cage is dry, flip it over and use a toothpick to coat the back with E600 glue. Adhere it to the base (hold it down for a minute or two). Then go back over any areas of the cage that need touched up. Be sure to recoat the top near the loop, then dump some tiny hole-less beads on it. Once the entire thing is dry, shake the excess beads off.


5. Take the bird charm and randomly put some of the enamel gels on it (I just used the toothpicks). let dry.


6. Once your birdie is dry, add a jump ring to him, and then a jump ring to the bird cage. Attach bird to cage and the entire thing to the cord necklace. 


Thursday, January 30, 2014

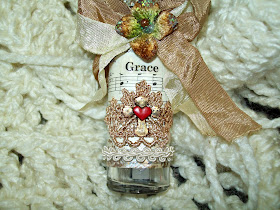
Grace

Good Morning. Teresa here again. When i applied for this design team, one of the things I included in the biography was that I consider myself a mixed media artist. I also use a lot of upcycled and repurposed materials. 

Today's project encompasses all of those descriptions. 

It's an altered bottle. I use a lot of bottles, jars, and other repurposed containers in my studio to store bits and pieces. I most likely would store beads in one this size, but even empty this one is just pretty to look at.

Here's the shopping list.
-  A128 Lil Flowers Leaves, Birds, and Bows Accents. (These are tiny - you get 32 assorted shapes in the packet)
- A124 Vintage Cross Accents 
- Deep Red 3D Enamel Gel
- Victorian Bronze Embossing Powder
-Mermaid Tears Embossing Powder
- Enamel Powder Adhesive 
- Glastique Gloss Finishing Glaze
- Glastique Matte Finishing Glaze

Additional Materials (Links to SweetStamps products are provided)
- Velvet Hydrangea(these are gorgeous)
- lace and assorted trims
- a paper appropriate adhesive (I used The Ultimate)
- A paper of your choice ( Mine is a cut from an old hymnal)
- a discarded bottle of your choice (Mine is a perfume bottle from the stash)

And here we go.


Over the weekend, I prepped several of the Lil Accents. You will be seeing these in the next few projects. And it was very relaxing to work up several of them at once.

I covered these with assorted 3d Gel Enamels (the colors are amazing and this link goes to the main category of the site)


For this project, the tiny heart I used was covered in Deep Red Gel.


Using the Enamel Adhesive, cover one of the small crosses from the Vintage Cross set with Victorian Bronze Powder.

See how I have picked this straight up from my paper. I leave the thick layer of the powder on the shape. Heat it from underneath initially until it starts to melt, then finish it from the top. This keeps the powder bits from being blown off the shape. You can also control how these powders finish, any where from a rustic "grainy" finish to a very smooth yet varied finish (simply stop the heating process where you like the look)

When you get your cross embossed set it aside.


Measure and cut your paper of choice to fit around the bottle. I used a "higly accurate" method here. I wrapped it around and simply trimmed to suit me.

Apply the Embossing adhesive to the edges of the paper  and emboss for a more finished look. For this I used the Mermaid Tears Powder


Go ahead - click on the picture for a better look - this color is stunning.

Set this aside and now we really get to play.

The top for this bottle was some sort of plastic with a metallic finish. I first made sure the heat from my gun would not melt the cap. I wanted it to have a mottled textured finish to coordinate with the rest of the materials


 More Enamel Adhesive and Mermaid Tears Powder. I held it carefully with needle-nosed pliers and worked my way around the cap. Emboss a section. Turn. Emboss.

After finishing that, set it aside.

Now for some assembly.


Glue the paper around the bottle.

I added some cording to the top and bottom areas. A bit of Gold and Cream Lace. Then glue the Cross to that lace. I added the heart to the cross and coated the entire cross with Matte Glastique ( I did not want a glossy finish to this one). I snipped the larger GRACE from the song title and adhered it with Gloss Glastique. I also covered that word with the Gloss as well.

(Note - the Glastique comes in two sizes - a 2 ounce and a 4 ounce size. This is a versatile adhesive/finishing glaze. I find myself using it for so much more than these projects.)


To finish off my bottle, I made a bow from seam binding and one of the beautiful Velvet Hydrangeas, that I ordered from Sweet Stamps.

(Globecraft & Piccolo and Sweet Stamps are sister companies)

Here are some closeup pictures of the finished bottle.


Grace ---


This one shows a bit more of the Hydrangea.


And the finished bottle. 

I think this would be a nice little gift for a beautiful friend. 

Come back for more inspiration. There is a new post every day. 

Life is beautiful. 

Wednesday, January 29, 2014

A Vintage Time Piece


 Happy Wednesday everyone! leslierahye here with another necklace project! Globecraft and Piccolo has so many wonderful bezels and charms to alter into wonderful jewelry! The Vintage Clock Necklace set is FANTASTIC! I LOVE how this turned out!!

I began by embossing the clock face and the "dangles" with the Victorian Bronze and the back of the clock with Micro Black. I embossed both sizes of the back of the clock a couple of times--using a tweezers to hold the chipboard while it cooled. Once the pieces were prepped [embossed several times] I adhered the clock face to the clock back with the glossy Glastique. I held my pieces into place with clothespins.

Once dry I filled the face of the timepiece with Instant UV Resin. While you can cure this product in the comforts of your home in the dark using a special UV heat lamp, I tested curing it outside with the sun--it's amazing how quickly this product hardens! It created a nice dome where a dome on the glass of a clock would be. for the remaining clock face, I filled in with a touch of gloss Glastique--leaving a ledge around the rest of the chipboard.

To assemble this piece I used some very small black link chain that would fit through my larger jump rings. I added a dangle to each end of the chain after threading it through it's rings. I like the look of triple jump rings with this piece and repeated it when adding the last piece and the neck chain. 

Globecraft & Piccolo Products used
Vintage Clock Necklace Set C114


I really love how this piece turned out and will definitely be playing with the UV resin again! Such a fun product!!!  Thank you for stopping by!!
*****


Tuesday, January 28, 2014

Mixing embossing powders.

Hi all, Tracy here. 
I wanted to share with you a Pendant that I have made this week. 


And here is how i created it...

First of all let me tell you what you will need- 
Black UTEE (Ultra thick Embossing Enamel)
Leather Cord


From the Fine Feathers Necklace set you need your pendant, one of the feathers...I later decided to add one of the swirls to. 


Using your Black UTEE & Enamel and Embossing powder Adhesive coat the pendant, I gave this 3 coats, but 3 probably would have given a smoother coating...it is personal preference. .if you have never used UTEE before It is slightly different when melting, it will "bead" and looking like you have melted it wrong, don't worry, it will then melt fully into a lovely thick enamel. 
Anyone with a Melt Pot, this Black UTEE would be perfect to use with your Melt Pot. 


Now one thing i love with Embossing powders is that you don't have to stick with just one colour, I LOVE Enamel Powder BAHAMA AQUA, but i wanted to "break" it up slightly for this, so in a small pot I mixed it with Black UTEE , when doing this test your "new" colour on some scrap paper first to make sure you are happy with the result. 


Take your feather (and Swirl) and Coat with Enamel and Embossing powder Adhesive


Give it a nice thick coating with your powder mix and melt using your heat tool...again I gave this 2 coats. 


I then dabbed some Enamel and Embossing powder Adhesive over where i wanted the feather and swirl to be and put a sprinkle of  Black UTEE and melted it with my heat tool, then using tweezers (its very hot so please use tweezers) I pushed my feather and swirl into the Enamel, then when it sets it will act a glue...you can see her that they are pushed into the enamel. 
Attach a cord and you are done. 
Here is another look at the finished pendant. 

Don't forget to head on over to Globecraft &Piccolo Facebook Page to share your creations, and pick up some inspiration.

Challenge #154 Lace & Hearts

Well, we're back in the cold...down south! Looks like winter followed us after all! Snow and ice are in the forecast for our destination: Lawrenceville, Georgia. Hope you're staying warm wherever you are! 

Here's a new challenge to warm your heart....
LACE & HEARTS
We'd love to see your Lace & Hearts creation (cards, scrapbook pages, mixed media, ATCs, etc.), so come and join the fun! You could win a $20 shopping spree for goodies at SweetStamps.com's online store by playing along in our challenge! Click here for our complete Challenge Rules.
 * * * * * * * * * * * * * * * * * *
Our Monthly Technique Challenge is Kissing Technique and runs through February 15th. Step by step directions and link to a video can be found by clicking here. Come join us and check out what our DT Sweeties made! View ALL the monthly challenges here.

***Don't forget to check back later this week for more inspiration from our monthly Guest Designers!***

Next week our theme is PINK, RED & WHITE. Happy Stamping! Have a super sweet week!
 

Monday, January 27, 2014

Enamel Stamped Monogram Necklace

Hello, Crafty Friends! Thanks for stopping by...what better way to start your week than to see some crafty goodness?

Have you stopped by the G&P shop, yet? There are a lot of goodies to be found! Sometimes I order stuff I like, but not really knowing what I will use it for just, yet. Not too long ago, I received a 2.25" acrylic circle and have been wondering how to use it. After a week or two of pulling it out and putting it back, I finally figured it out!


I've not made a lot of jewelry, but this was so easy, I may be designing a few more pieces! Let me show you how I made this necklace...

Peel off the top blue liner. Leave the bottom piece to protect the backside.

Dab the Enamel Powder Adhesive on to the acrylic circle. Sprinkle on Vintage Copper Enamel Powder and heat. (The adhesive will bead up, but don't worry! We will add 2 more layers...) 

Remember to be patient and take your time when heating to reduce the loose powder fly-off, especially with the first layer. Melt until the layer is molten and 'flowing'. You'll know what I mean when you see it. Think 'lava'.


Pretty rough looking, right? It's okay...trust me! Dab more adhesive, sprinkle powder and melt. Here's the second layer - much better!


Now ink up your stamp with the Enamel Powder Adhesive to protect your stamp (and make it easier to release the stamp from the melted powered) and lay it aside. You want your stamp ready to use when the enamel powder is molten. One more time: dab on adhesive, sprinkle on powder and melt. Here's the third layer, molten and ready to stamp. 


Stamp into the melted enamel firmly. Leave the charm to cool with the stamp still in the enamel for a minute or so. Lift off the stamp when the charm is cool enough to touch. Are you as impressed at the result as I was?!


Clean off your stamp and let the charm cool completely. You could stop at this point, but it was a bit too shiny for what I was looking for...

When cool brush on some black acrylic paint and then use a wet wipe or paper towel to remove most of the paint. This really makes the impression visible!


I felt it still needed something else, so I used a script stamp with Jet Black Staz-On. It adds a lovely vintage charm and interest to the monogram, don't you think?

Finish by peeling off the back blue liner and then use a brush to add a light layer of Glastique to seal the piece. Add a chain (the G&P shop has several to choose from), a bail, other charms...whatever you like and you have a stunning piece of jewelry handmade by you!

Did you try this technique? Did you use a different embossing enamel powder? Let me know so I can visit and see what YOU made!

Inky hugs,
Angi