Good Morning. Teresa here again. When i applied for this design team, one of the things I included in the biography was that I consider myself a mixed media artist. I also use a lot of upcycled and repurposed materials.
Today's project encompasses all of those descriptions.
Here's the shopping list.
- A128 Lil Flowers Leaves, Birds, and Bows Accents. (These are tiny - you get 32 assorted shapes in the packet)
- A124 Vintage Cross Accents
- Deep Red 3D Enamel Gel
- Victorian Bronze Embossing Powder
-Mermaid Tears Embossing Powder
- Enamel Powder Adhesive
- Glastique Gloss Finishing Glaze
- Glastique Matte Finishing Glaze
Additional Materials (Links to SweetStamps products are provided)
- Velvet Hydrangeas (these are gorgeous)
- lace and assorted trims
- a paper appropriate adhesive (I used The Ultimate)
- A paper of your choice ( Mine is a cut from an old hymnal)
- a discarded bottle of your choice (Mine is a perfume bottle from the stash)
And here we go.
Over the weekend, I prepped several of the Lil Accents. You will be seeing these in the next few projects. And it was very relaxing to work up several of them at once.
I covered these with assorted 3d Gel Enamels (the colors are amazing and this link goes to the main category of the site)
For this project, the tiny heart I used was covered in Deep Red Gel.
Using the Enamel Adhesive, cover one of the small crosses from the Vintage Cross set with Victorian Bronze Powder.
See how I have picked this straight up from my paper. I leave the thick layer of the powder on the shape. Heat it from underneath initially until it starts to melt, then finish it from the top. This keeps the powder bits from being blown off the shape. You can also control how these powders finish, any where from a rustic "grainy" finish to a very smooth yet varied finish (simply stop the heating process where you like the look)
When you get your cross embossed set it aside.
Measure and cut your paper of choice to fit around the bottle. I used a "higly accurate" method here. I wrapped it around and simply trimmed to suit me.
Apply the Embossing adhesive to the edges of the paper and emboss for a more finished look. For this I used the Mermaid Tears Powder
Go ahead - click on the picture for a better look - this color is stunning.
Set this aside and now we really get to play.
The top for this bottle was some sort of plastic with a metallic finish. I first made sure the heat from my gun would not melt the cap. I wanted it to have a mottled textured finish to coordinate with the rest of the materials
More Enamel Adhesive and Mermaid Tears Powder. I held it carefully with needle-nosed pliers and worked my way around the cap. Emboss a section. Turn. Emboss.
After finishing that, set it aside.
Now for some assembly.
Glue the paper around the bottle.
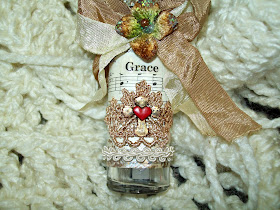
I added some cording to the top and bottom areas. A bit of Gold and Cream Lace. Then glue the Cross to that lace. I added the heart to the cross and coated the entire cross with Matte Glastique ( I did not want a glossy finish to this one). I snipped the larger GRACE from the song title and adhered it with Gloss Glastique. I also covered that word with the Gloss as well.
(Note - the Glastique comes in two sizes - a 2 ounce and a 4 ounce size. This is a versatile adhesive/finishing glaze. I find myself using it for so much more than these projects.)
To finish off my bottle, I made a bow from seam binding and one of the beautiful Velvet Hydrangeas, that I ordered from Sweet Stamps.
(Globecraft & Piccolo and Sweet Stamps are sister companies)
Here are some closeup pictures of the finished bottle.
Grace ---
This one shows a bit more of the Hydrangea.
And the finished bottle.
I think this would be a nice little gift for a beautiful friend.
Come back for more inspiration. There is a new post every day.
Life is beautiful.


Absolutely beautiful!! :)
ReplyDeleteFabulous! Love all the elements to this!
ReplyDeleteGreat ideas! Thanks for all the tips! I love my art around me too! :) Makes for a happy workspace
ReplyDeleteWhat a beautiful project. Love the red heart on the cross and the enameled cap.
ReplyDeleteWow this is stunning!!
ReplyDeleteJust stunning, i love everything about this xxx
ReplyDelete