HAPPY THURSDAY! I am really inspired by what the other designers have posted this week.
I'm very excited to share my first project using the Globecraft and Piccolo products with you today.
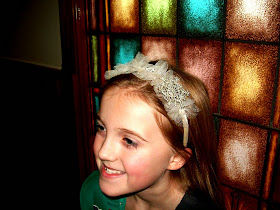
I'm helping a friend with some Winter Wonderland wedding ideas and who is the very next important (and sweet) bridal party member after the bride and groom? Well --- the flower girl of course!
Here's how I made and adorable accessory for the flower girl to wear.
G & P SHOPPING LIST
- bejeweled snowflake accents LA-100
- aged white enamel powder
- tweezers (not a requirement but I love the ones I have)
other items - Links provided for SweetStamps products
- heat gun
- extra fine vintage colored glitter
- clear drying glue
- tulle (I used ivory)
- headband (mine is an ivory satin one)
When I opened my package from G&P - I was blown away by the detail of the laser cuts. The bookboard is not heavy or bulky, but it is very strong.
I opened my Snowflakes and grabbed my pointy tweezers and punched all the excess bits from the laser cut. LOOK AT THAT DETAIL.
Knowing that the back of this may show I covered the front and back of the accent.The back of the accent was covered with Vintage Silver and the front with the Aged White. (aged white is a wonderful white with sparkly bits - simply beautiful)
I watched several videos previously published before I started ------ the links to the videos are at the main website.
Here are my "QUICK TIPS"
--- roll the container of the powder several times before each use and after adding the excess back to the jar.
--- if doing both sides - I discovered that a ceramic tile was a great nonstick surface to heat on.
--- on these fine detail shapes, a lot of my powder would blow off with the initial heating - I learned quickly to hold the shape with my tweezers and heat from the bottom until it started melting, then finish from the top.
--- the longer you heat the powder the smoother the finish. (I used the heatflash technique for the white side and heated the back to a smooth finish)
Now for the pretty pictures.
Roll the powder to prepare for pouring.
I used the embossing adhesive all along the shape.
Sprinkle with the powder (catch the excess on a folded paper - the fold makes it easy to pour back into the container).
Want the finish thicker? Simply reapply the adhesive and powder and heat again.
Oh look --- pretty.
I wanted a bit more sparkle to these - so I used the fine applicator tip with the Glastique GLOSS and added flat backed rhinestones to the rounded areas of the snowflake and to the centers of each of the connected ones.
Let those dry and then to strengthen the shape even more, I covered it all with more of the Glastique GLOSS finishing gel.
I gathered my tulle for the headband and then, using a small flat paintbrush, I randomly stroked more Glastique on the tulle and sprinkled with extrafine glitter. The Glastique dries clear and flexible and makes a great glitter adhesive.
Then using a heavy body glue - I glued the large snowflake and some cutoff small flake accents to the headband.
All that's left to do is add one really cute flower girl.
Be sure to come back tomorrow to see the next amazing creation.
Life is beautiful ---
Teresa (aka MaggieGraceCreates)


Lovely! What a beautiful project - love the added bling!
ReplyDeleteSuper creative!
ReplyDeleteGreat photos of the details...this is a darling project, Teresa! My little girl loves to wear headbands...now you've got me thinking! :)
ReplyDeleteWhat a beautiful headband, love how the snowflakes look with the tule. Thanks for including the tips too.
ReplyDeleteThis is beautiful!! What a great job! I love the tips, too :)
ReplyDeleteOMG this is seriously gorgeous <3
ReplyDelete