Teresa here again.
The off beat bouquet is finished.
I would carry this for my wedding.
My daughter has been seen handling it as well.
I am so proud of how this turned out.
I took it to work this morning so I could take pictures in the sun at lunch.
Even the men in my warehouse area were impressed - this is a good thing.
The Shopping list for each component is on the component posts.
Part one is HERE
Part two is HERE
Part three is HERE
Part four is HERE
The shopping list for today is and easy one too
GLASTIQUE MATTE - used as an adhesive.
Various other items as follows.
White synthetic fabric and or lace.
Circular patterns.
pen or pencil
Scissors
Candle
vintage and/or new buttons
fine gauge wire
glitter
white floral tape
satin ribbon
Here we go
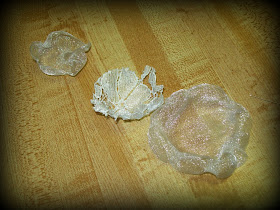
Using highly sophisticated tools (I used jar lids) mark fabric circles of three sizes. Cut these out - note - this is very forgiving, so do not be too worried about them being perfect.
After cutting the circles, hold carefully over a flame to melt and curl the edges. I love this step - I use a scented candle and keep a wet towel close by. Here is a great link for the process to make these --
After melting all the pieces - I used lace and two layers of sheer sparkled white - stack them and sew them together in the center.
Use an awl or a nail to make a hole in the center of these.
Now the real fun begins.
I chose an assortment of vintage buttons to add color pops to the bouquet.
My process was to lay my Piccolo component on my table and pick various buttons to coordinate with each shape.
Here is the dragonfly with his button assortment.
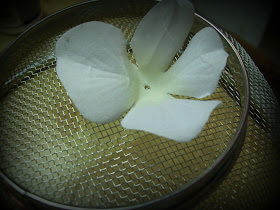
I then took a silk hydrangea stem in all white and snipped the petals off the stems.
I used a quick brush of the glastique with a sprinkle of extra fine glitter on some.
the fine gauge wire and wired through the buttons added a circle of glastique around the hole in the center of the petal and threaded the wire through. Pull the buttons snug against the petal center and hang upside down overnight to dry.
Each of the Piccolo shapes was added to the stacked fabric flower assemblies using the same assembly method.
I hung my assemblies from the dining room light fixture.
Using white floral tape, wrap each stem to cover the bare wire.
After all of the wires are wrapped, start the assembly process, I clustered three or four button assemblies around the larger Piccolo component. I tried to keep in mind the adjoining components so that my buttons coordinated.
I also varied the depth of the button flowers so that some are in full view
and some give just a peek of color and filler.
After making all the clusters, I started wiring the clusters together.
This is where I fluffed and moved and twisted things - over and over until I was happy with the arrangement.
The picture above shows the handle area after that was done.
I then took another long piece of the wire and wrapped the entire stem for extra security.
I wrapped and glued satin ribbon around the handle of the bouquet for a finish.
Then tied ribbon and a long strip of lace tucked in under the assembly and let that flow down from the bouquet.
Here are some closeups of the finished bouquet.
The dragonfly.
I love the blue and yellow stacked flower
An openwork rose and butterfly.
The cross.
The darker butterfly
And the birds.
This made up beautifully and with all the selections of Piccolos that are available, and the enamels, and embossing powders, you really can customize a bouquet to fit ANY theme of wedding.
Please visit everyday here for even more inspiring ideas.
Life is Beautiful .


What a wonderful bouquet, I love the variety of Piccolos and enamels you used, they made beautiful flowers.
ReplyDelete