Hello everyone! I hahve some fun mini Birthday Gift Bags for you today for Sweet Stamps :)
I created these gift bags using several products from the Sweet Stamps store, can you guess which ones? To find out for sure, you can visit my blog at Ode to Paper.
Come back soon for more inspiration from our talented design team :)
Showing posts with label Shades dye ink. Show all posts
Thursday, July 21, 2016
Thursday, May 19, 2016
Matching Bookmarks
Hello everyone, I have a pair of matching bookmarks for you today. What better way to celebrate you and your daughter's love of reading than with matching bookmarks!
I created these bookmarks using several Sweet Stamps products:
Wild Roses Clear Stamp Set
French Writing Background Stamp
Locket Lady stamp
Checker Flowers 6x6 stencil
Forget Me Not Shades Dye ink
Medieval Medals embossing powder
If you would like to see more details about how I created these bookmarks, please visit my blog at Ode to Paper.
You can find all of the linked products in the Sweet Stamps online store. Check back soon for more great inspiration from the talented design team members!
I created these bookmarks using several Sweet Stamps products:
Wild Roses Clear Stamp Set
French Writing Background Stamp
Locket Lady stamp
Checker Flowers 6x6 stencil
Forget Me Not Shades Dye ink
Medieval Medals embossing powder
If you would like to see more details about how I created these bookmarks, please visit my blog at Ode to Paper.
You can find all of the linked products in the Sweet Stamps online store. Check back soon for more great inspiration from the talented design team members!
Thursday, April 14, 2016
One Sheet Wonder with Leah Tees
Hello everyone! I have created some fun cards for you today, using the one-sheet wonder technique and some paper that I decorated myself using products from Sweet Stamps.
I created 14 cards from one sheet of 12 x 12 card stock, and I am showing you 8 of them here. For the other 6, you'll have to visit my blog at Ode to Paper...I know, I'm sneaky hehe.
The Sweet Stamps products used in this project include:
ASM-008 Moroccan Tile ATC Stencil
AS66-008 Checker Flowers 6x6 Stencil
Shades Dye Ink Duchess Rose
Shades Dye Ink Latte
Shades Dye Ink Amaryllis
Shades Dye Ink Beach
SS4406 Framed Handwritten Words Clear Stamp Set
1019H Apple Blossom Branch Rubber Stamp
AF1 French Script Artsy Fartsy Rubber Stamp
1004G Spring Blooms Rubber Stamp
I forgot to take a picture of the paper I created before I cut it up ahahaha, so check back again next Thursday and I'll make another sheet and post a picture for you :)
All of the linked products can be found in the Sweet Stamps online shop, and don't forget to come and join in the fun with the two challenges every month! The next one starts on Sunday, and the theme is Anything but a Card!
I created 14 cards from one sheet of 12 x 12 card stock, and I am showing you 8 of them here. For the other 6, you'll have to visit my blog at Ode to Paper...I know, I'm sneaky hehe.
The Sweet Stamps products used in this project include:
ASM-008 Moroccan Tile ATC Stencil
AS66-008 Checker Flowers 6x6 Stencil
Shades Dye Ink Duchess Rose
Shades Dye Ink Latte
Shades Dye Ink Amaryllis
Shades Dye Ink Beach
SS4406 Framed Handwritten Words Clear Stamp Set
1019H Apple Blossom Branch Rubber Stamp
AF1 French Script Artsy Fartsy Rubber Stamp
1004G Spring Blooms Rubber Stamp
I forgot to take a picture of the paper I created before I cut it up ahahaha, so check back again next Thursday and I'll make another sheet and post a picture for you :)
All of the linked products can be found in the Sweet Stamps online shop, and don't forget to come and join in the fun with the two challenges every month! The next one starts on Sunday, and the theme is Anything but a Card!
Thursday, March 31, 2016
Scripty Butterflies with Leah
Alas, my reign of watercolor has ended for this month, lol, but that doesn't mean I won't do it again soon muwahahahaha.
For this project, although not watercolor, it is an equally fun technique, that you can find more about on my blog at Ode to Paper. I used the Flutterby #2 Sweet Cuts die for this technique, as well as the Artsy Fartsy French Script ATC background stamp, Framed Handwritten Words clear stamp set, some Glastique and some Shades Dye Ink in Amaryllis.
There are so many dies, stamps and other fun stuff in the Sweet Stamps online shop, and you create so many different things with them! The possibilities are endless, and i want to try them all!!!!!
See you next month (lol) for more Sweet Stamps creative fun :)
For this project, although not watercolor, it is an equally fun technique, that you can find more about on my blog at Ode to Paper. I used the Flutterby #2 Sweet Cuts die for this technique, as well as the Artsy Fartsy French Script ATC background stamp, Framed Handwritten Words clear stamp set, some Glastique and some Shades Dye Ink in Amaryllis.
There are so many dies, stamps and other fun stuff in the Sweet Stamps online shop, and you create so many different things with them! The possibilities are endless, and i want to try them all!!!!!
See you next month (lol) for more Sweet Stamps creative fun :)
Thursday, February 25, 2016
Elegant Blue Birthday with Leah
Hi everyone, I hope you are all well. I have created an elegant blue birthday card for you today :)
I used the following products from the Sweet Stamps online store:
Splish Splash Stencil
Elegant Leaves Sweet Cuts die
Framed Handwritten Words stamp set
Flourish Medallion Sweet Cuts die
Shades Dye Ink in Aquamarine and Montego Bay
I used the following products from the Sweet Stamps online store:
Splish Splash Stencil
Elegant Leaves Sweet Cuts die
Framed Handwritten Words stamp set
Flourish Medallion Sweet Cuts die
Shades Dye Ink in Aquamarine and Montego Bay
And of course I have linked them all for you ;) Come and join us over on the Sweet Stamps Challenge Blog for our two monthly challenges. There are loads of inspiration as well as a prize! See you over there!
Thursday, February 18, 2016
Medieval Metals on Kraft Happy Birthday
Hello everyone, I have a male-themed Birthday card for you today :)
This is part of my own personal challenge to create at least one male-themed card every month. I think it turned out well...what do you think? I love the elegant but manly feel to it :)
I used the following Sweet Stamps products in the creation of this project:
Checker Flowers Stencil
Framed Handwritten Words
Medieval Metals Fine Detail Embossing Powder
Elegant Leaves Sweet Cuts die
Shades Dye Ink in Brownie
You can find all of these products in the Sweet Stamps online shop and I have linked them all for you.
Come and join us for the two monthly challenges at the Sweet Stamps Challenge Blog, there is loads of inspiration and even a prize! Hope to see you there!
This is part of my own personal challenge to create at least one male-themed card every month. I think it turned out well...what do you think? I love the elegant but manly feel to it :)
I used the following Sweet Stamps products in the creation of this project:
Checker Flowers Stencil
Framed Handwritten Words
Medieval Metals Fine Detail Embossing Powder
Elegant Leaves Sweet Cuts die
Shades Dye Ink in Brownie
You can find all of these products in the Sweet Stamps online shop and I have linked them all for you.
Come and join us for the two monthly challenges at the Sweet Stamps Challenge Blog, there is loads of inspiration and even a prize! Hope to see you there!
Sunday, December 5, 2010
Open House Make and Take
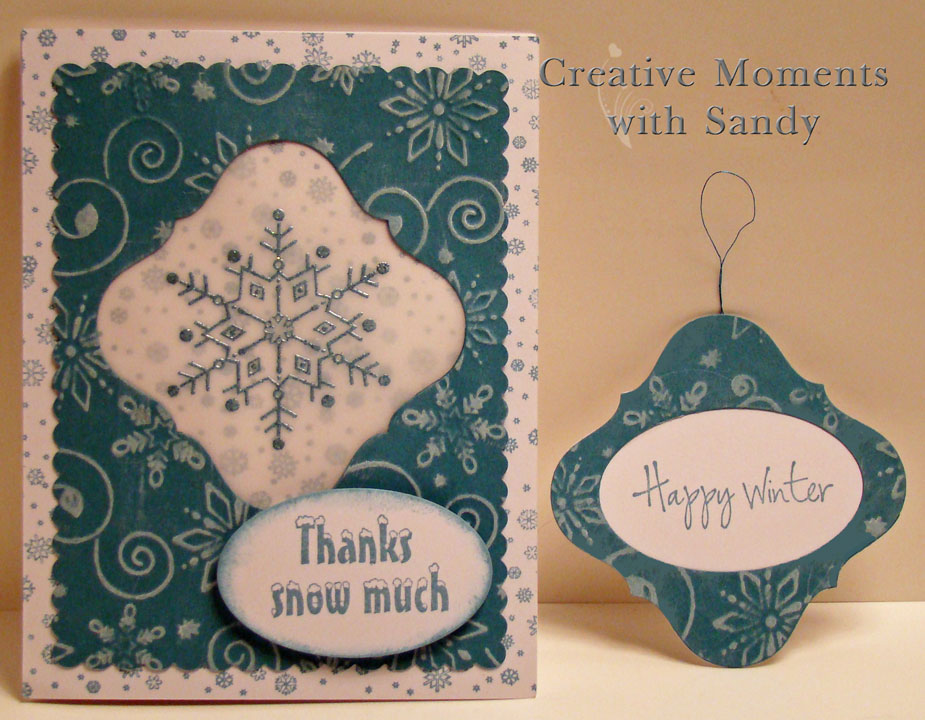
Here is one of the wonderful make and takes we did using dies from Cheery Lynn Designs and stamps and ink from Sweet Stamps at the Open House Friday and Saturday.
We started with the blue panel which was die cut with Cheery Lynn Designs largest die from the Scalloped Rectangle Card-Maker's Nesting Dies. We embossed this panel with the fabulous new Snowflake Flurries XL embossing plate, running white dye ink over the raised areas. Isn't it beautiful? Using the largest die from the Little Stackers French Flair Nesting dies, turning it on point, we cut the opening in the embossed panel as well as a second French Flair from white card stock. Vellum was added to the back of the opening and the Sweet Stamps 8033 - Crystal Snowflake was stamped with Shades Aquamarine dye ink and heat embossed with Diamonds and Pearls embossing powder. It really shimmers! The background panel was created using Sweet Stamps 8022 - Tiny Snowflake Background stamped with Shades Tidal Wave dye ink. Using a die from the Little Stackers Oval Nesting dies, we cut an oval in the center of the ornament as well as an oval from white card stock. On the white card stock oval, we stamped 9103 - Snow Thanks with Tidal Wave dye ink, distressing the edges with the ink as well. This was added to the card with pop dots for some dimension. Next we added a hanger to the French Flair ornament, then adhered the white card stock French Flair to the back of it. The last step was to stamp 8028 - Happy Winter in the opening on the ornament. What a fabulous card with a wonderful little ornament enclosure.
Supplies used:
We started with the blue panel which was die cut with Cheery Lynn Designs largest die from the Scalloped Rectangle Card-Maker's Nesting Dies. We embossed this panel with the fabulous new Snowflake Flurries XL embossing plate, running white dye ink over the raised areas. Isn't it beautiful? Using the largest die from the Little Stackers French Flair Nesting dies, turning it on point, we cut the opening in the embossed panel as well as a second French Flair from white card stock. Vellum was added to the back of the opening and the Sweet Stamps 8033 - Crystal Snowflake was stamped with Shades Aquamarine dye ink and heat embossed with Diamonds and Pearls embossing powder. It really shimmers! The background panel was created using Sweet Stamps 8022 - Tiny Snowflake Background stamped with Shades Tidal Wave dye ink. Using a die from the Little Stackers Oval Nesting dies, we cut an oval in the center of the ornament as well as an oval from white card stock. On the white card stock oval, we stamped 9103 - Snow Thanks with Tidal Wave dye ink, distressing the edges with the ink as well. This was added to the card with pop dots for some dimension. Next we added a hanger to the French Flair ornament, then adhered the white card stock French Flair to the back of it. The last step was to stamp 8028 - Happy Winter in the opening on the ornament. What a fabulous card with a wonderful little ornament enclosure.
Supplies used:
- Scalloped Rectangle Card-Maker's Nesting Dies
- Snowflake Flurries XL embossing plate
- Little Stackers French Flair Nesting dies
- Little Stackers Oval Nesting dies
- Shades Aquamarine dye ink
- Shades Tidal Wave dye ink
- White dye ink
- Diamonds and Pearls embossing powder
- 8033 - Crystal Snowflake
- 8022 - Tiny Snowflake Background
- 9103 - Snow Thanks
- 8028 - Happy Winter
Tuesday, November 2, 2010
Embossing Plate Fun (without a machine)
There are so many looks you can get with one embossing plate, here are just a couple to get you started:
No machine required for these two techniques!
Rub Shades™ dye ink directly onto plate, place cardstock onto inked plate and use a brayer to evenly transfer ink from the plate to the cardstock.
For the sample to the right, I used Shades™ dye ink in Tank green on the E127 Foliage Embossing Plate by Dies Direct and used a wide rubber brayer to transfer the ink to white CS.
MagicStamp™ Foam Block required. Make a reverse image stamp of the pattern on the plate by heating up a block of magic stamp foam and pressing it into the plate while warm. Ink the foam like you would a stamp, and when you stamp it on cardstock you’ll get a reverse impression of the pattern on the plate.
The sample pictured here was created by pressing a MagicStamp™ Foam Block onto the E127 Foliage Embossing Plate, inking with Shades™ dye ink in Paprika and stamping onto white CS.
Check back soon for even more embossing plate fun!
#1. Litho Plate Transfer
Rub Shades™ dye ink directly onto plate, place cardstock onto inked plate and use a brayer to evenly transfer ink from the plate to the cardstock.
For the sample to the right, I used Shades™ dye ink in Tank green on the E127 Foliage Embossing Plate by Dies Direct and used a wide rubber brayer to transfer the ink to white CS.
#2. Reverse Image Stamp
MagicStamp™ Foam Block required. Make a reverse image stamp of the pattern on the plate by heating up a block of magic stamp foam and pressing it into the plate while warm. Ink the foam like you would a stamp, and when you stamp it on cardstock you’ll get a reverse impression of the pattern on the plate.
The sample pictured here was created by pressing a MagicStamp™ Foam Block onto the E127 Foliage Embossing Plate, inking with Shades™ dye ink in Paprika and stamping onto white CS.
Check back soon for even more embossing plate fun!
Subscribe to:
Posts (Atom)