Pages

Tuesday, March 25, 2014

Butterfly card

Morning everyone Tracy here. 
I have a card to show you this week that I have created using Mermaid Tears Embossing Enamel and the lovely Fanciful-Butterflies stamp set from Sweet Stamps. 


To change the colour slightly I used a bright pink pigment ink as a base, I was surprised at how much this changed the colour of the powder, especially on the butterflies. 
The powders worked perfectly with this stamps, which is brilliant because they have some fine detailing. 
I hope I have inspired you to have a play with your Enamel powders. 
Happy Crafting :) 
x 

Monday, March 24, 2014

Altered Clothes Pins

Now that Spring is officially here, I have been on the lookout for fun ideas that involve plants and pots and found a project that is definitely my kind of art - it involves creativity, things I have around the house and can be made in a short amount of time!


Isn't this a great planter?! 

Let's get our supplies!

Globecraft & Piccolo:


Tuna can, cleaned & dry
19 clothes pins (or enough to go around your can)
Various word stamps
Archival Ink Jet Black
Distress Stain Tattered Rose
Distress Stain Picket Fence
Distress Ink Vintage Photo

The How To:
Start by pouncing the Adhesive Fluid around a small portion of the can. Because the can is nonporous, the fluid will bead up and create your random splatter. Easy peasy! Roll the bottle of embossing enamel. Sprinkle on the enamel and heat. (Be careful! The can will get HOT!)


While you are waiting for the can to cool, work on the clothes pins. I dabbed some Distress Stain in Tattered Rose. (My pins were coated, so they didn't absorb the color well. Next time I will lightly sand the clothes pin faces.)

Dab Adhesive Fluid only onto the bottom portion of the pins. Melt the powder and set pins aside to cool. Love the silver in the Temple Stone powder and how it all comes together now!


Lightly swipe the Picket Fence Distress Stain across the pins and let dry. Using your favorite blender, apply Vintage Photo Distress Ink to the sides.


 Using your favorite word stamps & Archival Ink, add words to the pins. (I used stamps from Studio Calico, 7 gypsies, Stampin' Up!, Studio G...) Let dry.

At this point, I adhered Piccolo Accents with Glastique. After the embellishments dried I added Glastique to the tops of the accents to add shine and durability.

Time for the 3D Enamel Gels! Apply the gel to one or two of the small portions of the pin. Let dry.

If I decide not to use this as a planter, I can easily use this as a pencil/pen/marker cup. If I add magnets to the pins I could use this on a metal board or refrigerator...oh the possibilities!


Love the gloss of the 3D gels on the clothes pin tips!


Use number stamps for special dates, times, addresses...


Even if the whole stamp doesn't fit onto the clothes pin, you might be able to use! See the chevrons?


I think I'm going to have to make a few more of these to contain the mint!

Inky hugs,

Sunday, March 23, 2014

Happy Easter


I have a fun Happy Easter card for you today.  I began with a white 4.25 x 5.5 inch card base.  I added a DP background from my stash.  I die cut the largest of my Cheery Lynn Designs Nesting Eggs, heat embossing it with Piccolo Aged Pink Enamel Powder.  I wanted a rough texture so while the embossing powder was still hot, I added additional powder.  I think is has a nice egg shell look. 


Using the new Piccolo Spring Accents chipboard set, I embossed the leaves of the flowers with Shamrock Dreams Embossing Powder and added Rose Pearl 3D Enamel Gel to the petals.  I used Lemon Butter 3D Enamel Gel on the sun. 


I used Victorian Bronze Enamel Powder to heat emboss the cute Chocolate Bunnies Piccolos.  The last step was my words, Cheery Lynn Designs Happy (set of 2) Easter (set of 2), also heat embossed with Shamrock Dreams.  Be sure to visit us each day for more inspiration from the design team. 

Saturday, March 22, 2014

HIS and HERS

Hi friends!  Sandy here for my next March guest designer post.  This week is Sweet Stamps'
  Anything Goes challenge
 and the March monthly technique challenge is Coloring Stamps with Inks.
I enjoyed making cards for these challenges.

The first card is Anything Goes. I decided to do a masculine card. I never do enough "guy" cards so for me this a little challenging. I think simple is best so I went with a bunch of layering with mats.
For the coloring, I decided to use a neutral ink and then using Prismacolor pencils, I add just a quick touch of color. I don't think it is too fancy.

For my second card, I wanted to make a more feminine card. It was easier to do to, lol. I used Tim Holtz Distress Markers to color my stamp with ink.  I absolutely love the "line art" that this image has. I think these birds are fabulous. Definitely one of my favorite stamp!  To mat this great stamp, I used Martha Stewart punches.  I also used just the first line of the sentiment stamp on the front and then added the whole sentiment on the inside.

Eagle's Nest & Scripture DUO 3072K
  • Item #: 3072k
  • Manufacturer:SweetStamps.com

AND

Goldfinch Pair & Scripture DUO 3071K

Goldfinch Pair & Scripture DUO 3071K
  • Item #: 3071k
  • Manufacturer:SweetStamps.com

Thanks for stopping by. I hope you have a blessed day!
See ya next week, 
Sandy

Spring Flowers. . .


Side 1
I had so much fun using the French Oval Bubble Frame Kit to make my Spring Scene that I made this Spring Flowers ornament using another kit that Globecraft & Piccolo manufactures.  There are actually four different Ornament Kits so you can find one to perfectly suit your needs.  


Spring is in the air and I can't wait for the flowers to start blooming!


Side 2
That is one of my four cats, Junior, in the background.  He is enjoying the window!

What I used:


As you can see, I decorated both sides of this ornament; one side is so full of flowers you can’t see the background and the other side I used Distress Markers in Peeled Paint & Mowed Lawn, on the craft sheet, spritzed them, and placed the ornament “back” on it so the background was a nice springy green.  I am calling the green side of the ornament side 2 just so I can be clear on how I decorated each side.

TONS of Flowers!!

When I was looking at all the flowers I had I decided to see if I could emboss one of them to match my project.  I took a pink mulberry flower and used both Enchanted Aubergine & Girls Night Out Embossing Enamel on it and it came out fabulous! I let that cool while I worked on some other flowers.  I also colored one with a Distress Marker in Dusty Concord.  I took my flowers that I was going to use on side one and dotted the centers with White 3D Gel Enamel.  Once they dried (I let them sit overnight just to be sure the dots dried thoroughly) I put some jewels on some of the centers of the flowers and I left some just white.  I placed the flowers where I wanted them and adhered them to the side 1 of the ornament middle.  


Since I used so many flowers on side 1, I decided to go easier on side 2.  I picked out a few more flowers and leaves, attached gems to the centers of the flowers and glued them to the green background. 

The two outer frames

I used the rim as a guide and cut out paper to cover it using the KaiserCraft Violet Crush paper.  I embossed the outer ring (the one that has the hole for hanging), on both sides, with Enchanted Auberguine Embossing Enamel, pieced the ornament together and let it dry (with the help of some binder clips). It is very simple to put the ornament together; it looks harder than it is!

Another view of side 1


I think it came out really sweet (but I honestly should of used less flowers on side 1) and I hope you enjoyed my little tutorial.  The Bubble Ornaments are SO fun to make and they come in so many sizes; I am already planning my next one!
Another view, side 2, no bubble
I'm not sure why the Aubergine Embossing Enamel came out looking so dark in some of the pictures.  It really is a beautiful color, much more purple than what shows (could just be my monitor. . .).

Thanks for stopping by everyone! I appreciate your comments & thoughts ~
Fondly, Christi

Friday, March 21, 2014

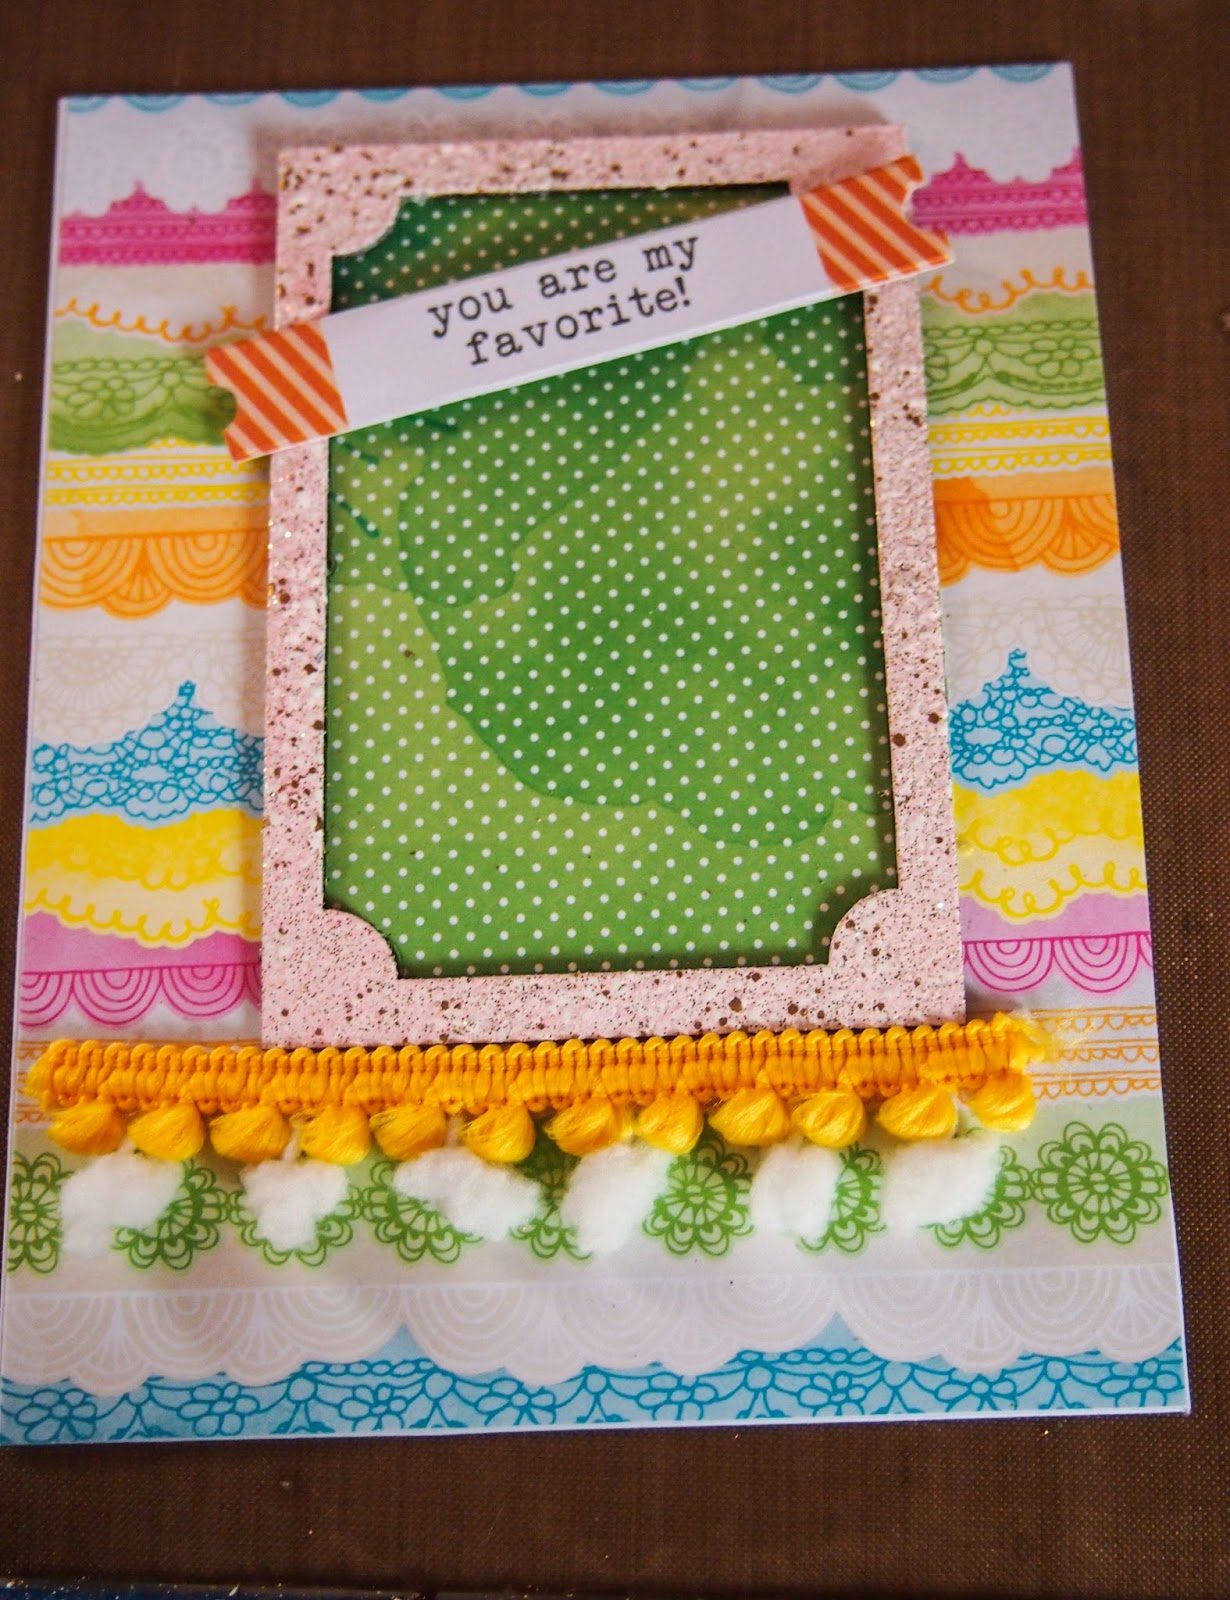
You're My Favorite

Aimee here with a bright, fun card for you!
 
Yes, my yearning for springtime weather continues on.
I am really loving the new spring Enamel Gel colors and intend to play with them a LOT!
 
 
So.....wanna make a card?
YAY!


Supplies:
Folded card base, patterned paper (this is Amy Tan paper), trims, paper flowers, bling, scissors, toothpick, small tag or ticket shape (with a sentiment on it, or stamp one on), pop dots, Enamel Powder Adhesive
Enamel Gels: White, Rose Pearl, Daffodil, Avocado
Enamel Powders: Aged Pink & Shamrock Dreams
 
 
What to do:
1. Cover the front of the card with patterned paper. Choose a second patterned paper to fit into the frame from one of the Piccolo sets that we are using.
 
2. Take the frame and coat it with Enamel Adhesive Fluid. Then coat with the Aged Pink powder and heat it up to melt the powder and activate the adhesive. It is soooo pretty!
 
3. Adhere the patterned paper to the frame back and then adhere to the card.
 
4. Use the E600 and a toothpick to add trims below the frame.
 
5. Add sentiment near top of frame using pop dots.


5. Choose a few flowers from each of the Piccolo sets and start giving them some color. Use the Shamrock Dreams and Avocado for the stems and the other colors for the flowers. Once they are all dry and set, start layering into the frame.


6. Adhere some paper flowers in the frame, then add the Piccolo flowers over top of them. Add a couple of flowers to the left edge of the trim, too. Any flower centers that are visible need some BLING in them, too!! :)


Thursday, March 20, 2014

A Colorful Journal

Good morning - Teresa here. Today's project was so much fun. It's colorful --- and EASY. 

A journal - made from a plain old composition book. You know - those that have the marbled black and white covers. 


See - isn't that FUN.


Here's what you need.

- Enamel Adhesive
- Deep Blue Sky Enamel Powder
- Enchanted Aubergine Enamel Powder
- Gilded Rose Gold Enamel Powder 
- Mardi Gras Enamel Powder
- Mossy Glen Enamel Powder
- Shamrock Dreams Enamel Powder 
- Peacock Accent Piccolo 
- Glastique Matte Glaze 

Additional Materials
- Heat Gun
- Scrap paper for the scallops down the edge of the journal
- sheet of paper to cover journal front
- your favorite adhesives (i used YES paste to cover the journal front)
- small flat back pearl accents (these are from Sweet Stamps)
- detail paintbrush

The peacock cutout is beautifully detailed and I immediately knew I wanted a multicolored effect on it.

Here's how I approached that process -


I poured a bit of enamel adhesive into a bottle lid and using a detail paintbrush painted the area I wanted my first color on.

Pour the embossing powder in that area and heat to emboss.


Repeat process for the entire bird. In the picture above you can see that I am painting the middle area of the feather fan.


Above is a color detail shot as I was almost done with the process

Don't freak out -- it took about 15 minutes to do ALL of the embossing details for this entire project.

I used Mossy Glen on the bird body - Gilded Rose Gold for the comb and feet - then starting at the center area of the feather fan - Aubergine - Deep Blue Sky - Mardi Gras. The "eye" of the outer feathers was embossed in Shamrock Dreams.


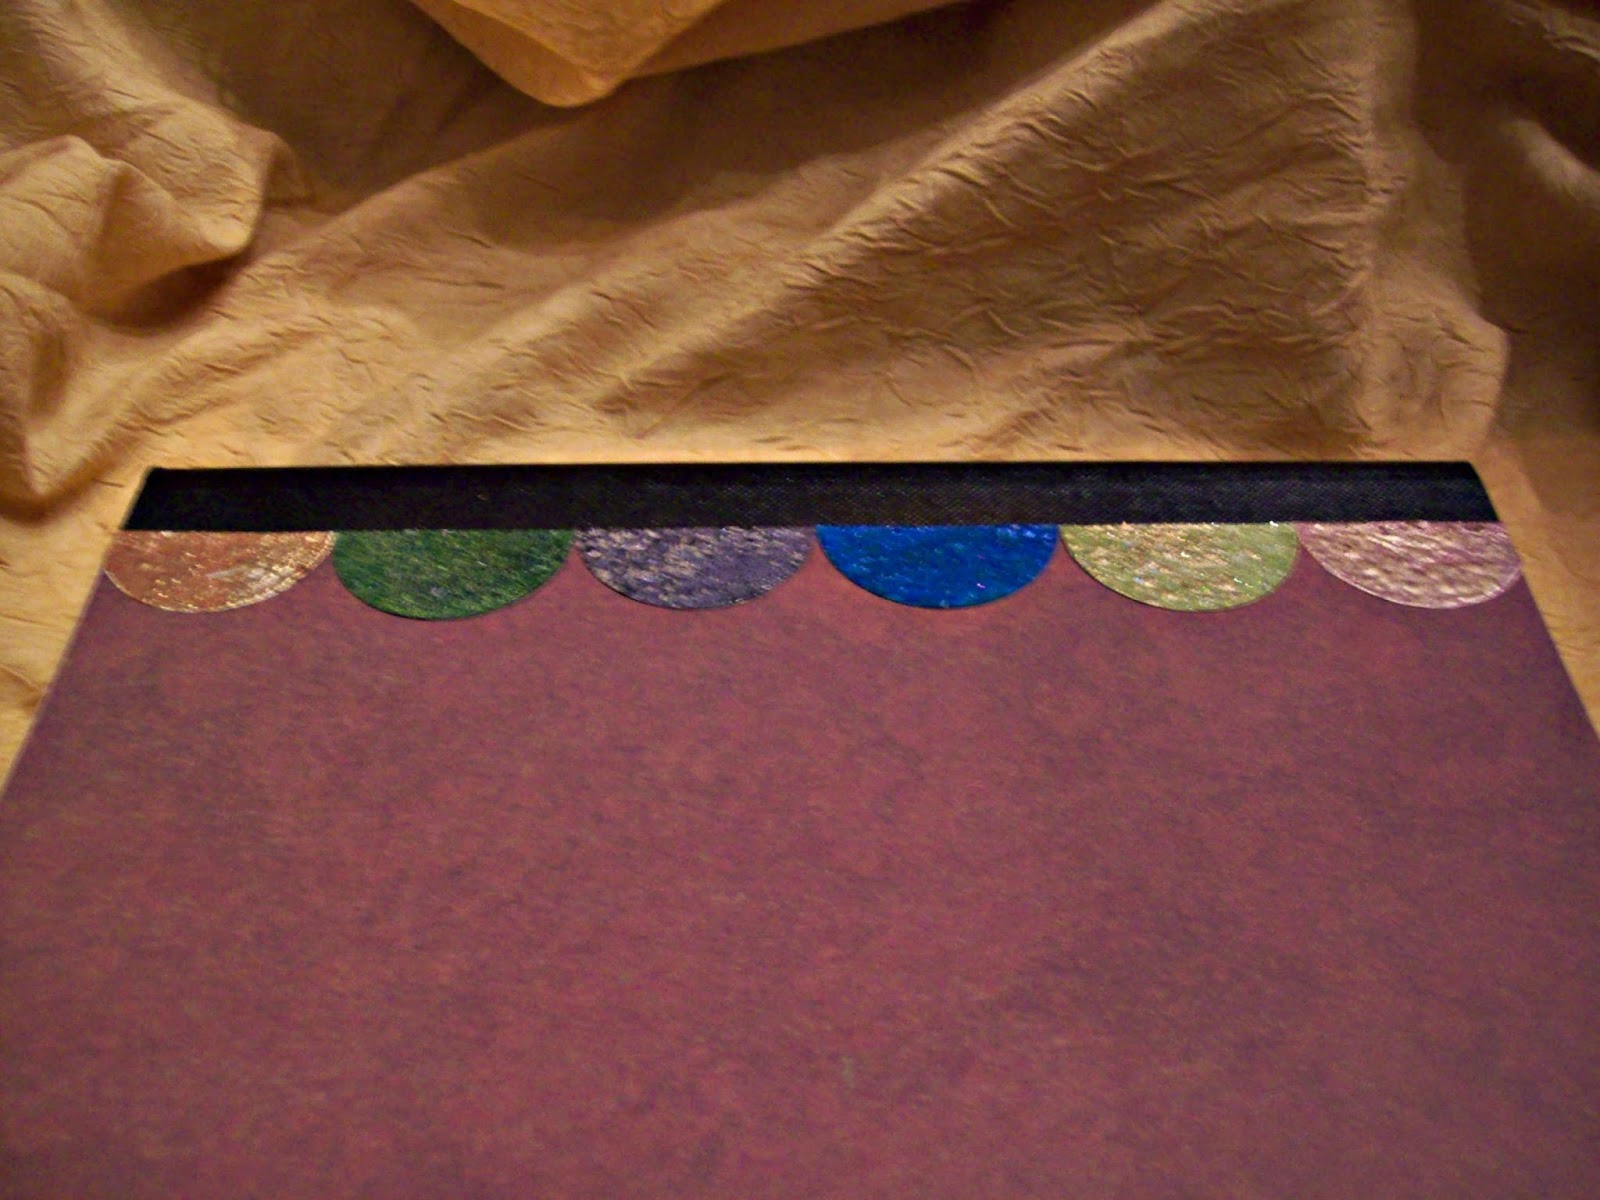
 After I covered my composition book with the background paper, I wanted to pull the colors from the bird onto the cover. I cut half circles of scrapbook paper and embossed them using those same powders.  From left to right - Gilded Rose Gold, Mossy Glen, Enchanted Aubergine, Deep Blue Sky, Shamrock Dreams, Mardi Gras. I used  just plain glue stick to attach these to the binding area.


Then, using Glastique painted on the back of my bird, I glued the shape to the corner of my journal.

For a final accent - I added flat back pearls to every other eye on the peacock's outer feathers.


There you have it --- ready to record your memories, hopes and dreams, or gratitudes. Maybe even a new design idea or two.


Wednesday, March 19, 2014

A Fishy Tale ATC


 Happy Wednesday everyone! leslierahye  sharing a fun embossed ATC with new release gels and Piccolos and some fun techniques. I hope you enjoy!
 I begin by layering and mixing various Emboss Powders on my ATC base--the initial powders were adhered with emboss adhesive but the remaining powders were added while the enamel was hot! I added Mossy Glen and Starry Sky to a base of Mermaid Tears and Aged White. I embossed the fun Bubble background with Mermaid Tears and added it to the background while the enamel was hot~it is basically embedded into the background.

 Micro beads were added to a few of the bubbles and held in place with a glob of glossy glastique.

I needed orange enamel gel so I mixed the new pearls together to create orange
 I purposely globbed on the orange gel for a special technique that leaves lots of texture.
 Once the enamel is dry to the touch I zap it with the heat tool making it bubble and pop! It creates the most fun texture. I used this technique this past Halloween with green to make bubbling potions and creepy backgrounds for cards. In this instance it gives the fish a scaly appearance when Glossy Glastique is added to the top.
 note: the gloss and shine of these make photographing difficult and the bubbles appear cloudy despite them being clear. 

I hope you enjoy my project!


I hope you enjoyed my project! Thank you for stopping by today!

Tuesday, March 18, 2014

Challenge #161 Anything Goes

Happy Tuesday crafty friends!  

It's time for March's Anything Goes Challenge!
Always a favorite with our DT Sweeties, as they get to show off any of the products they wish, check out these lovely projects from them:

We'd love to see your creation (cards, scrapbook pages, mixed media, ATCs, etc.), so come and join the fun! You could win a $20 shopping spree for goodies at SweetStamps.com's online store by playing along in our challenge! 

Click here for our complete Challenge Rules.

 * * * * * * * * * * * * * * * * * *
Our Monthly Technique Challenge is Inking Stamps with Markers and runs through April 14th. Come join us and check out what our DT Sweeties made! View ALL the monthly challenges here.


***Don't forget to check back later this week for more inspiration from our monthly Guest Designers!***


You may have noticed some "new" items on some of our DT's creations from Globecraft & Piccolo {a division of SweetStamps.com}. Click here to jump to the G&P blog to check out some of the G&P DT posts, they are a great addition to any crafting project!

Next week our theme is SWIRLS. 

Happy Stamping! 
Have a super sweet week!