Pages

Showing posts with label Bejeweled Snowflakes. Show all posts

Thursday, September 4, 2014

Christmas is Coming....

Happy Thursday everyone. Teresa here and,  as much as it freaks me out to remind you, there are only 111 days until Christmas. I know that sounds like PLENTY of time. But I know myself quite well and I don't want to be scurrying around at the last minute AGAIN - trying to put a personal touch on my gifts. 

So today we are making a gift tag. 


Let's gather our materials.

From Globecraft and Piccolo

Embossing Enamel Adhesive
Glastique Gloss
Aged White Embossing Powder
Micro White Embossing Powder
Pure Platinum Embossing Powder
Bahama Aqua Embossing Powder
Siam Silver Embossing Powder
Clear Ultra Thick Embossing Powder
Fancy Labels and Roses Piccolo Set
Bejeweled Snowflake Piccolo Set

And from our sister company, SweetStamps

Snowflower Art Stencil  (the art stencils are a new release item for SweetStamps and they are wonderful)

You will also need
- self adhesive glitter dots (you can also use the Glastique and fine glitter)
- a large tag base
- a light blue color spray
- Ribbon for the hanger

Now let's get started.

First - spritz the tag with the light blue color spray - giving that pale blue back ground to work with. I dry mine with the heat gun.

Now for the stencil back ground.
     Lay the tag flat and center your stencil over the tag.
     I wanted a "hint" of snowflakes in the background so I lightly sponged on the Enamel Adhesive through
     the stencil. Keeping in mind my final layout, I applied the adhesive more heavily in some areas.


Emboss the tag with the Aged White Powder --- this powder has a lot of glittery sparkle. A wonderful wintry feel is emerging. Set your tag base aside.


I then embossed the rectangular label from the Fancy Labels set. I used the Bahama Aqua on the center of the medallion and the Siam Silver as a "frame" around it. I embossed one of the large snowflakes with the Micro White Powder and the smaller on with the Pure Platinum Powder.

I dry fit the Piccolos on the tag to decide which areas would get a tiny glitter dot accent. And because the Ultra Thick Clear Powder enhances the coloration behind it, I used that to emboss those areas.

Glastique was used to attach every thing. After the tag dried, I added a bit of bright blue tulle ribbon as a hanger.

The first thing a little buddy said to me when he saw it was "It's a Frozen tag". I'm taking that as a major accomplishment - when you can impress a 5 year old - you got it going on.


Saturday, June 21, 2014

Too early for holiday ornaments?


I say NEVER! For this Globecraft & Piccolo post I decided to beat the heat by making a holiday ornament.  Using one of the Ornament Kits (in addition to the kits found on the linked page, there is the DIY Portrait Ornament and the DIY Landscape Ornament) make it SO easy and really fun, but my favorite is using one of the 2 DIY kits, like I did here.  I wanted an icy feel to my ornament, hoping that keeping cool could be a bit of mind over matter!

The final ornament - pretty, but I'm still hot!
What I Used to Make My Project
Fishing Line or Craft Filament (I used jewelry cord, clear)

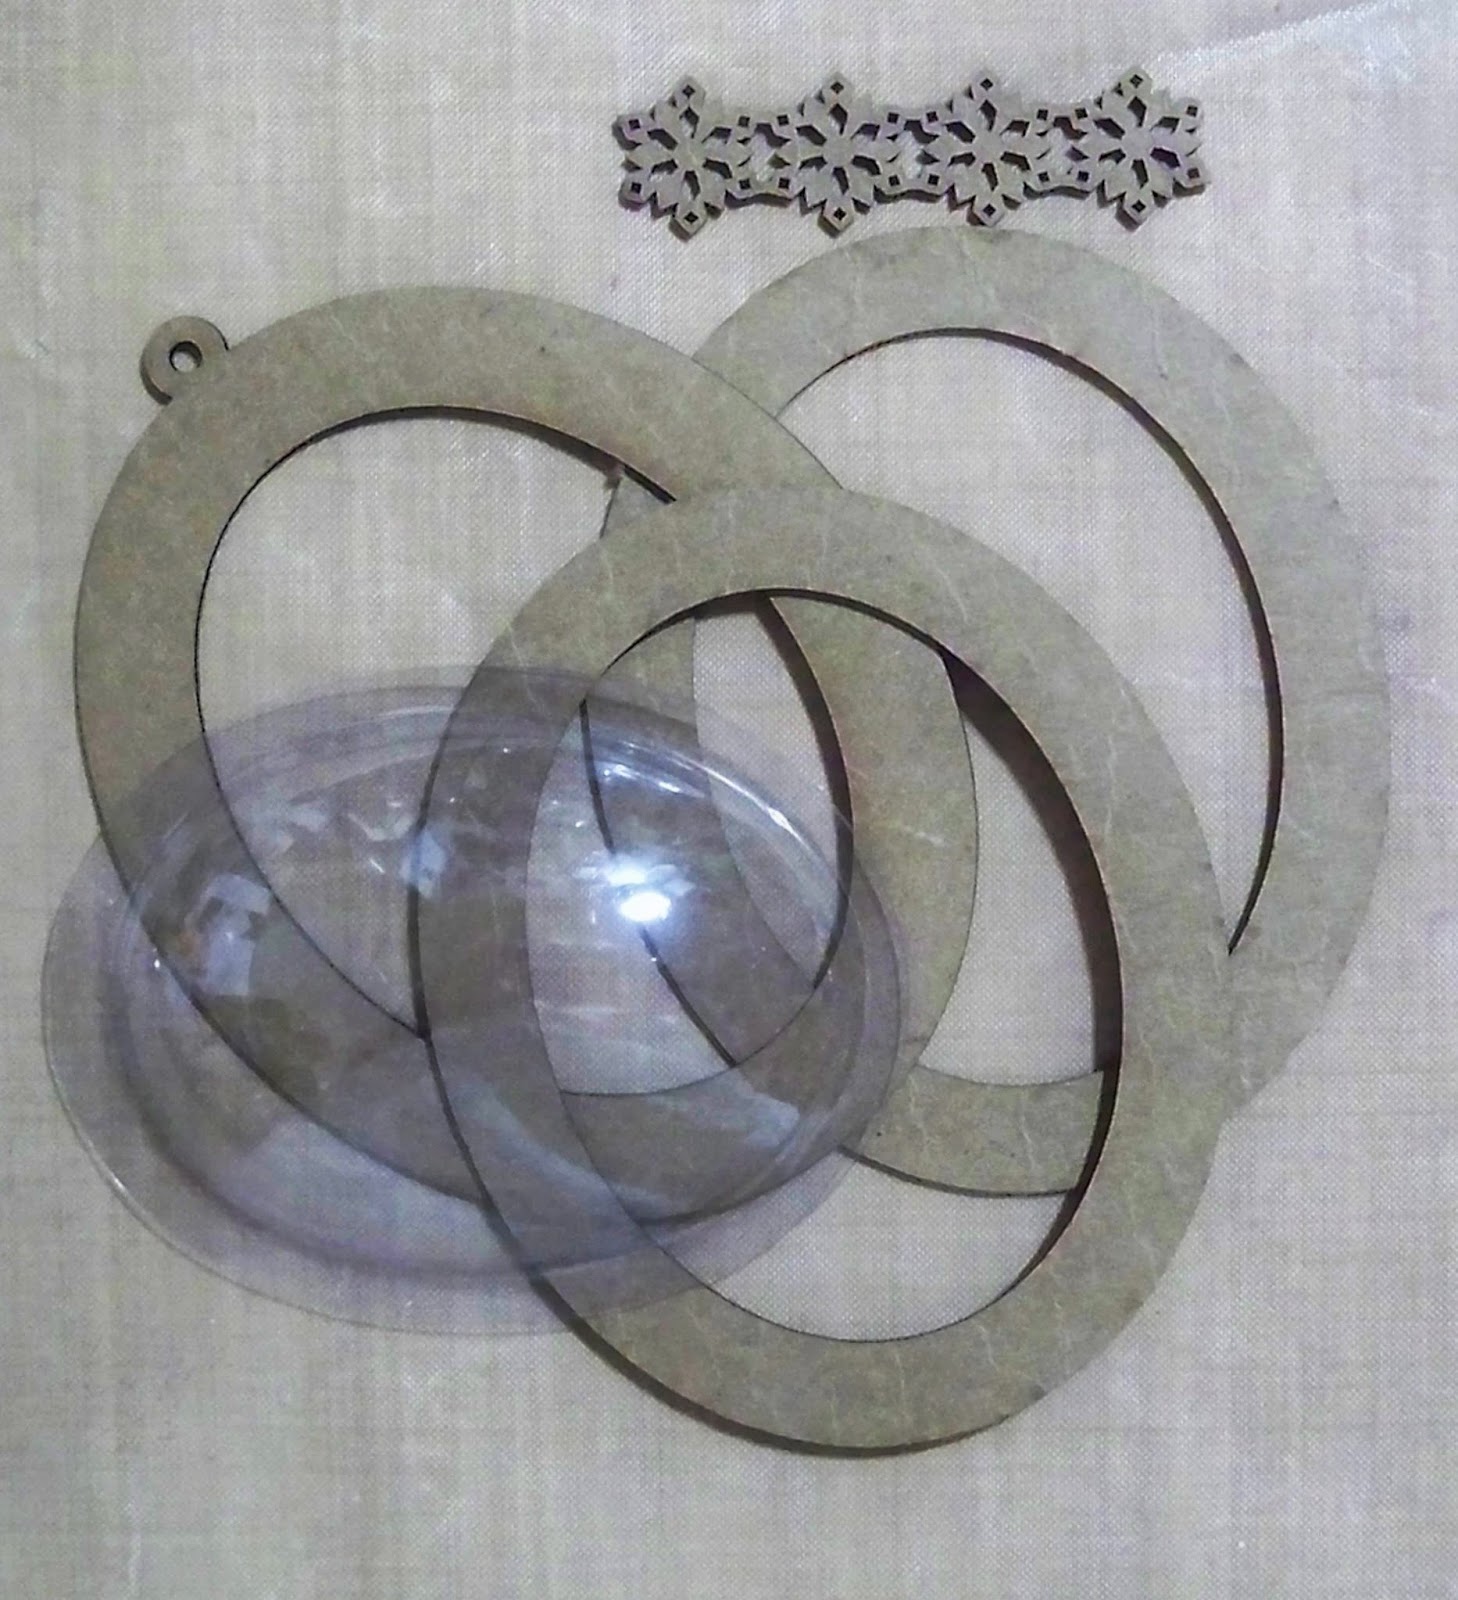
The kit with the piece from Bejeweled Snowflakes
First thing I did was cut my long snowflake border from the Bejeweled Snowflake Set in half – there are 8 little snowflakes on each strip, so I just snipped it into 4.  Then I applied the Embossing Fluid and embossed the strip with Aged White Embossing Enamel, both front and back.

Then I embossed the inner circle of the ornament – the inner piece is the
Inner bezel with snowflake piece
piece in the kit that has the loop on the top to hang the ornament.  I just pounced my Embossing Fluid along the outside of the ring (super easy since the Embossing Fluid uses a dauber on the top of it – you never get too much or too little! Just don’t squeeze your bottle as it will explode – or so I hear - hehehe) since I knew once the ornament is assembled you can only see a small bit of the ring; I embossed the inner ring on both sides.  Then, I threaded the cord through the very top of the snowflake strip that I had cut so that the ends of the cord could be glued to the inner ring and the strip would hang correctly.  For that I used E6000 and I did one piece of string at a time (for me that was easier than trying to line the filament up on both sides, ensure the strip was even, then try to glue both ends of the cord – it became like a game, with me fighting against everything.  So, I surrendered and did each end separately).
All the pieces embossed, attached & ready to assemble (except the globes)
While my hanging piece was drying, I embossed the 2 outer rings with Mermaid Tears, being sure to roll the Embossing Enamel to shake up the enamel.  The Globecraft & Piccolo Embossing Enamel is hand blended in the USA and each color is so unique – the Mermaid Tears is such a pretty mixture of colors!  I did one side of each of the outer rings, but I did emboss each side twice.  Then I glued the globes and the rings to the inner ring, lining it up and clamping them together with bulldog clips.  I let it dry overnight and I was done!

Another look at the final product (hard to get those bubbles to photograph!)
Also, another great use for the bubbles is to use them as "shields" - when you have items drying, perhaps with Glastique Gloss, you can place a bubble over the item and that helps to keep the cat hair, human hair, Embossing Enamel and all the other floaties out of your finish.  Thanks so much for stopping by – I appreciate your comments and sharing of my posts so much! Hope you have a fantastic weekend! Christi

Saturday, March 1, 2014

Hanging Snowflake Altered Art


I love to make use of items that I’d normally throw out and the main components of this project contain exactly that.

Hopefully you saw my two previous projects using the Globecraft & Piccolo Bejeweled Snowflakes accents set, if you need a refresher you can find them here (Snowflake Votive) & here (Happy Winter Card).  For this project, I used the little snowflakes that are in the set and my "stencil" that I made and used for the Happy Winter Card.  There are 6 adorable snowflakes, measuring about 3/4", that I had left in the set, so I used them up!  

Before I get into the tutorial, let me tell you about the products I used:
Small Snowflakes from Bejeweled Snowflakes   
Stencil I used in making the Happy Winter Card (from Bejeweled Snowflakes  
Frame, 7” x 7” square
White Gesso
Distress Paint in Stormy Sky
Dylusions Spray Ink in London Blue
Ranger Archival Ink in Jet Black
Fishing Line (or other clear string material)
Oval Word Charms
Piece of White cardstock
Sentiment “Warm Winter Wishes” by Quietfire Design 

I know it seems like a daunting amount of stuff but most of it you use only once.  First thing I did was work on the snowflakes.  I had originally wanted to have one side glitter and one side embossing enamel but that didn’t work out very well. 
I know I could of made this work, but I didn't really like the glitter
The detail in the flakes was a wee bit too defined for the glitter I had so I switched to embossing both sides.  
These are only embossed once - like my fingerprint?
I embossed both sides about 3 times (don’t forget to roll your jar of embossing enamel – it blends all the granules and colors perfectly!), which was tricky because each time I embossed a side the other side grew hot as well and would end up either slipping off or making a finish that I didn’t like.  My solution was to go slower and use a lighter touch with my heat gun; I also wonder if the fact that I have a Weller Heat Gun which is actually made for industrial applications may have caused the powder on the other side to keep reheating so much. When I find my regular crafty heat gun, I will do an experiment and see if the heat was too hot.

Once the flakes were embossed to my liking I set them aside to completely cool.  At this point, I wasn’t sure how I was going to hang them but I had a very vivid picture in my mind of how I wanted the assemblage to look – I thought about threading fishing line through each flake, of tying each flake to cord, using fibers, and a few other ideas.  The more I thought about it the more I liked the idea of having the flakes hang invisibly – so I used fishing line! 
In the picture, you can barely see the fishing line stretched across one of my homemade art boards (cardboard covered with wax paper) and held in place with painters tape.  I then glued each snowflake to the line with E6000.  I made sure I used plenty of line and I matched up the snowflakes so they would all be in about the same place.  I let them dry overnight.


Way too dark!
I went to work on what I think is the focal point of the assemblage, the “stencil” I made from the Bejeweled Snowflakes set – the stencil is actually made out of the waste leftover after all the items are punched out.  This is the third project I am getting out of just one set.  When I made the Happy Winter Card, I had spritzed the stencil with Dylusions Spray Ink in London Blue to make the image on the card.  The stencil was really saturated with the spray ink and much darker than what I wanted for this project so I painted some gesso over the London Blue and got the perfect, icy baby blue color I wanted.  Then to give the stencil a bit more stability I painted over it with Glasstique Gloss FinishingGlaze.
Perfect!!!
The frame that I used came from a picture bought at the Dollar Store and had gotten ruined – and the frame was originally black. So I gessoed over the black, twice to be sure it was covered completely and then colored it with Distress Paint in Stormy Sky using a paint brush dipped right into the bottle.  I finished it off with a few light spritz of Dylusions Spray Ink in London Blue, let it dry a few seconds and swiped it very lightly with a baby wipe. 

I had already stamped the sentiment on a piece of white cardstock using Ranger Archival Ink in Jet Black; all I need to do was trim it up a bit and it was ready to go!


All the pieces ready to be assembled!
Now that all the pieces were done the fun part – putting it together!  This is when I discovered my fishing line refused to stay straight and kept curling up on me.  No fear! I dug into my charms stash and decided that these oval word charms would fit the bill nicely.  I attached one to the bottom of each snowflake line and they worked like a charm (pun intended), in addition to tying the fishing line, I also added a dab of E6000 to each knot.  Now that my curling issue was fixed, I moved on to getting the stencil ready to be attached to the frame.  First thing I did was poke 3 holes into the stencil and thread the fishing line with the snowflakes through the holes, being careful to make sure all the lines were even with each other, then I flipped the stencil over and used E6000 to glue to fishing line to the back so the rows of flakes would stay put.  I let that dry overnight.

The finishing touches are easy – I glued the stencil to the inside of the frame & then attached the sentiment.  It took a bit of thinking and problem solving but I think this is an awesome winter decoration.  I hope you had as much fun reading about it as I had making it!
Another view
Next week I officially start spring, regardless if the weather cooperates or not.
Thanks for reading and I hope you & yours have a fabulous week!

Thursday, February 27, 2014

My hope is found.....


Good morning peeps --- Teresa here with a tribute to many many people. Meet HOPE. I have known I wanted to make her, and the new Aged Pink Powder gave me the very last item I needed.

She looks a lot more complicated to assemble than she actually is. So let's jump on in. Shopping first.

from the New Release Items.

- Aged Pink Enamel powders
- Aged White Enamel powder

Other Globecraft Piccolo products.
- Cranberry Wine Enamel Powder
- Poodle Skirt Enamel Powder
- Enamel Adhesive
- UV Resin
- Matte Glastique Finishing Glaze
- Snowflake Accents 
- Bejeweled Snowflake Accents


Miscellaneous Supplies
- Cross Stitch Fabric (I used a 32 Count Linen in Ivory)
- Sparkly Floss in pink
- small bit of ivory cardstock
- glitter paper for wings
- silver stamp ink (the London Fog from Sweet Stamps is really pretty)
- a tiny lace medallion for her halo (I made my own.)
- buttons to use as spacers.
- silver sewing thread
- a mounting board
- a tiny bit of gesso
- tiny bit of pink glitter

Now here we go.


I stitched the word HOPE at the center bottom of my fabric using the pink floss. (Link to a free PDF of the font)


I covered all of my Piccolos with a bit of gesso. The sides will show and I carefully made sure to cover them. Wait patiently for this to dry.


Then I embossed all of my shapes in assorted Pinks.


The ones above are Cranberry Wine (this is my current favorite)


The ones above are Poodle Skirt


The top one above is Aged Pink and the smaller one is Aged White.


I stamped my pretty angel's face and then added a bit of the Aged White Powder to her hair. I even used a paintbrush and flecked a little into areas in her hair. I cut her out to fit my medallion.


After embossing her accents - I covered her with UV Resin and set it outside in the sun to cure. In sunshine it takes about 3 minutes. 


I added a medallion behind her pretty face. I made my own to give her a halo effect. I simply glued the resin piece to this.


I cut wings from some glitter paper.  Then (using my finger) smeared the Glastique on them waited just a moment and sprinkled with some pink glitter.

The Glastique is a fabulous adhesive for the glitter. See the detail below. By waiting just a moment before I added the glitter, some of the Glastique dried and the remaining areas held the glitter.


Now all of our components are ready.


I sat down and stitched her bits and pieces to the fabric.


Stacked some, using buttons for spacers. I gasped when I started the stacking. It gave great dimension to the artwork.


After I stitched everything down, I added her face. I simply glued it on with E6000.

Then I wrapped her around an 8x10 board. I have her in a shadow box now - but she could be framed or mounted on canvas.


I love the various ways you can combine the Piccolo shapes.

A similar angel could be made from flowers, from flourishes, even from the various gears.

I do hope you will try your hand at some of these ideas son.

Saturday, February 8, 2014

Happy Winter Card & Last Chance to Enter!!

Hi all you Happy Crafters!  It’s Christi again with another fun card using products from Globecraft & Piccolo. Before I get into my newest creation, I want to let you all know that this is the LAST day to enter for a $10 gift certificate to Globecraft & Piccolo.  How do you enter? 
  • Leave a comment on daily posts Sunday, February 2nd through Saturday, February 8th, 2014
  • You must be a Follower of the Globecraft Piccolo blog
  • You must like us on Facebook (click on the Facebook tab at the top of the blog)
  • Only 1 comment per day per person
  • If you refer a friend and your name is mentioned in their comment, you will get a second entry to the drawing for that day
  • Winners will be chosen by Random.org and announced on Sunday February 9th, 2014
You can win on multiple days so be sure to visit each day - I hope you all have been commenting & I wish you luck!

On with the show! Here is my finished card.  Read on and you will learn how to make this cute card.
My finished card
 This is the second project I have made using just one set of Bejeweled Snowflakes Accents!! After I had removed all the beautiful snowflakes from the board I noticed that there was a stencil possibility hiding within the “scrap” (really, is anything ever scrap to a crafter?) or the negative left after removing the snowflakes.  I carefully cut off the parts I didn’t want and was thrilled to see a snowflake stencil ready for me to use.
The chipboard is very sturdy & flexible
I decided I wanted to make a card. I love shades of blue with silver.  Especially brilliant blues.  And what goes better for a shivery winter card than blue and silver?  I had already made the background paper using Distress Paints for another project (I used Distress Paints in Chipped Sapphire, Stormy Sky & Brushed Pewter and a piece of watercolor paper – the paints were pounced on the craft mat, sprayed with water and the paper was smooshed into the paint), so I just built off of that.
 
Items I used:
Stampin’ Up! Everyday Flexible Phrases Rubber Stamp set
Base card in Cream
Piece of Background Paper, already prepared (see description above)
Piece of Gray cardstock
Piece of gray/blue cardstock
Dylusions Spray Ink in London Blue
Krylon Leafing Pen in Silver
Robin’s Nest Drops
Ranger Archival Ink in Jet Black

Removable Tape (to hold the stencil in place. I used blue painters tape)

First step in making this card was I took my background paper, laid the stencil over it and spritzed it with Dylusions in London Blue.  Lifted off the stencil and chose where I was going to trim the paper down. 
You can see the tape marks!
 Once it was dry, I trimmed it and in the middle of the full snowflakes I added a wee dot of 3D Enamel Gel in Satin Silver. The gel looks blue in some pictures and I am not sure if it picked up some of the spray ink or it is the reflection of the blue in the metallic – makes no difference to me either way – I set the panel aside so I would not smoosh the dots as they dried (and yes, I have smooshed many a drying dot!). 

I took a spare piece of cream cardstock and stamped my little sentiment, Happy Winter, with the Jet Black ink – this was a test since the stamps I used are the old fashioned, can’t see through the wooden block type of stamps, which I had hand mounted.  After a bazillion tries, I think I got it straight enough.  Or, let’s just say it IS straight enough. I mounted that on a piece of grayish blue cardstock & then again on a piece of cream because at this point I was vacillating between a cream or blue card base. 

Back to the panel where I used the snowflake stencil.  I swiped my Krylon Leafing Pen in Silver around the sides of the background paper and mounted it on a gray piece of cardstock.  Then I mounted the whole shebang on the card base, which as you can see was decided to be cream and added the three little dots.

The 3DEnamel Gel also works when you want a cute little dot on your card or project, but I haven’t gotten the hang of making them even remotely the same size, so I cheated and used pre-made dots.  I am practicing though & hope my dots will debut soon.

Stay tuned for my third project still using only one set of the Bejeweled Snowflakesset – if that isn’t a good deal, I don’t know what is!  I hope your weather is settling down a bit and that you & yours have a wonderful week!

Thanks!
Christi

Saturday, January 25, 2014

Snowflake Votive Holder


I have wanted to do a 3D project since I got my Silhouette CAMEO and I thought this was a perfect opportunity.  I also get to showcase one of my absolute favorite accents sets from Globecraft & Piccolo - Bejeweled Snowflakes!

This post is a little photo heavy but I really wanted to showcase how I made the project and how beautiful the snowflakes & embossing enamel are together.

Globecraft & Piccolo Items Used:
1 set of Bejeweled Snowflakes Accents, LA100 

Other Items:
1 piece heavy cardstock, 12 x 12, white
1 piece heavy cardstock, approx 7 x 7, white (for top)
2 pieces of Denami Design Colored Cardstock in Iridescent Gold
4 pieces of regular Vellum, 2 ½” x 2 ½”
Krylon Gold Leafing Pen
Double Stick Tape
Glue
5 Gold Beads
Cutfile for a 4” x 4” box, with top (I put the 1 ¾” x 1 ¾” windows on myself)
Cutfile for the frame
1 Battery Operated Votive**


**DO NOT USE A Candle – it will burn & cause a fire!

The votive holder all cut and ready to go!
First thing I did was search for a lantern/votive holder cutfile that was fairly small knowing I wanted to use the Large Snowflakes in the Bejeweled Snowflakes Accents set as the focal point, but I couldn’t find any that suited my vision, so I made my own!  I used a regular cutfile of a small box with a lid and just added the windows to it.  Sounds easy but I am new at playing with files and it actually took me longer to get the right sized windows, and many, many votive holders cut, before I hit upon the right size.  Once I had the votive holder body and top cut out the real fun began.

Coloring the Snowflake Strips
I started by coloring the snowflake strips (after I cut them in two, 5 snowflakes each strip) with the Krylon Gold Leafing Pen.  After they dried, I dotted them with the 3D Enamel Gel in Satin Gold in the center of each snowflake. 

Adding the 3D Enamel Gel in Satin Gold
Then I turned my attention to the 4 large Snowflakes.  I coated them with the Enamel & EmbossingPowder Adhesive Fluid (IMPORTANT!! Do NOT Squeeze The Fluid – this will cause the top to pop off and you will create an amazing mess! All you need is to tap the fluid onto whatever you wish to emboss, the little dauber thing will refill naturally – and I am PROUD to say I haven’t popped my top!) and embossed them using Aged White Embossing Enamel (don’t forget to roll your enamel before you use it – that will ensure the colors are mixed properly). NOTE: Since the Snowflakes are very detailed the embossing enamel may clog some of the holes – just use a toothpick and poke it out!  

A close up of the Snowflake embossed

Showing some bling!
This color is fantastic! It has little bits of metallic goodness mixed in with the white powder and it really sparkles! I put the Large Snowflakes aside to cool.

I then cut my vellum and attached it to the inside of the windows in the box.  Since vellum is tricky to use glue with I used double stick tape, just the regular red kind.  It’s very important that nothing gets on the vellum because you will see it when the holder is lit (and I am sure if I tried to use glue I would get it on the vellum.  In fact, I even washed my hands and used a clean piece of scrap paper to ensure the vellum would stay clean).

The windows taped with the double stick tape

And the windows covered with the vellum

Then I attached the Large Snowflakes to the outside of the windows.  I lined them up so they would be the same no matter what window was looked at.

All the Embossed Snowflakes attached to the holder


Close Up of the attached Snowflake
The next step was to figure out what I wanted to add to the sides of the box, around the windows, because it looked very plain to me.  I used another cutfile to make frames out of thin (lightweight) metallic paper. Once I had the four frames cut I glued them to the sides using them to frame the snowflakes.  Be sure to keep one of the insides of the frame you use!  

The frame framing a Snowflake
I assembled the top and gathered my colored & dotted Snowflake Strips.  I put one strip on each side of the top and used one of the innies from the frame cutfile on the very top.  

Assembling the top
The Top with the Filled in Gold Bead and "innie"

I also used one of the gold beads to serve as a handle so you can open the holder without having to touch the top.  The bead I used had a hole in the center, which will be fine for the feet, but I didn’t like the look of it on the top since you could see the hole.  I solved this issue by putting a few drops of the 3D Enamel Gel in Satin Gold, letting it dry, then adding more.  I did this about four times to “fill” in the hole.

The final step is to assemble to actual box.  I used glue and hinge clips to hold the sides together and I put 2 sides together at a time. The same steps I used to put together the top.

**REMEMBER – DO NOT USE a candle in your creation – it WILL cause a fire.  Use a battery operated votive!

The bottom of the holder & the top
I put my battery operated votive in the holder and lit it up.  I think this came out amazingly well for my first 3D project and makes a lovely winter centerpiece or decoration.


The Finished Holder


All lit up!


A close up, lit but it's hard to tell
This reminds me of the paper bag luminaries that people would put out on their walkways and such back in the day.  I know people still use them, but I think the old ones were so beautiful!
 
I have 2 other projects to share that used the same Bejeweled Snowflake Accents set – three projects out of ONE set! Be on the look out!
Thanks for stopping by!  Don’t forget to bookmark the Globecraft & Piccolo blog and stop in daily to see more creative ways to use the Globecraft & Piccolo products!  Also, check out our sister company, Sweet Stamps, for some fabulous rubber stamps!

And here is a really good look at what the votive holder would look in the dark - I couldn't resist sharing this picture :)


Thank you for sticking with me on this longer than usual post ~ blessings to you & yours!