Pages

Showing posts with label Clear Thick Enamel Powder. Show all posts

Thursday, September 18, 2014

dragonfly dreams


Good Morning everyone. Wow time flies and it's Thursday again. Teresa here to share another easy to create tag using several of the Globecraft and Piccolo products. 


Shopping list -

Enamel Powder Adhesive
Ultra Thick Clear Embossing Powder
Micro Copper Embossing Powder
Mardi Gras Embossing Powder
Dragonflies Piccolo Set
Burnt Umber 3d Gel
Glastique 

Other items

Manilla Tag Base
Craft Mat
Walnut Inks - I used a leaf green, gold, and red maple
       Note Sweet Stamps keeps a stock of Distress Inks in many colors.
micro gold Glitter
flower stamp


**** **** **** **** **** ****
Let's get started.

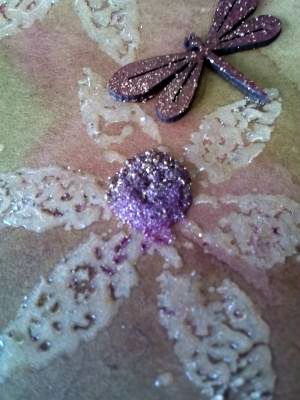
I used a tried and true stamping trick for this. I used the EMBOSSING ADHESIVE to ink my stamp directly onto my manilla tag base. Sprinkle with the CLEAR EMBOSSING POWDER and emboss.

Spritz the craft mat with the inks in a random pattern. Place the tag into the inks and pick it up. I use my fingertips but you can use a sponge for this next part. Smear the ink around into the tag background blending areas and leaving some as the original full color. The clear embossing using the clear EMBOSSING ADHESIVE leaves a "resist" area for the flower stamps. Loving this.


Let the tag fully dry.

I then added a dot to the center of each flower using the BURNT UMBER 3D GEL. I sprinkled one with the MICRO COPPER POWDER and the other with the MARDI GRAS POWDER. Let this dry over night. (I did not emboss these at all) I like seeing all the little particles with the Brown peeking through.

Take two of the DRAGONFLIES and ink them with the walnut ink -- I used the leafy green and the red maple. Let these dry completely.

Using my fingertip again (my favorite tool) I smeared the dragon flies with GLASTIQUE and lightly sprinkled with the fine glitter.

After that dried, I shook of the excess glitter and then adhered the DRAGONFLIES to the tag using the GLASTIQUE.


Ready to attach to a gift.


Thursday, September 4, 2014

Christmas is Coming....

Happy Thursday everyone. Teresa here and,  as much as it freaks me out to remind you, there are only 111 days until Christmas. I know that sounds like PLENTY of time. But I know myself quite well and I don't want to be scurrying around at the last minute AGAIN - trying to put a personal touch on my gifts. 

So today we are making a gift tag. 


Let's gather our materials.

From Globecraft and Piccolo

Embossing Enamel Adhesive
Glastique Gloss
Aged White Embossing Powder
Micro White Embossing Powder
Pure Platinum Embossing Powder
Bahama Aqua Embossing Powder
Siam Silver Embossing Powder
Clear Ultra Thick Embossing Powder
Fancy Labels and Roses Piccolo Set
Bejeweled Snowflake Piccolo Set

And from our sister company, SweetStamps

Snowflower Art Stencil  (the art stencils are a new release item for SweetStamps and they are wonderful)

You will also need
- self adhesive glitter dots (you can also use the Glastique and fine glitter)
- a large tag base
- a light blue color spray
- Ribbon for the hanger

Now let's get started.

First - spritz the tag with the light blue color spray - giving that pale blue back ground to work with. I dry mine with the heat gun.

Now for the stencil back ground.
     Lay the tag flat and center your stencil over the tag.
     I wanted a "hint" of snowflakes in the background so I lightly sponged on the Enamel Adhesive through
     the stencil. Keeping in mind my final layout, I applied the adhesive more heavily in some areas.


Emboss the tag with the Aged White Powder --- this powder has a lot of glittery sparkle. A wonderful wintry feel is emerging. Set your tag base aside.


I then embossed the rectangular label from the Fancy Labels set. I used the Bahama Aqua on the center of the medallion and the Siam Silver as a "frame" around it. I embossed one of the large snowflakes with the Micro White Powder and the smaller on with the Pure Platinum Powder.

I dry fit the Piccolos on the tag to decide which areas would get a tiny glitter dot accent. And because the Ultra Thick Clear Powder enhances the coloration behind it, I used that to emboss those areas.

Glastique was used to attach every thing. After the tag dried, I added a bit of bright blue tulle ribbon as a hanger.

The first thing a little buddy said to me when he saw it was "It's a Frozen tag". I'm taking that as a major accomplishment - when you can impress a 5 year old - you got it going on.


Monday, January 13, 2014

Altered Bottle Caps | Love Hang Ups

Happy Monday!

i love saying that...

I have a wall of love in my home and am always in need of a few more magnets. Even if you don't have kids and a plethora of 'Good Job!' papers to hang, you may still want to make these.


They're cute and useful.

Did I mention really cute?

G&P Shopping List:
Enamel & Embossing Powder Adhesive Fluid

Enamel Powders:
Temple Stone
Poodle Skirt

Clear Thick Enamel Powder

Tweezers

your favorite Piccolo Accents 

Other:
Heat Tool
Craft Mat
metal bottle caps (rinsed and dried)
scraps of paper, stickers, sequins, etc. (I cut words from some packaging.)


Notes: Take your time. Let the Diva of Perfection go...because sometimes the powder moves in it's own direction!

The metal cap will get HOT! Be sure to use tweezers and let the cap cool as necessary before you handle it!

1.  Sprinkle a light layer of Stone Temple Enamel Powder into the bottle cap.

black, gray, white, gold

2.  Hold the bottle cap with the tweezers. Heating from underneath and about 5-6 inches away, slowly heat the bottle cap. Once the enamel starts to melt you can heat it from the top, starting 5-6 inches away until the powder no longer blows around.

3.  While still warm, add another layer of Stone Temple. Repeat Step 2.

4.  Repeat Steps 3 and 2 until you have the bottom of the cap covered.

 This is 3 layers.

5.  This time add a layer of the Clear Thick Enamel Powder. Repeat Step 2. Take your time. (It appears the Clear Thick Enamel Powder is heavier than the Stone Temple. It didn't mix as much as it moved the other powder. I LOVE this effect!) 
6.  Using the tweezers, hold the tiny heart. Using a paintbrush dab on the embossing fluid. Sprinkle the Poodle Skirt Enamel Powder on the heart and melt from underneath. Let cool before removing tweezers.

Look at the depth & detail of the Piccolo Enamel Powders (+ Clear Thick Enamel Powder)! Gorgeous!

7.  Repeat Step 5. While still warm begin to add your embellishments. Layering the Clear Thick Enamel Powder as you like.

Two layers.

Here you can see where the melted enamel moved across my sequin.
 Three layers. Done!

8.  Add your favorite kind of magnet to the back! Of course, you could also use this in another project, punch a hole to use it for a charm...I'm sure you'll think of something!

Last notes: I love that I didn't have to wait for stuff to dry, but you could use the Glastique or Instant UV Resin instead.  You can continue to layer more stuff into the cap whenever you want to. Added a tiny rhinestone to the 'empty' area in the top right of the cap.

Stop by the G&P store and check out the NEW ITEMS...I'm already working on a wishlist...

Well, that's it for today! See you here tomorrow with a fab project from Tracy!

Inky hugs,