Pages

Showing posts with label Kristie Taylor. Show all posts

Thursday, April 4, 2013

Flower Drop Charms warming up to Spring


Hi, Kristie here and I am going to show you how I made this lovely Flower charm earrings and pendant using the Piccolo Enamel Gels.


Here is what you will need:
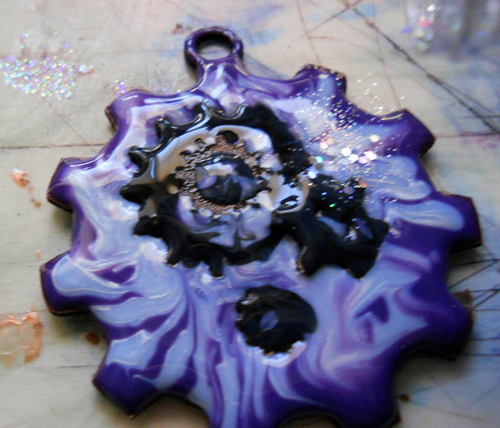
Step one: choose one flower in each charm and apply Cobalt Turquoise 3D Enamel Gel to it.
Use a slow movement to avoid air bubbles.


Step two: Apply Napthol Red 3D Enamel Gel to the rest of the charm, and repeat for each one.


Add a small dot to the center of the Turquoise flowers with the  Napthol Red 3D Enamel Gel 


Step three: Sprinkle on a little  Pure Sparkle Silver Glitter.


Step three: After the enamel gel dries, turn over each piece and repeat the process on the opposite side. 


 Step four: After this side dries, apply a layer of Instant UV Resin.


Just look at how lovely they turned out! I love how the gels stay "domed" and shiny!


See how easy it is to create beautiful jewelry with just a few supplies from Globecraft and Piccolo!


Kristie Taylor
The Scrapinater

Stop over on my personal blog to take a look at a steampunk dragonfly I've been working on.

Saturday, March 9, 2013

3D Enamel - give it a swirl!


Hello all, Kristie here to share a tip with you.

Did you know that you can swirl Globecraft 3D Enamels to get even more awesome color and interest in your jewlery peices? You can!


Just apply one color of Globecraft 3D Enamel Gel on top of another and Swirl.


You can even add decorative pieces, and glitter to the wet enamels


And when it dries, you get amazing effects and color!  


Tuesday, February 26, 2013

Gearing up with G&P 3D Enamel Gels


Lets learn how easy it is to blend Globecraft and Piccolo 3D Enamel gels.

Gather your supplies:

  • G&P 3D Enamel Gels in Mars Black, Metallic Silver, Dark Violet
  • Gear Bezel
  • Vintage Gears Set 


Cover the Gear bezel with Dark Violet 3D Enamel Gel by gently squeezing the fluid from the bottle.


Gently blend in the Metallic Silver 3D Enamel Gel; you want some streaks, so don't worry about it being smooth.


It will look something like this.


Cover the smaller vintage gears with Mars Black 3D Enamel Gel.


Place them into the wet 3D Enamel Gel on the gear bezel.


Sprinkle on some G&P Pure Silver Sparkle Glitter.


That's all there is to it!


Saturday, February 9, 2013

Easily create texture and shine G&P products


Hello everyone, Kristie here with a product tip for you. If you love the shine that you get from the Globecraft & Piccolo 3D Enamel Gels, but also enjoy the texture that you get from dry embossing, why not combine the two!


Run your G&P bookboard bezel through an embossing folder to get yummy texture like this.


Then apply a nice layer of Globecraft & Piccolo 3D Enamel Gel to get this! I used Metallic Copper 3D Enamel Gel here and applied it directly from the bottle. Depending on how the light hits it, it sometimes appears red. The flourish is treated with Vintage Silver Embossing Powder.


Now you have the best of both worlds, shine and texture!


Thursday, January 10, 2013

Simple steps to jewelry making with G&P


Hello all, Kristie here and I am thrilled to show you how I made this Lovely Bezel. It has amazing texture and dimension, and you can do it in just a few easy steps.

Kristie Taylor
kristietaylor.blogspot
Supplies:
  • Globecraft & Piccolo (G&P) Oval Bezel with 1 Loop
  • 3D Enamel Gel - Burnt Umber
  • G&P Embossing Powder Adhesive
  • G&P Ultra Thick Embossing Powder
  • Art Anthology Gelate - Baby Blue Eyes
  • Stampendous stickers - dragonfly
  • Stampendous stamp - Clockworks
     
  • Side note: Wait for the Enamel Gels and Gelate to dry completely before adding adhesive and ultra thick embossing enamel.

Apply Globecraft 3D Enamel Gel in Burnt Umber to the bezel with a small brush.


After the Enamel Gel dries, coat the front of the bezel with a nice thick layer of Art Anthology's Gelate paint in Baby Blue Eyes.


Stamp into the wet Gelate and rinse your stamp right away.


 Just look at all that yummy texture!


Apply the metallic dragonfly sticker to the colored bezel.


After the paint dries completely, give the front of your bezel a thick coat of G&P
Embossing Powder Adhesive then pour on the G&P Clear Ultra Thick Embossing Powder.


Tap off the extra, and put it back in the bottle. 


Then use a heat tool to melt the Ultra Thick Embossing Powder.


 That is it - you are done! Just look at the lovely bezel you can make!


Visit my blog to see another bezel I made using G&P products.