Pages

Showing posts with label St. Patrick's Day. Show all posts

Sunday, March 13, 2016

Lucky Me


Happy Sunday Stamping Friends!

Kendra here from Luv 2 Scrap N Make Cards to share a fun card with you using some SweetStamps.com products!!!!

-------

With St. Patrick's day being this coming Thursday, I thought I would create a card using the cute new Lucky Rainbow Leprechaun stamp set!!!

This was such a fun image to color!!
I also really like the sentiments in this set!!

The "Lucky Me" is one sentiment.  And the "to have a friend like you" is another sentiment, which I masked up to have it inked and displayed like this.

And there is one more sentiment in the set, check out the entire set:


-------

Be sure to come back for more wonderful inspiration from the "Sweeties"!

Be sure to join in our Blog Hop for a chance at winning one of our new stamps!!!  You have until tonight to hop!!

Have a wonderful day!


Tuesday, March 19, 2013

St. Patrick's Day Challenge Winner

The winner of SweetStamps.com's Challenge #108 St. Patrick's Day is...

Please contact me for your winning prize of a $20 shopping spree for rubber stamps at SweetStamps.com.

Thank you to everyone who joined in on the challenge, we hope you had fun and will join us again — we have a NEW technique challenge every month, along with a weekly challenge each Tuesday!

Tuesday, March 12, 2013

Challenge #108 St. Patrick's Day

Top O the Mornin' to ya! It's Tuesday and that means there's a NEW weekly challenge at SweetStamps.com! This week's theme is...
St. Patrick's Day
We'd love to see your St. Patty's creation. You can win FREE stamps by playing along in our challenge. Click here for our complete Challenge Rules.

Check out the beautiful designs our Design Team sweeties have created this week:


 * * * * * * * * * * * * * * * * * *
Our Monthly Technique Challenge begins on Friday, March 15th: Wax Paper Resist. Next Tuesday's weekly challenge theme will be Crosses. Hope you'll join us for your chance to win some Sweet Stamps!

Happy Stamping! Have a super sweet week!

Thursday, March 7, 2013

Adding a bit of Irish bling


The celebration of the luck of the Irish is almost upon us and before you sink your teeth into the salty and savory goodness of corned beef and cabbage and peasant bread, you need to frost yourself with a little handmade St. Patty's Day bling. I would hardly call myself a veteran jewelry maker, but with the help of Globecraft and Piccolo's new Shamrock Dreams Embossing Powder and Glastique Gloss, I was able to turn an ordinary ring base and chipboard into a fun piece of wearable art in no time flat. Hopefully this fun and festive ring will pinch proof this Irish lass.


Arin Flynn
A Piece of Life's Pie
Material List:
  • Globecraft and Piccolo Shamrock Dreams Embossing Powder
  • Globecraft and Piccolo Embossing Powder Adhesive
  • Globecraft and Piccolo Glastique Gloss Finishing Glaze 
  • Globecraft and Piccolo Easy Grip Tweezers
  • Cousin Silver Plate Ring (can be found at Michael's)
  • Heat Gun
  • Silhouette, die cut machine or punch using a Shamrock Image (or if you can find a plain shamrock book board charm)
  • Chipboard 
  • Sand Paper
  • Harbor Freight Epoxy Mix
  • Rubbing Alcohol 
  • Toothpick
Step 1: Making the Charm 
Using my Silhouette Cameo, I purchased "Lucky Irish Charms" by SnapDragon Snippets from the Silhouette store. I deleted all but the three sided shamrock and modified it to no longer have the charm bracket. I cut it using chipboard at around 3/4 inches.


Once you have your image cut, apply Piccolo Embossing Powder Adhesive to the charm and dust with Piccolo Shamrock Dreams Embossing Powder. Using Piccolo Easy Grip Tweezers, remove and shake off charm from the excess embossing powder and apply heat from a heat gun. Set aside to cool and set. Once cool and set, repeat process three more times (with each new layer of embossing powder a new level of depth and dimension is added). Once one side is complete, flip over the charm and repeat the same steps from the previous side.


Once both sides are cool and complete add Glastique Gloss Finishing Glaze to one side, let set and dry and repeat on the other side. This will add not only protection to the charm, but an additional layer of depth and dimension!


Step 2: Mounting the Charm
Using sand paper, rough up the plate of the base ring. Once area is sanded, apply rubbing alcohol to the ring to remove any oils or dirt the ring may have on it.


Set aside and mix up a small batch of epoxy. Using a toothpick apply epoxy to the base plate of the ring and then add the charm and position quickly. Apply pressure to set the charm to the ring and hold for a 30 seconds to a minute. Set aside and allow to fully set.


The fun thing about this project is that any type of charm or embellishment can be used. Globecraft and Piccolo has a wonderful inventory of book board charms and embellishments that would make any boring base ring come to life in the form a great piece of wearable art!  Head over to my blog and see what I easily made to pair with this fun project!


Friday, February 15, 2013

A Celtic Relic Necklace

For today's post, I was inspired by Celtic knots.  I was thinking about these ancient symbols and trying to create something that looked like it could be a relic.
So, here is how it was done:

Materials

Piccolo Square Tag Bezel
Piccolo Embossing Powder Adhesive
Globecraft Mossy Glen Enamel Powder
Globecraft Guilded Rose Gold Enamel Powder
Piccolo Easy Grip Tweezers
Globecraft Vintage Gold Bail
Black Real Silk Cord Necklace With Lobster Claw Clasp
Heat Gun
Dreamweaver Stencil LL381 Celtic Hexagon
Dreamweaver Gold Embossing Paste
Dreamweaver Palette Knife
Removable Scotch Tape
Tim Holtz Alcohol Inks in Cranberry, Espresso, Oregano and Butterscotch
Alcohol Ink Applicator Tool

Directions:
1)  Use Embossing Powder Adhesive on Tag Bezel by simply blotting it on the tag board.
2)  Cover with Mossy Glen Enamel Powder.
3)  Heat embossing powder.
4)  Repeat steps 1-3, alternating sides, until you have about 3 layers on each side.  As you heat, you will need to hold the bezel with tweezers.
This is what it looks like after the enamel.
5) Use the removable tape to tape off a single triangle.
6)  Center the triangle over the bezel.  Use tape under the bezel to attach it to the stencil.


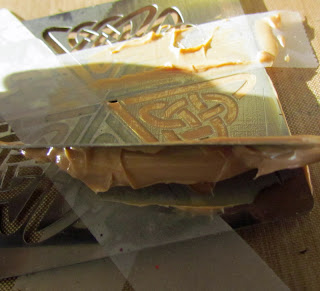
7) Use the palette knife to place embossing paste on the tape above the opening on the stencil.


 8)  Use the palette knife like a squeegee and spread the paste across the opening on the stencil.  Don't push down hard, but run the knife along the stencil.

 9)  If you have any paste that bled under the stencil, use the tip of the tweezers to remove it.
This is what it should look like when it is pasted.
10)  Pour Guilded Rose Embossing Enamel over the top of the paste. The variation in color and texture of the embossing enamel will add to the look.  Let dry for about 15 minutes.

11)  Use tweezers to clear out any excess embossing powder.
12)  Heat the embossing enamel.  Don't get too close.   The embossing paste will not be totally dry yet, and will bubble, adding to the weathered look.  Also, as it heats, the paste will "damage" the green embossing enamel, leaving bluish white areas around parts of the knot.
This is what it looks like completed.
 13)  Use alcohol inks and applicator to "age" the bail.

14)  Attach the bail and cord.

Thanks for stopping by!  Drop by my blog at www.rememberinglifesmoments.blogspot.com for a different take on St. Patrick's Day jewelry with Globecraft.


Tuesday, February 28, 2012

SweetStamps Challenge #55 St. Patrick's Day

February is coming to an end, so this week at SweetStamps our challenge theme is...
ST. PATRICK'S DAY

Join us in this challenge for a chance to win $20 of rubber stamps from SweetStamps. The challenge rules are listed in the sidebar, and instructions are at the bottom of this post.


So let's see what the sweet & talented ladies of our design team have created for you this week:


* * * * * * * * * * * * * * * * * *
What a wonderful variety of St. Patrick's Day cards! Check out the St. Patty's Day stamps available in the store here.
* * * * * * * * * * * * * * * * * *
WIN FREE STAMPS! 
Join our weekly challenge
You can use any stamp on your challenge entry, but if you use a SweetStamps image, you will get two entries into the giveaway! To enter the challenge, please add the URL to your actual blog post or online gallery to the InLinkz at the end of this post. Please do not link to your main blog; we want to be able to find your post to leave you comments. Also, please link back to our blog.


Remember, you can only enter the challenge one time, use a SweetStamps image to get an extra entry in the challenge. Please limit the amount of challenges to 10 (including ours).  You must link back to us in your blog post.
 * * * * * * * * * * * * * * * * * *
Next week's challenge theme is Monochromatic, we hope you'll join us!

Happy Stamping! Hope your day is super sweet!
:) stacey