Pages

Showing posts with label butterflies. Show all posts

Friday, November 27, 2015

Frosty Papillon

Hello there crafty people! Britt Bass here from Pink Paper Crowns!

Today I'm bringing you a shimmery masterpiece featuring Sweet StampsStarflake Medallion stamp, Large Butterfly Accent Piccolo, and Embossing Powders and Enamels!

Let's get started!
First, I took the Starflake stamp and stamped it twice on my background, once on the top right and once on the bottom left, in versamark ink.  I used white detail embossing powder to heat emboss the images.  Next, I used several colors of glimmer mist and sprayed over the embossed stamped images to create the shimmery background color.


Next, I used the same stamp and stamped it onto periwinkle cardstock, heat embossed it with the same white embossing powder, and sprayed it with clear, shimmer glimmer mist.  I cut out the shape, leaving a bit of room around the edge and attached it to the background with foam adhesive. (See below how shimmery it is?!)


Lastly I took one of the Large Butterfly Accent Piccolos and covered it with Embossing Fluid and used the same white embossing powder all over the front.  After that layer had dried I used layers of Embossing Fluid and Aged Pink Piccolo Embossing Enamel on the edges of the butterfly to create the look the the butterfly had begun to build up frost on its wings!

Lastly, I attached a gem from my stash to the middle of the butterfly and it was done!

Thank you so much for spending a little of your holiday weekend with me!  Don't forget to visit the Sweet Stamps Store today!


Sunday, March 8, 2015

Easter Gift


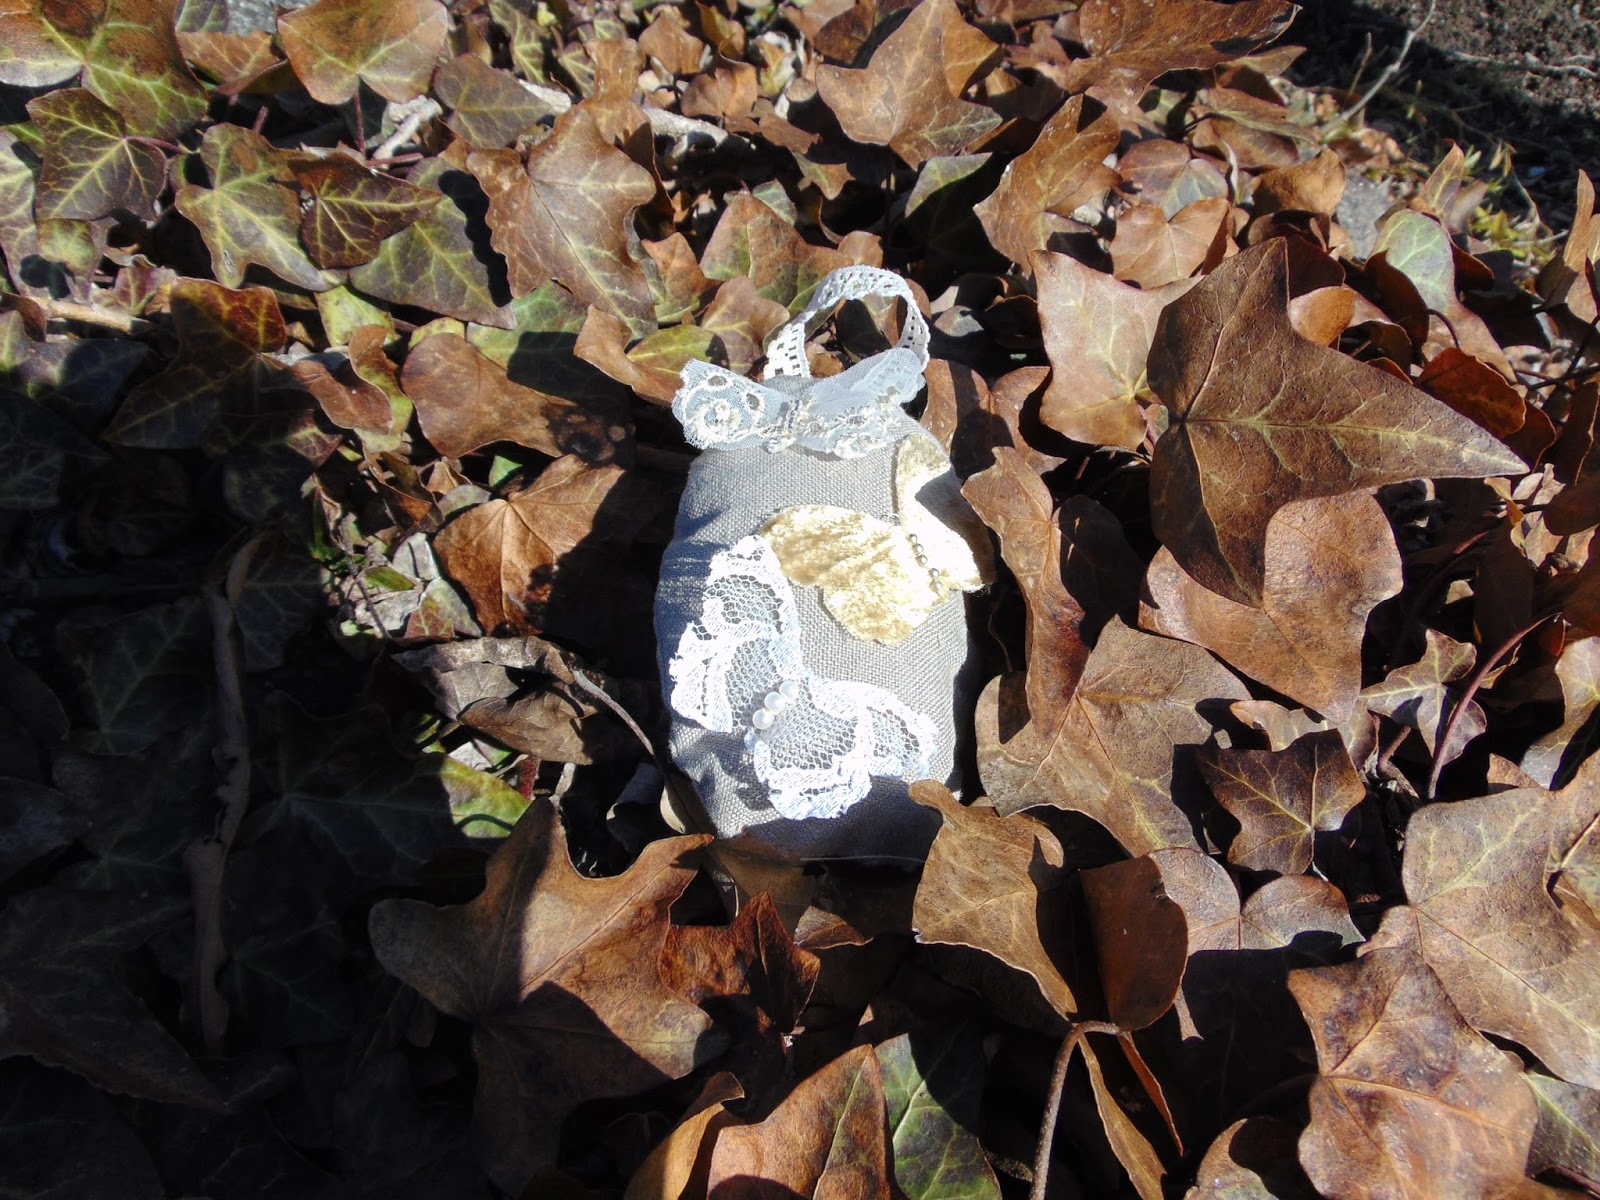
Spring is trying to arrive. Easter is coming and I've made a sweet little linen and lace egg ornament.

I am definitely a mixed media artist and I love the versatility of the SweetCut Dies.

To make this, I cut a pair of egg shapes from linen. Added a lace hanger and stuffed with fiberfill.

Next, I cut a trio of butterflies using the solid back piece of the Flutterby 2 die. One from lace, one from velvet, and one from sheer trim. Simply sew onto the ornament with beads for the bodies.

You can easily make a basketful in an afternoon.

Happy Sunday everyone.

Sunday, February 22, 2015

Spring.....


I love spring. I love Kraft paper.
 
I also love gift tags.
 
So here's my offering for this week.
 
I covered a tag base with a metallic swirl paper.
 
Then using my Flourish stamp set, I stamped and embossed with Java Sparkle Powder.
 
I also covered a Butterfly Charm with the powder. I used glue for this and treated the powder like glitter.
 
I then die cut three paper butterflies and three solid tulle bases for them using the Small Flutterby Die.
 
I stacked the tulle and die cuts and glued them in place, adding flat backed pearls. After these dried, I flexed the wings, giving them some dimension.
 
Tied on a bag, this is a beautiful accent tag.


Saturday, March 15, 2014

Colorful Butterfly ATC


I am in love with Globecraft & Piccolo’s Embossing Enamel.  The colors are amazingly vibrant, colorful and each one is blended by hand in the USA.  The color combinations are incredible! Trust me when I tell you the pictures cannot capture the true beauty of this powder.  
Plus, you get a huge amount of powder for your money!  In the photo below I used a bottle of Distress Paint to illustrate how large the containers of the Embossing Enamel are:
Lots of yummy color!
I recently got some new colors and I always want to use my new goodies as soon as I get them, so I decided to make an ATC (artist trading card).
What I used to make my Butterfly ATC:
Decorative Paper
ATC blank

The first thing I did was use the Mars Black 3D Enamel Gel on the frame.  I just used it right out of the bottle.  The funny thing is the black comes out looking like a dark gray.
But it turns to a shiny deep black once it dries.  I set my frame out overnight covered with an extra bubble I had so no cats, or cat hair would get into it. I love how these frames are the perfect size for ATC's!

Then I took my butterfly blank and used a paintbrush to paint where I wanted the Embossing Enamel to adhere.  I use a paint brush so often that I actually poured some of the Embossing Fluid out of the bottle into a small, air tight container so I wouldn’t have to keep popping the top off of the applicator.  I brushed the fluid onto the butterfly blank and shook some Deep Blue Sky enamel onto the blank and heated until done.  I only used one layer of Enamel and I still got this awesome result:
Then I edged the butterfly in Royal Sterling Enamel, again using my paintbrush and embossing fluid.  When you use the fluid with a paintbrush you don’t have to re-dip the brush each time you use it- the brush retains a good amount of the fluid.  For the body I used Ruby Red Slippers – the butterfly is SO sparkly, I tried to capture it but it is very difficult.
See that bubble on the body? Popped it with a toothpick - POOF!
For my ATC I used a piece of cardboard from a mailing box.  You can get a lot of ATC’s from one box and they are sturdier than using just paper.  After I covered my cardboard with the decorative paper (I used a handmade paper in navy blue with little silver sparkles in it) I glued my frame and then my butterfly in the center.

I love the look of the multiple embossing enamels and I think the frame sort of holds it all together.  I hope you are getting some warmer weather where you are; I’m keeping an eye out for the real butterflies!
Thank you for stopping by ~
Blessings!
Christi

Tuesday, February 18, 2014

Vintage style French Bubble Frame


Morning everyone, Tracy here. 

Have you been and checked out the new Spring release ? there is some fantastic items in the release, so if you haven't checked it out, then what you waiting for ! 

Onto what I have been creating this week. 

I have used one of the fab Bubble Frame kits, the one I have used is the new French Oval Kit, and it is beautiful ! 
I wanted to go with a vintage/shabby style with it...


What do you think ? I was really happy with how it turned out. 
On the actual frame I have painted it with Off white paint, and then used a Crackle glaze, once dry I used Distress stain, which i rubbed all over and then buffed off. 
The edges of the frame and French oval I rubbed some gold wax. 

Inside the Bubble I have used the new Stacey's stacking flowers, which are brilliant and so versatile ! I used Aged White Embossing Enamel & Copper Kettle Embossing Enamel on the flowers and trimmed them so they sat around the edge of the frame, I also "lifted" some of the petals to give some dimension to them.
I have also used one of the butterflies from the Butterfly Accents set and one of the flourishes from Medium Flourish Accents set, i embossed these using Bahama Aqua Embossing Enamel

Here is a closer look at the butterfly...
You can also see the crackle and the beautiful frame better in this picture. 

I hope you like what I have been creating this week, don't forget to check back everyday and see what the rest of the team have been creating, and why not head on over to our Facebook page and share what you have been creating too. 
Happy crafting. 

Monday, February 17, 2014

Hello Sunshine Mixed Media Sign


I love finding ways to repurpose something that is no longer needed as is. I found a Halloween sign in the clearance section of a fabric store for $.50 and decided it needed a Spring makeover...using items from our new Spring Release!

The new items that I'm using on today's mixed media sign:

3D Enamel Gel Daffodil Pearl
3D Enamel Gel Satin Rose (also a pearl gel!)
Butterfly & Flowers Accents A153
Stacey's Stacking Flowers LA106

Other supplies used:
Enamel Powder Adhesive Fluid
Distress Ink Vintage Photo
Fine Line Applicator Tip
3D Enamel Gel Mars Black
3D Enamel Gel Titanium White
Enamel Powder Aged White
Archival Ink Jet Black
Dylusions Ink Spray Bubblegum Pink, Lemon Zest, Vibrant Turquoise
heat gun
type stamp
sentiment stamp
oil pastels
gesso


Let's get started! Begin by applying 2-3 thin coats of gesso using an old plastic card. (I have found this to be The Best Way Ever for applying thin coats of paint and gesso!) Let each layer dry.

Spray with Dylusion Ink Sprays and then spray lightly with water to move and diffuse the ink. Use a heat gun to dry the ink as you go along. This helps to leave light texture and interesting patterns.

Once dry, use the Archival Ink and your type stamp and randomly tap the words onto your sign.


Isn't this new butterfly so pretty?! Using the fine line applicator tip and the 3D Gels (be sure to rinse the tip between colors or make sure to have a few more on hand) to color the butterfly wings and body. Let dry.

There are *4* different sizes of flowers in the Stacey's Stacking Flowers package (and you get a total of 24 flowers). These flowers are fabulous! They have detailing on the petals and *you can even bend them up to give them more dimension.


*I brushed on a thin coat of the 3D Gel in Titanium White to strengthen the petals. After they dried I held the flower by the center and gently pushed the petals up.

I used a smattering of Aged White Enamel on the petals, too.

Under the flowers and butterfly are scrap circles of white cardstock that are hand-torn. After gluing the circles down, I used various oil pastels to color the edges and traced over it with my finger to soften the color. Draw stems and trace over with your finger.


All that is left is to stamp your sentiment with the Archival Ink. Well, there you have it, my crafty friends - a beautiful Spring Mixed Media sign to brighten your day!

Be sure to visit daily to see more wonderful projects made using the new Spring Release!

Inky hugs,
Angi


Tuesday, January 21, 2014

Frame Card

Hiya all, Tracy here. 
I wanted to show you how beautiful the Piccolo Frames look when used on a card. 
Here is what I have created: 

And here is how I created it.

First of all here is all the items you will need-

Cardstock cut to 10x8" and folded in half for your card blank, and a Piece of watercolour card cut to 4x3"
Paper & Ribbon of your choice
Inkpad for Background & Stamping

Cut your card blank, and also make sure your piece of water colour card fits well behind the frame. 


Using blue Distress ink cover your Watercolour card, you want this too be patchy as represents the Sky. 


A good tip I use is to give a light spray of water over the top of the card, this helps "soften" the distress ink and makes it look more sky like. 


 Take your frame that comes with your Butterfly Flurry Flourishes Piccolo Set and give a nice layer of  Enamel & Embossing Powder Adhesive Fluid


Apply a nice thick layer of  Mermaid Tears Embossing Powder...I love how this picture shows all the beautiful colours in this powder. Tap off the excess & set with your heat tool. 


Take the butterflies from the Butterfly Flurry Flourishes Piccolo Set and emboss with Mermaid Tears Embossing Powder


Take the Tall Grassy Flowers Stamp and stamp up your card. 
I used Green Distress ink for this. 


Once stamped I then used Aged White Embossing Powder on the heads of the flower grass and sprainkled some across the bottom, heat set this from underneath your card. 
Glue your frame and butterflies to your watercolour card. 

Assemble your card using your paper, ribbon & frame.  Here is a closer look at the Flowers & Butterflies. 


Finishing touch is done using the brilliant Satin Silver 3D Enamel Gel , put 3 dots in the corner of your card. 

And here is the finished card again. I do hope you have enjoyed this little tutorial. 
Don't forget to head on over to Globecraft &Piccolo Facebook Page to share your creations, and pick up some inspiration. 

Sunday, January 19, 2014

Butterflies and Bubbles


Sandy here with you today.  When I started my Globecraft Piccolo project, I had in mind that I would make a 5 x 7 inch card.  But I liked the look of it so much, I decided to add it to a frame for display in my house.  I began my creation with the new A2 Bubble Background Piccolo, embossing it with Aged White Enamel.  The corner vine pieces are from a discontinued set but I spoke to the owner, Stacey, and she said we will be seeing them again in several sizes.  I embossed them with Shamrock Dreams Enamel


Next came the Large Butterfly;  using a paint brush, I applied Enamel Powder Adhesive Fluid so I could add Bahama Aqua Enamel to the top wings and Royal Sterling Enamel to the bottom wings.  I used Vintage Black Enamel for the body.    For the small butterflies from the Butterfly Charm Set, I first trimmed off the hangers with scissors and then embossed them with Vintage Copper Enamel.   Be sure to click on the pic above for a larger view of the beauty of these embossing powders.


Lastly, I added some Mars Black 3D Enamel Gel to the bodies of the small butterflies and as "eye spots" on the wings of the large butterfly.  The bookboard is flexible enough that I could mold the wings up a bit for some added dimension. Be sure to stop by each day for more inspiration from the Globecraft Piccolo Design team. 

Tuesday, September 10, 2013

Butterflies Challenge Winner

The winner of SweetStamps.com's Challenge #133 Butterflies is...
Congratulations!

Please contact me for your winning prize of a $20 shopping spree at shop.SweetStamps.com.

Thank you to everyone who joined in on the challenge, we hope you had fun and will join us again — we have a NEW technique challenge every month, along with a weekly challenge each Tuesday!


Happy stamping!

Wednesday, September 4, 2013

The Butterfly Effect


Intro
Hello sweet friends! I'm guest designer Michelle McClure and I'm super excited to be rubber stamping along side you all this month.


I reside in Temple City, CA which is a small suburb in Southern California with my hubby and two doggies. I taught elementary school for sixteen years and just love those third graders. I've naturally been scrapbooking most of my life, making my own Smash type books as a kid. I seriously started crafting when stamping was all the rage and later transitioned to official scrapbooking. Now I can combine my two passions of stamping and scrapping as I'll be sharing in today's project. 

The Layout
When I first heard that September's first challenge was about butterflies, I immediately imagined a rabble of them fluttering across a page. I thought that would be the perfect background for a layout. 


The Details
I wanted a soft color palette to match the butterfly theme so I chose to use My Mind's Eye's Follow Your Heart, Be Happy collection. Using the patterned paper as a guide, I picked 4 coordinating ink pad colors. I wanted an ombre effect, so I stamped from dark to light, and right to left going diagonal on my page using just one stamp, Bold Butterfly Medium. I drew a rectangle slightly smaller than the size of my photo mat so I'd know where to stamp and the lines will be covered by the mat later. 


I wanted the butterflies to be the star so I faded my photos prior to printing so most of the color would be in the stamping. To further emphasize the butterflies, I added some Stickles glitter to them. 


It made the plain cardstock look like expensive glitter embossed designer paper. 


Here is a look at the date and journaling cluster. The bit of the patterned paper peeking out from behind the photos is actually the color inspiration for the entire layout. 


I was thinking this sketch would look cute as a card, just scale everything smaller and replace the photo block with the sentiment. 


If you have a stamp that you love, try using it to make your own patterned paper. Then you can get the exact color and design that you need for any type of project. 


Thanks so much for flutterin' by,

Tuesday, September 3, 2013

Challenge #133 Butterflies

Happy Tuesday from Hamburg, New York! It's time for another challenge! The theme at SweetStamps.com this week is ...
Butterflies
We'd love to see your butterfly creation (ATCs, cards, tags, scrapbook pages, and altered art are welcome), so come and join the fun! You could win a $20 shopping spree for goodies at SweetStamps.com's online store by playing along in our challenge! Click here for our complete Challenge Rules.
 * * * * * * * * * * * * * * * * * *
Don't forget: our Monthly Technique Challenge {Masking Technique} runs through September 14th. Check out all the monthly challenges here.

Next week our theme is ATC (Artist Trading Card)! Happy Stamping! Have a super sweet week!