Showing posts with label Christina Colón. Show all posts
Thursday, April 25, 2013
Making a pretty little teapot
Good morning! Chrissy here to show you how to use your scrapbook paper to dress up the Teapot Bubble Frame.
For this project, I used Glitz Designs' "Cashmere Dame" paper collection and some May Arts bead strands.
First, trace the teapot layer with the oval cut out onto the paper. Then cut it out.
Next, glue your cutout onto the chipboard layer. Because I wanted to use some Metallic Gold Gel Enamel, I cut the paper off the loop at the top of the teapot.
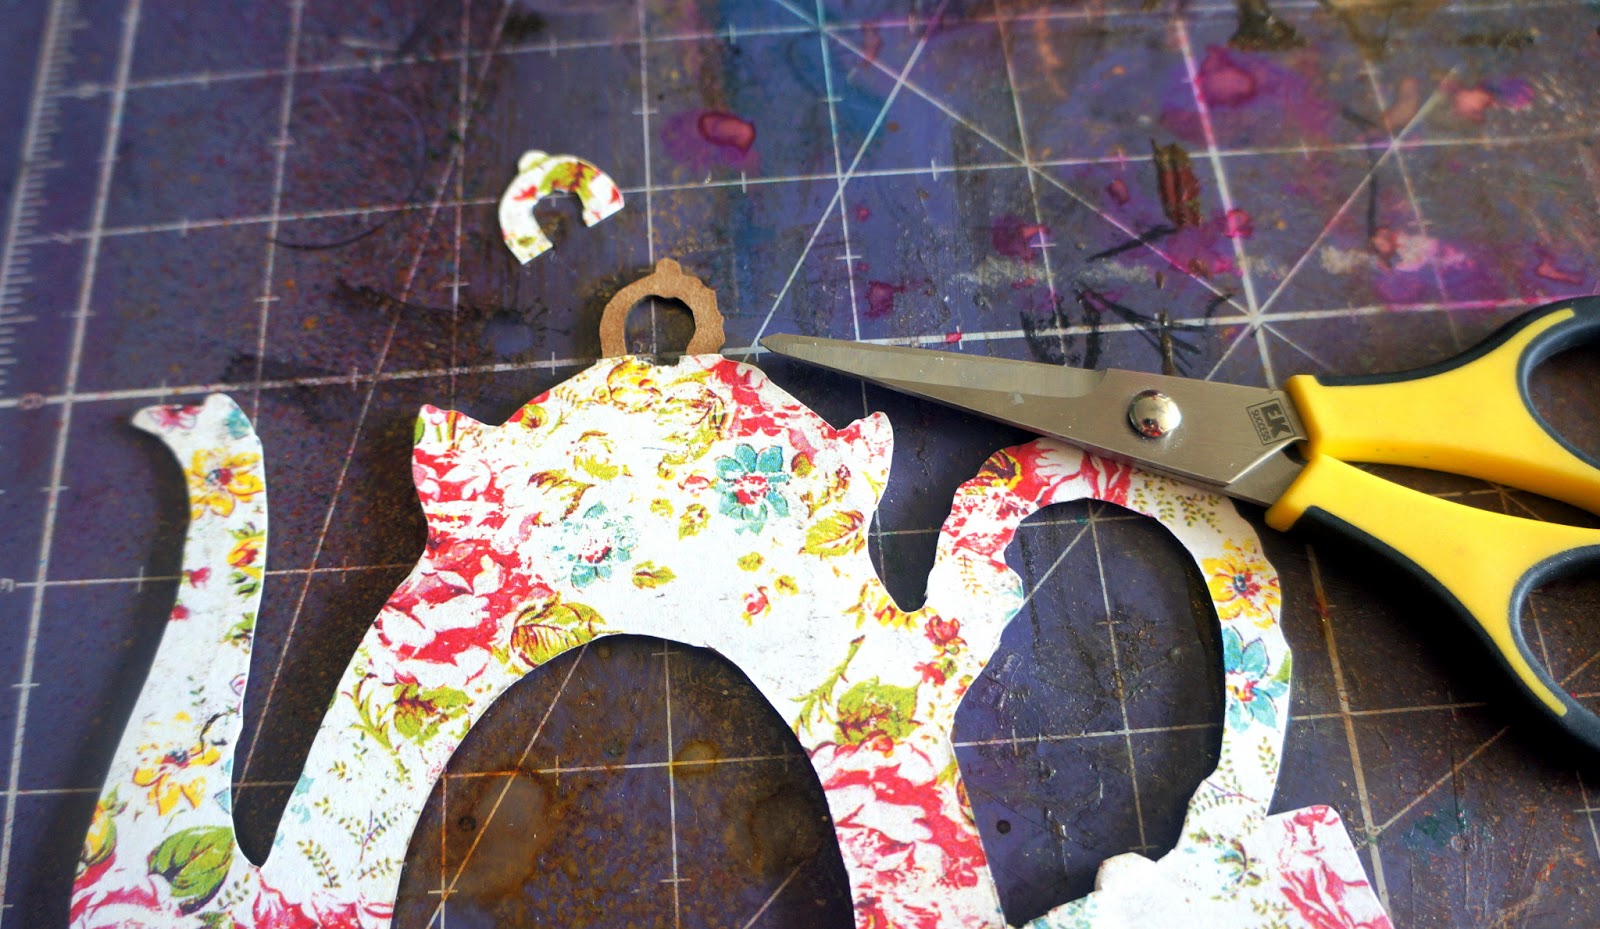
Now apply the gel enamel.
While the enamel is drying, it's time to start working on the teacup layers. Go ahead and trace them onto the pattern paper.
Once you have both of of your teacup layers traced and cut out, you can glue the paper onto the chipboard and then glue your layers together.
Now it's time for the fun part. Embellishing! For my teapot, I used some May Arts bead strands, gesso, punchinella, and a cameo. I busted out my trusty hot glue gun and started gluing down my bead strands.
Here's what it looks like with all of the beads applied.
I brushed some gesso onto the back layer of the teapot. Once it dried, I glued my punchinella down.
Now it's time to glue the top onto the bottom and apply the cameo.
And there you have it. For a quick tutorial on how to use something of this size as an embellishment, head over to my blog and check it out!
Cheers!
Thursday, March 14, 2013
Saving the Pieces....
....from other projects! Good morning crafters!
Chrissy here to share a quick tip on how to get the most bang for your buck. Remember that Steampunk Watch Ornament I showed you a couple weeks ago?
Well, I hope you saved that beautiful oval piece that you had to pop out of the frame because it makes the perfect little background for a little charm.
I saved the oval pop-out and made this little piece using it. I simply embossed it using my Sizzix Vintaj machine and added some embellishments.
Heat emboss a little Piccolo butterfly with some new Piccolo Turquoise Lagoon Embossing Powder for a bit of whimsy. Coat a couple Piccolo flourishes with some Piccolo Metallic Gold 3D Enamel Gel.
Add some small alphabet letters and a thin coat of Glastique to a resin flower and VOILA! You have a nice little charm to attach to a card or gift in no time flat. Not to mention, you cut down on your waste from a previous project!
Thanks for taking a look and remember to look at every piece with a creative eye!
![]() | |
Chirstina Colón The Twisted Muse |
Well, I hope you saved that beautiful oval piece that you had to pop out of the frame because it makes the perfect little background for a little charm.
I saved the oval pop-out and made this little piece using it. I simply embossed it using my Sizzix Vintaj machine and added some embellishments.
Heat emboss a little Piccolo butterfly with some new Piccolo Turquoise Lagoon Embossing Powder for a bit of whimsy. Coat a couple Piccolo flourishes with some Piccolo Metallic Gold 3D Enamel Gel.
Add some small alphabet letters and a thin coat of Glastique to a resin flower and VOILA! You have a nice little charm to attach to a card or gift in no time flat. Not to mention, you cut down on your waste from a previous project!
Thanks for taking a look and remember to look at every piece with a creative eye!
Thursday, February 21, 2013
Making a Stand-Up Card
Good morning crafters! Chrissy here to show you a neat little standing "card" you can make for the special honey in your life. You really don't need much and you can even dive into your stash and use up some paper you've been hoarding for the last year. Come on now. Don't lie. We already know you have some because we all hoard it too.
![]() | ||
Christina Colón The Twisted Muse |
- Globecraft Memories Fancy Bubble Frame
- Piccolo Accents Small Flourishes
- Piccolo Cranberry Wine Embossing Powder
- Piccolo Embossing Powder Adhesive
- Piccolo 3D Gel Enamel in Napthol Red
- Scrapbook Paper (I used Secret Crush by Pink Paislee.)
- Stickles
- Sequins
- Adhesive
- Heat Tool
Step 1: Heat emboss the decorative frame piece. As this cools and sets, use the 3D gel to add color to the small flourishes you wish to use.
Step 2: While the gel pieces are drying, cut your scrapbook paper to the appropriate size and shape of the individual pieces of the frame you wish to cover. I also attached the decorative frame as well as highlighted my image with my Stickles glue. You can also attach the bubble piece to its proper layer.
Step 3: Assemble the pieces of your frame.
Step 4: Add the back piece with the image. Don't forget to put the sequins in before you glue the back piece to the rest of the frame. Now is also the time to add your small flourishes.
Step 5: Sit back and admire before you give it to your honey!
You don't have to use lovey-dovey papers like I did on this project. The great thing with these frames is that you can use any motif you desire! Head over to my blog to check out how I used the ever-popular steampunk theme to dress up a bubbleframe watch!
Thanks for hangin' out with me today!
Sunday, February 10, 2013
Fun With Piccolo 3D Enamel Gels
Good morning! Chrissy here to show you how you can use Piccolo 3D Enamel Gels on different surfaces and incorporate into your papercrafting.
For my first example, I used it on a paper embellishment from Maya Road. This page is part of a mini album I am putting together for my sister. This shows how the brand new Satin Pearl gel adds a nice but subtle highlight to the kraft envelope.
This next example is how gorgeous the gel looks on wood veneer embellishments. I used the Honey Mustard gel on the sun frame. I just love that it finished nice and smooth with no need for a paint brush, just squeeze it direct from the bottle and there are no brush strokes!
For my final surface, I used the Napthol Red gel to color my piccolo accent.
The last example is part of a future blog post so you'll have to come back later in the month to see the finished project with a tutorial!
Share your 3D Enamel Gel projects with us on our G&P Facebook page. Check your local store for our G&P products or click the link below to shop online.
Monday, January 28, 2013
This steampunk airship is smokin' hot
Hello crafters! Chrissy here with some steampunk fun using G&P embossing powders and the G&P Classic Airship.
Here's the breakdown on how I put together my airship and the product I used.
- Embossing Powder Adhesive
- Piccolo Embossing Powders: Vintage Black, Copper Kettle & Gilded Rose
- Steampunk Airship Kit
- Glastique Finishing Glaze
- Vintage Gears Set
- Floral Whimsy Accents
- Halloween Graveyard Haunting Accents
![]() |
Christina Colón The Twisted Muse |
First, I embossed all of my little pieces.
While those were cooling off, I embossed the rest of my pieces and starting putting the main elements together.
Tip: Use a fine-tip paint brush to apply Piccolo Embossing Powder Adhesive onto the tinier pieces.
Start building and layering your elements. I used foam adhesive so that there was added dimension.
I like adding other Piccolo pieces for visual interest and to make my airship more unique. You may recognize the gears from my last post. Told you I had a project in mind for them!
I also used a small flourish as the 'smoke' and cut another flourish in half for the decoration on the hull of the ship, both from the Floral Whimsy Accents set. See that spiky 'Mohawk' on my ship? That is the fence from the Halloween Graveyard Haunting Piccolo Accents set!
And there you have it! You can use any G&P colors of embossing powders you like or you could even use paper, which will probably be my next idea.
For another steampunk tutorial, head over to The Twisted Muse and see how I made a piece of jewelry! Thanks for taking a look!
Tuesday, January 8, 2013
Tips & Tricks: Embossing Powders
Good morning! Chrissy here to show you how awesome our Piccolo Embossing Powders are. To showcase them, I chose the Steampunk Gears Piccolo Accents and some of the metallic embossing powders. You will also need the Piccolo Enamel Powder Adhesive. Without it, the embossing powders will not stick to the bookboard.
Another technique these powders allow you to use is layering. Yes! Layering! For the second gear, I used Vintage Silver as a base layer, leaving some gaps in the powder. I also love the way this looks on its own.
For the purposes of this technique, I did fill in the gaps with another color embossing powder. I used Mardi Gras and once again, did a total heat set. You can see how the Mardi Gras powder filled in the gaps as well as blended with the Vintage Silver to give it a more dynamic color.
For the first gear, I just used one embossing powder, Copper Kettle, and gave it a total heat set. You can already tell how dimensional the embossing powders are. There is always going to be texture as well as a sparkle to catch the light and your eye.
For the purposes of this technique, I did fill in the gaps with another color embossing powder. I used Mardi Gras and once again, did a total heat set. You can see how the Mardi Gras powder filled in the gaps as well as blended with the Vintage Silver to give it a more dynamic color.
You can experiment with color mixes as well as the heat set to achieve the look your project needs. Here is the completed set of gears with different color mixes as well as heat sets. These are some of the most dynamic embossing powders I have ever used.
Keep an out for a future project from using putting these gears and embossing powders to use! Thanks for taking a look!
Wednesday, December 19, 2012
Using the Fine Tip Applicator
![]() | |
Christina Colón The Twisted Muse |
![]() |
Fine Line Applicator Tip |
For example, I love decorating the Piccolo Snowflakes Accent for the winter time. However, it is very hard to do super small ones because of the really teeny tiny segments of the flake.
Just put the tip onto the bottle of enamel gel or even the Glastique and apply according to the directions.
Continue decorating snowflakes to your heart's desire!
Subscribe to:
Posts (Atom)