Pages

Showing posts with label Embossing Enamel. Show all posts

Monday, March 21, 2016

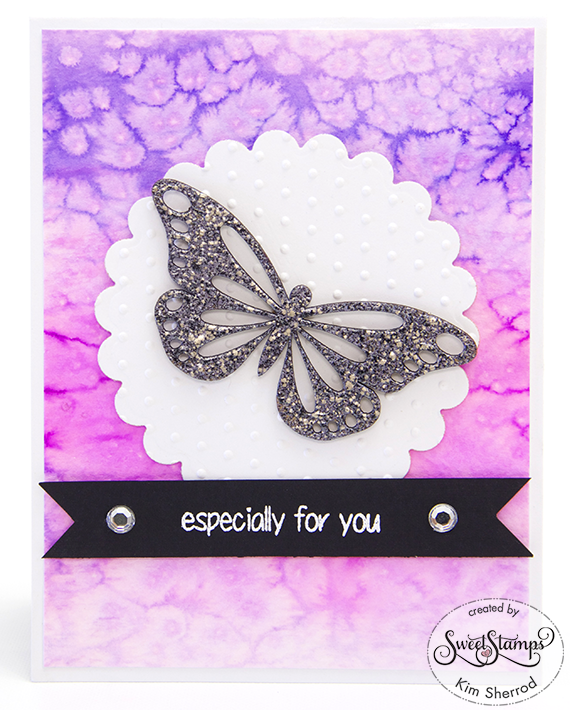
Especially For You

Hello Stampers! This is Kim her to share with you a fun watercolored card. I am using this beautiful butterfly piccolo shape from Sweet Stamps as my main focus for my card today. I used the enamel fluid to get the image wet then I sprinkled on a generous amount of the Vintage Black enamel powder.
The background was watercolored using various shades of pinks and purple Zig Clear Real Brush pens. I also added some coarse salt to the paper while it was drying to add some texture the the background. I die cut the circle and embossed it. The butterfly is adhered using 3D tape for dimension. I used the white fine detail embossing powder for the sentiment.

Friday, November 27, 2015

Frosty Papillon

Hello there crafty people! Britt Bass here from Pink Paper Crowns!

Today I'm bringing you a shimmery masterpiece featuring Sweet StampsStarflake Medallion stamp, Large Butterfly Accent Piccolo, and Embossing Powders and Enamels!

Let's get started!
First, I took the Starflake stamp and stamped it twice on my background, once on the top right and once on the bottom left, in versamark ink.  I used white detail embossing powder to heat emboss the images.  Next, I used several colors of glimmer mist and sprayed over the embossed stamped images to create the shimmery background color.


Next, I used the same stamp and stamped it onto periwinkle cardstock, heat embossed it with the same white embossing powder, and sprayed it with clear, shimmer glimmer mist.  I cut out the shape, leaving a bit of room around the edge and attached it to the background with foam adhesive. (See below how shimmery it is?!)


Lastly I took one of the Large Butterfly Accent Piccolos and covered it with Embossing Fluid and used the same white embossing powder all over the front.  After that layer had dried I used layers of Embossing Fluid and Aged Pink Piccolo Embossing Enamel on the edges of the butterfly to create the look the the butterfly had begun to build up frost on its wings!

Lastly, I attached a gem from my stash to the middle of the butterfly and it was done!

Thank you so much for spending a little of your holiday weekend with me!  Don't forget to visit the Sweet Stamps Store today!


Friday, May 1, 2015

Wave Catchers Layout

Hello!  Happy Friday!!!  It's Lisa here with you all, and I'm excited to share today's project.  In keeping with this weeks challenge theme of anything but a card I have a layout to share with all of you today.  This layout incorporates lots of stencils and stamps in various ways, and let's not forget the cute piccolo accents too...


Supplies Used:


Now on this layout I have used stencils in three different ways... spraying ( tag and background ), embossing ( blue splash background ), inking ( yellow and orange background ).  Stencils are some of the most fun and versatile tools out there, and SweetStamps.com has quite the selection!  In the last photo I tried to take my photo on an angle so you could see the gorgeous shine of the blue embossed background.  To create the embossed stencil look I began by taping my stencil to cardstock with washi tape.  I then pressed my versamark ink pad into the stencil until the whole thing was covered.  Next I removed the stencil, added the embossing powder and heat set it.  I love this look and the texture.

I also used stamps in two different ways on this layout.  If you look in the upper left corner you will see I made a corner border by stamping the word summer repeatedly.  Then in the lower right corner you will see where I stamped "surfs up" repeatedly without re-inking.

Finally, you will see that I embossed two beach themed piccolo accents that are the perfect embellishments for this fun mixed media layout.

Thanks so much for stopping by and Happy Crafting!
Lisa

Friday, February 13, 2015

Love layout

Hi!  Happy Friday!!! It's Lisa here with a fun layout that uses some of the great Piccolo and Globecraft accents, and since it is almost Valentine's Day I had to do something all about love...


Supplies:


I love dressing up the accents with various embossing enamels!  For my title I also sealed it with Glastique in gloss for a nice shine.  Now technically my card wouldn't fit in the current challenge, since I have lots of little spots of colors, but I hope to see you join us in our Pink, White and one more color...

Happy Crafting!
Lisa

Friday, January 23, 2015

I Love...

this new stamp! Hi!  Lisa here today and Happy Friday!  I'm playing along with the newest challenge here on the blog: Hearts...


This beautiful and intricate heart stamp is from one of the SweetStamps.com Clear Stamp Sets: Spring Time Doodles.  I started by die cutting my decorative circle and "smooshing" it in distress ink that I had watered down on my craft mat.  Next I stamped and heat embossed the heart image.  I tied some ribbon behind it and adhered it to some patterned paper.  I then added a large doily behind it for a little more texture and romantic feel.  Finally I stamped the sentiment in the right hand lower corner and added some pearls/rhinestones.

Supplies Used:


Thank you so much for stopping by and I can't wait to see what you make for our challenge!!!
Happy Crafting!
Lisa

Friday, December 5, 2014

Quick and Simple Christmas Ornament

Hello!  Lisa here today with a quick and easy Christmas Ornament that could also double as a gift tag!  As the Holidays are upon us we often find ourselves busy, spread out, and trying to squeeze in some last minute projects, so this will be something you can make in a matter of minutes as well as mass duplicate and still have fun...


Supplies Used:


To create this ornament I started with the base tree (plain tree piccolo accent) and embossed it in Mossy Glen Enamel Powder.  I repeated this step for extra coverage.  I then took the Lattice Christmas tree and embossed this in Victorian Bronze.  I adhered the two together using Glastique in gloss finish.  A tip when doing this to make sure the adhesion is tight use something with a little bit of weight to lay ontop of them for at least 5 minutes.  You can then adhere rhinestones, glitter or whatever you would like.  To add ribbon I simply punch a hole through the plain tree accent and tied my elastic cord through here.

Hope this has you inspired to look at your accents in new ways!  PS - Don't forget to join us in our Christmas Spirit Challenge!  All products are welcome, but we love to see you use our SS and Piccolo Products so you will earn an extra entry if you do!

Happy Crafting!
Lisa

Friday, September 26, 2014

Halloween Pumpkins Altered Frame

Today I have a fun Halloween altered frame project. Need a bit of fall decor? This cute frame comes together in less than an hour...including dry time!


To make this frame, you'll need a few items from the G&P store:
Embossing Enamel Powder: Mossy Glen
Tim Holtz Distress Ink: Mustard Seed

Other supplies:
misc. frame (this would be so cool in a Bubble Frame, too! Tune in next week - I actually use one!)
scrap of patterned paper
scrap of fuzzy fibers

Your first step: color the Accent pieces with the 3D gels. *Let dry.

*To add texture to the 'enameled' pieces: let dry until the pieces are tacky. Using a scrap piece of paper, gently dab the semi-wet surface, pulling off small amounts of the gel. Repeat until you like the texture. Let dry.

Using your finger (or a paintbrush) apply the Satin Gold 3D Gel to the raised parts of the frame. LOVE this subtle gilded look!


These carved pumpkins have hilarious faces! They would be even funnier with googley eyes!

When the frame and all of the pieces are dry, lay the house on the scrap piece, trace under the house. Ink up the area and emboss with Mossy Glen. 


Using a foam blender, add the moon using Mustard Seed. Attach all of the Accents and fiber using the Glastique.

That's it! 

Is it too early to start on Christmas cards?

Inky hugs,
Angi

Friday, September 19, 2014

Be Your Own Kind of Beautiful Faux Watercolor


 Welcome to the weekend! Are you looking forward to getting your crafty on?!


Today I have a mixed media card using embossing enamels and inks that results in fun and color!

To make this card, you will need a few items from the G&P shop:
Enamel Powder Adhesive Fluid
Embossing Enamel Powders: Girls Night Out, Micro Gold, Vintage Silver
Art Stencil Fancy Flowers AS46003
Tim Holtz Distress Inks: Picked Raspberry, Salty Ocean, Seedless Preserves, Shabby Shutters, Spiced Marmalade, Squeezed Lemonade

favorite stencil
spray bottle with water
stamps: Stampin' Up! Four Feathers and dies
sentiment stamp: 7Gypsies by Hampton Arts
watercolor paper
scraps of white cardstock and vellum cardstock
Tim Holtz Tiny Stapler

Let's get started!

If your stencil has a backside, flip it so the backside is facing up. (This is really important if you have numbers or letters that need to go a certain way.)

Dab the Distress Inks directly onto the stencil. I find it's better to start with the light colors, moving up to the darker ones. No rush here.

When you like the distribution of color, spritz with water, flip over onto the watercolor paper. Use a couple of napkins or a papertowel to press and dab the stencil. This prevents the water from pooling into open areas of your stencil.


This technique has varying results depending upon the amount of water you use. Do you want muted or defined?

I am so in love with feathers on cards!


Stamp your sentiment on the vellum and use the top photo for placement of the rest of the elements.

That's it!

What will you make this weekend?

Inky hugs,
Angi

Friday, September 12, 2014

Halloween "Believe" Pendant & Earrings

T.G.I.F. (Thank Goodness It's Fun day!)

The holiday season is coming up fast...before you know it Halloween will be here and we will be working our way through to Christmas and New Year's! 


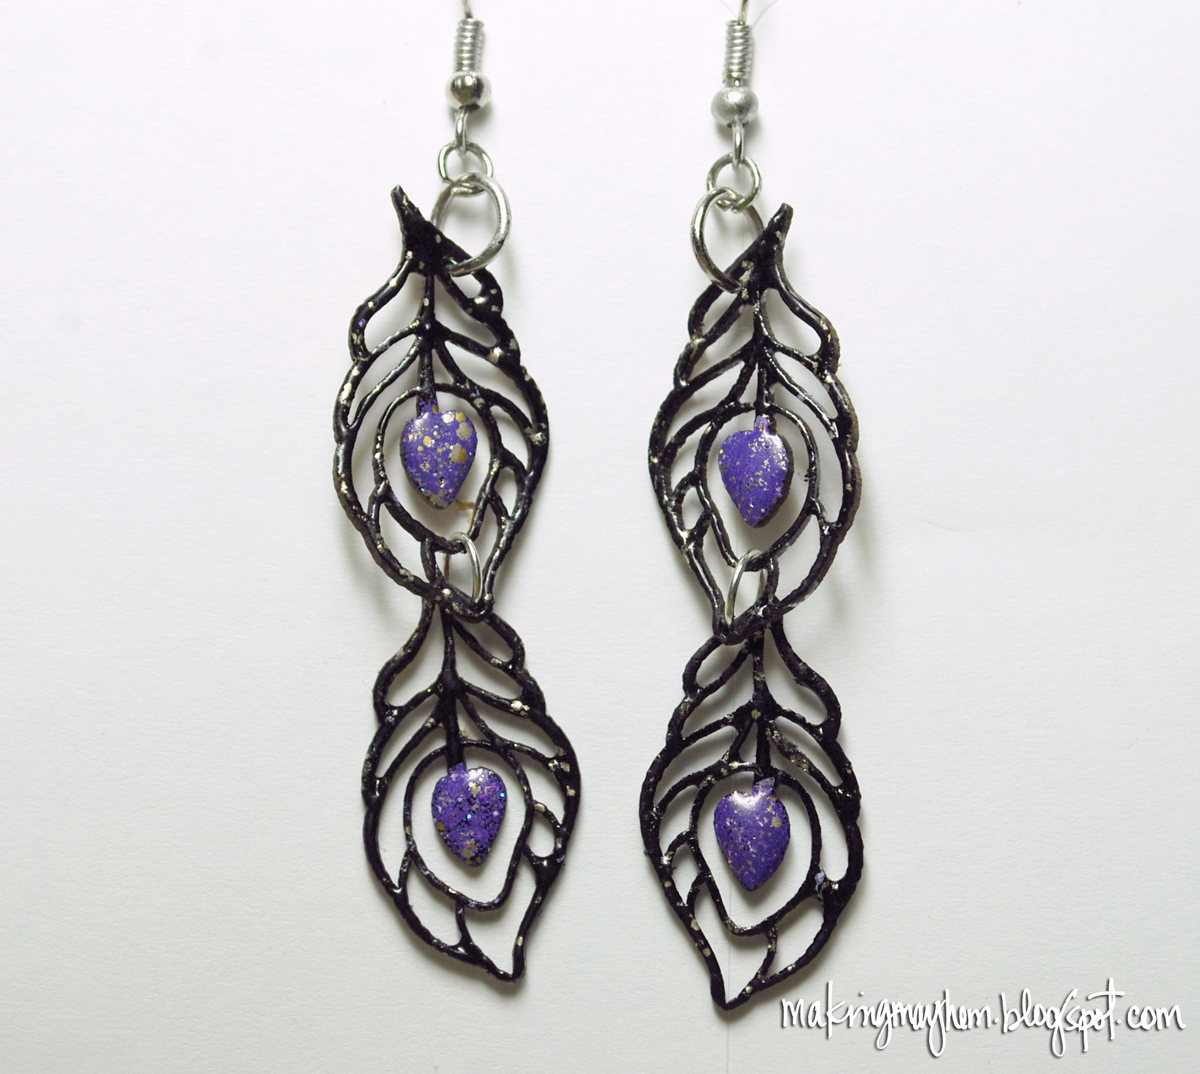
Today I have a FUN jewelry set using a package of Piccolo Accents and a few Embossing Enamel Powders.

To make the earrings and pendant, you will need a few items from the G&P shop:
enamel Powder Adhesive Fluid
3D Enamel Gel: Mars Black
Glastique, Gloss

scrap of paper, copy/patterned/plain - your choice


The key to this project is to be patient when building the layers. You don't want finger prints or peaks in your melted enamels!

Begin by covering the peacock feathers with the Starry Sky. When cool, use a small paintbrush to to coat just the 'eye' portion of the feather. Using a small scoop (slushee straws work great for this!) add the Royal Sterling just to the middle. When cool, attach earring hoops and rings to connect the feathers.


The pendant was made by building several layers of Starry Sky (I did 3 layers.) Now add the Royal Sterling randomly, covering a majority of the circle. Don't worry if the Royal Sterling seems too solid after it melts. Just stick with me! Do NOT clip off the hanging circle, yet. It comes in handy as a handle when you are melting the powders and adding things. Clip it AFTER you are finished with the enamel powders. You're welcome.

When you add the Ultra Thick Clear, the magic starts...it will start to move the other colors around as you heat the powders. Keep repeating the layers until you are happy with the results.

When you are finished, write (or stamp) the sentiment on sticker paper, scrap of patterned paper, copy paper...whatever you prefer. Heat up the pendant and when it's warm, use the side of the tip of the tweezers to very gently push the sentiment into the melted enamel.  I LOVE how the paper turned transulcent.

Just for fun I used the Mars Black on the tiny bat (click on the picture for a better look!)

Thanks for stopping by today! Be sure to follow and 'like' the G&P Facebook page to stay up to date with new releases and design team inspiration!