Pages

Showing posts with label Juliet Arrighi. Show all posts

Thursday, September 26, 2013

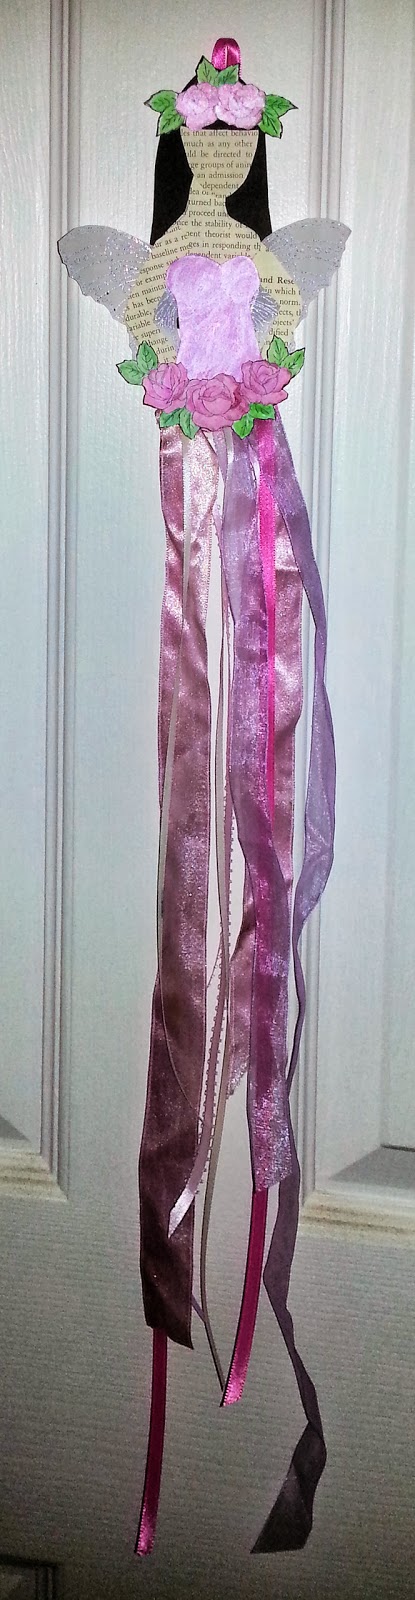
Rose ribbon doll by Juliet Arrighi, guest designer

The Rose Surround is one of my first SweetStamps purchases - I love how it is perfectly designed to accent a curved focal area, and it is a great way to add a floral touch without bulky embellishments.  However, I was admiring a set of Dia de los Muertos dolls with floral garlands in their hair, and I wondered if the gentle arch of my Rose Surround would work that way.  I decided I wanted a fairy instead of a skeleton, though:
 I drew the patterns for the doll, dress, and hair myself.  If you think you can't draw, I will tell you a secret - even professional artists don't expect to get it right the first time.  They draw something over and over, with their erasers in their other hand, constantly tweaking until it looks the way they wish. also, you don't have to get the whole thing right - I drew the torso, head, and arms separately.  I went through a lot of sketches before I got the shape that I wanted.  once I had a pattern, I cut the parts from an old book page and glued it all together.

I started out coloring the roses with Tombow markers and a blender pen, but then I didn't have a pink cardstock to match for the dress, so I ended up painting the dress and then painting the roses to match.  I used a shimmery pearlized paint for shine.  The wings are actually from the Dot Butterfly, stamped on vellum and embossed with lavender tinsel embossing powder.  Along with the shimmery paint and ribbons, this fairy practically glows!

I added a ribbon on the top of the head for hanging, but I found that a glue dot worked fine for mounting the doll on a door.

I have a friend who will just love her - and she will  fit flat into an envelope to send!

It has been so much fun sharing the ways I use SweetStamps with you this month.  I hope I have inspired you to try something new!

Juliet Arrighi

Sunday, September 22, 2013

Paper Piecing by Juliet Arrighi, Guest Designer

I love doing snow scenes on my winter holiday cards, but the problem with snow on a card is that it is white.  You either have to spend forever coloring a background, or you have to paper piece.  I do a lot of paper piecing.
You might think that I used a stamp positioner to get the sentiment just right on the blue paper and the white paper, but I used a much easier technique - I used a larger piece of white than I needed, and once I lined the words up, I cut off the excess.The sentiment is embossed in white on the blue, and in denim blue on the white, so it looks really crisp.  I love the selection of vertical sentiments at SweetStamps - you really can't find them like this anywhere else.

I have a lot of snowman stamps, but I had to have this Stitched Button Snowman because of his country craft look and because it is an easy shape to cut out.  Take a closer look at the holly berries - they are made with the same buttons that are on the snowman!  They fit perfectly in a quarter inch punch.  I put Diamond Glaze on all the buttons for a little extra shine and dimension. This was so much fun to make!

Juliet Arrighi

Thursday, September 19, 2013

Western Accordion Card by Juliet Arrighi, Guest Designer

I love the details of the western style - gingham and calico, leather and demin, silver conchos and turquoise jewelry.  I tried to put a number of those elements in this western style card.
By embossing the Horse Silhouette Oval with silver embossing powder on silver metallic cardstock, I was able to simulate the look of a concho.  The sentiment is embossed on the "belly band" that holds the card flat.  I wanted a bit of bandanna technique paper to show, but I couldn't find a white gel pen that was still working (what is it with those white gel pens?), so I reversed the technique, stamping (Wedding Roses Silhoutte) in white and highlighting in black.  You can see a corner of the writing panel on the inside.

Thanks for looking!

Juliet Arrighi

Thursday, September 12, 2013

ATC by Juliet Arrighi, guest designer

Hello again!  I love swapping ATCs - I must have thousands of them - and I'm always looking for some new way to create them.  For this ATC, I'm using the Flower Oval SweetCuts Die, which I wanted to use for glitter techniques as soon as I saw it.  The lines are so thin, but they cut so cleanly!  Here is a scan of the finished ATC - I am happy to tell you how I made it.

I started with the background - really, I gathered a bunch of paper scraps that were on my desk and pieced them onto a scrap of copy paper for a colorblocked effect.  I cut a perfect hole for the SweetCuts flower oval with one of the Little Stackers oval dies - it is exactly the right size, and I can save the oval for another project (I don't waste much!)
 Here you can see both of the dies, and how they cut.  The die is just under two inches wide, so I was able to use clear packing tape for the next part.
Here I flipped the background and the oval flower diecut and nested them, and covered the hole with clear packing tape. (you can see that this was literally a recycled scrap - the lines and numbers on the paper don't mean anything to this project)  At this point, I really pressed hard to make sure it was all well adhered.  The reason I'm working on a craft sheet is that the tape will not stick permanently to it.
Flipping it right side up, I  filled all the holes in the diecut with iridescent transparent glitter.  It would be beautiful with just the glitter, but I want color too!

 Now, working from the back, on the smooth clear plastic of the packing tape, I colored in the flowers with permanent markers.  This is one of the few times that a Bic or Sharpie is better for coloring than a Copic.  I left the background white for contrast, but a color would have been nice, too.

After I colored the flowers, I put some white paper behind the hole, then trimmed and layered it to ATC size.  I couldn't resist adding a little embellishment!

 I hope you will try making ATCs - it is a great way to showcase your papercrafting without using up a lot of materials.

Juliet Arrighi

Thursday, September 5, 2013

Butterfly by Juliet Arrighi, guest designer

Shana Tova (Happy New Year)!  My name is Juliet Arrighi, and I will be joining the SweetStamps team this September as a guest designer.
 I live just outside of Washington DC and have an extremely forgiving husband and 4 children, 3 of which have thankfully grown up and moved out.  I have replaced them with cats. You can see more of my work on my blog.  I used to be very resistant to the whole idea of rubber stamping - why would I put someone else's images in my work?  Then I came to see a rubber stamp as being more like a brush with a very specific shape, that I could use in techniques that don't lend themselves well to hand drawing. I've been hooked on stamps and stamp techniques for about 11 years now.

 My Rosh Hashanah cards traditionally feature apples and honey, but Rosh Hashanah is also a time to try things that are new, so I tried two new things with this card.


 First of all, this butterfly is a new stamp for me. Although I have a lot of butterfly stamps, I had to have this one for three reasons - first, the design is so ornate that not only is it fun to color, it looks great without any coloring. Second, the antennae are outlined so you can color them if you like. Third, it is really easy to cut out (especially the antennae)!  I heat embossed the butterfly on vintage silver lustre cardstock for shimmer, and colored it with Tombow markers.

The second new thing for me is the design - this is a rocker card, the first I've made.  I started with a 3 1/2 by 5 1/2 base; I drew the curve using a dinner plate, and tapered the sides on the radii.  If you look closely, you can see I used the same butterfly with pale purple ink on the background - it gives a feeling of movement.  Speaking of movement, it was hard taking this photo in my backyard, because every time the wind blew, the card started rocking!  You'll notice I stamped the envelope, too - this card fits perfectly in a normal invitation envelope.

I'd also like to point out the sentiment - I can't think of anything scarier than handwriting a sentiment on a card! Jewish sentiments are so hard to find.  Glitter pens don't often show well, so I first wrote it with marker, then colored over it with glitter pen.  I think that making this card was a great way to start the new year!

Juliet Arrighi