Pages

Showing posts with label Arin Flynn. Show all posts

Friday, July 19, 2013

Tick-Tock pretty and dainty clock


It is Arin here and I have a timely project for you where I pulled out all the stops while using Globecraft and Piccolo's 3-D Enamel Gel and Piccolo Instant UV Resin. Nothing adds to a room than an personal themed clock and this clock just oozes the sweet daintiness of a little girl's love for horses. 


Arin Flynn
A Piece of Life's Pie

Materials Needed:


Step 1: Clock Base - First trace clock base onto the backside of desired designer paper and cut. Using Glastique Matte, apply to both the base and the backside of paper with a foam brush. Align, apply pressure to set and allow to dry. Once dry, ink edges and sand down to distress.  Punch hole through the middle.


Step 2: Apply 3-D Enamel Gel to Embellishments - Using Piccolo 3-D Gel Enamels, apply to wooden and Globlecraft and Piccolo embellishments.  When applying more than one color of 3-D Enamel Gels, allow each color to set and dry before applying a new color for best results. Once all complete, set aside to set and dry.


Step 3: Applying Instant UV Resin to Handcrafted Embellishments - Using a 1 inch circle punch, punch out a circle and add boarder (this boarder is from Samantha Walker Giddy Up scrapbooking Element Sticker Kit).  Apply the Instant UV Resin under artificial light and THEN set in direct sunshine/UV lamp for about 30-90 seconds.  Add sticker and repeat the process of applying and setting the Instant UV Resin.

Stickers can easily be made into a durable and attractive embellishment by securing to a piece of parchment paper and adding Piccolo Instant UV Resin in artificial light and THEN setting in direct sunlight for 30-90 seconds.  Once set and dry, they easily pop off the parchment paper ready to be added to the project. 


Step 4: - Using a Bezel Charm as a Base: - In the need of a solid base for the ribbon embellishment, use the Globecraft and Piccolo Circle Bezel Charm. Add the self adhesive ribbon sticker to the bezel and then tie double bows with crinkle ribbon to the top ring of the bezel.  Apply hot glue to the wooden doily and secure bezel to it.


Step 5: Final Assembly of Clock - With a hot glue gun set at low, add the cloth doily to the center of the clock.  Then begin to attach the wooden doilies with the first layer being secured with hot glue, then the second doily added by securing with Pop Dots for added height.  Then secure the ribbon layered doily with Pop Dots. Add the pre-made resin flower stickers and peal gems. Secure the clock motor and hands and hang!


Making creative and special crafts can be very easy with a little added help of all the stunning and vibrant colors of Globecraft and Piccolo's 3-D Enamel Gels and having Piccolo's Instant UV Resin at your finger tips.  Both products are easy and practical to work with and the possibilities of what you can do with them are endless. Head over to their online store and check out all colors and creative possibilities!  To see more of what I have been cooking up with Globecraft and Piccolo products, pop over to my blog!

Friday, July 5, 2013

Adding a touch of summer sunshine


Hi all, Arin here and I have a piece of wearable art that has a great vintage flair to it! With it being summer, I love to dress up my very plain and dull wardrobe with the bright colors of summer and adding a piece like this around my neck just begs for a sunny compliment while in line at the store. The best part of this piece is that is not difficult to make!


Arin Flynn
A Piece of Life's Pie
Materials Needed:
Step 1: Bezel Tag prep -Apply Piccolo 3-D Enamel Gel to the tag to the front and allow to dry (about 30 minutes) and then turn over repeat. 


Step 2: Apply 3-D Enamel Gel - Apply Piccolo Enamel Gel in a simple pattern, one color at a time. Set aside to set and dry.


Step 3: Cut out vintage circle shape - Using a 1 inch punch, pick a fun vintage design and punch out the image. 


Step 4: Apply Glastique Gloss - Apply Glastique to the back of the frame and secure to the yellow base to frame the cutout, framing the cutout that has been glued down using Glastique. Apply Glastique to entire surface front and back. Set aside to dry. 


Step 5: Apply UV Instant UV Resin - While inside, away from a window, apply UV Instant Resin to the inner cavity of the wearable art piece covering the cutout. Expose project to direct sunlight or UV light lamp for 90 seconds and allow to cure and harden. I cured this in direct sunshine and it cured within 60 seconds.


Step 6: Adding silver bail - Using the Piccolo silver bail, secure it to the top of the bezel tag, run a chain through it and wear! 


Making fun and fashionable wearable art is not as hard as you may think, and having Globecraft & Piccolo products to help get the job done is the perfect assistant! Head over to their online store and check it out! To see more of my project using this amazing product, head over to my blog, www.apieceoflifespie.com

Friday, June 21, 2013

Simplify with Piccolo Embossing Powder


Hello, it's Arin here and I have to say Globecraft & Piccolo Embossing Powders have breathed new life in my interest in scrapbooking!  

Yes, I have admitted that I am not a fan of scrapping, but being able to add layers of interest and depth without a whole lot of embellishments and pre-planning the layout, is right up my alley! 

I challenged myself to do a real layout with only using what I had in my supply stash and the Piccolo Embossing Powder. I feel I have myself a layout that looks interesting and tells a story that was quick and easy to throw together, yet the high quality of the Piccolo Embossing Powder really carries this beyond the simplicity of this layout! 

Materials Needed:
Arin Flynn
A Piece of Life's Pie
  • Globecraft & Piccolo Embossing Powder Adhesive
  • Globecraft & Piccolo Micro White Embossing Powder
  • Globecraft & Piccolo Bahama Aqua Embossing Powder
  • Globecraft & Piccolo Siam Silver Embossing Powder
  • Globecraft & Piccolo Poodle Skirt Embossing Powder
  • Globecraft & Piccolo - Royal Sterling Embossing Powder
  • Recollections Washi Tape
  • Lawn Fawn Clear Stamps - Critters Ever After
  • Clear acrylic stamp block
  • Die Cuts with A View - All About Girls 4.5x6.5 cardstock
  • Crate Paper- Little Bo Peep 12x12 sheet
  • Dauber
  • Close to My Heart Stamp Ink - Cotton Candy (for the inking on cardstock)
  • Scotch ATG
  • Heat Gun
  • Silhouette Cameo
  • Color Pinter
  • Recollection white cardstock
  •  
Step One: Embossing Printed Pictures - Once pictures are printed out on a color printer and hand cut or cut with a Silhouette Cameo (smooth white cardstock was used), apply Piccolo Embossing Adhesive around the border of each picture and dust with Piccolo Embossing Powder.  Remove excess and set with heat gun.


Step Two: Embossing edges of cardstock layer - Applying the same method above, apply Piccolo Embossing Adhesive around the border of and dust with Piccolo Embossing Powder.  Remove excess and set with heat gun. This provides a great framing element to each of the pictures. 


Step Three: Embossing with stamp images - Applying Piccolo Embossing Adhesive to clear stamps, stamp onto desired surface and dust with Piccolo Embossing Powder. Remove excess and set with heat gun.  This was done onto the base of the layout at well as an inked edge scrap piece of paper for the sentiment. 


Step Four: Assembly and adding final touches - All layers were attached to the base of the layout with ATG and washi tape was added for a final touch. 


Creating keepsake layouts can be overwhelming at times when you feel like you have to add all but the kitchen sink to make them feel unique and personal.  Using the magic of Piccolo Embossing Powder and a few quick and simple techniques, you can succeed in creating special layouts without a whole lot of fuss! 

To see all the fun I have been having with Globecraft & Piccolo products, head over to my blog

Friday, June 7, 2013

Daddy's Girls - embossed canvas


Hi all, it is Arin here and I have a huge confession to make . . . I am not a big fan of scrapbooking. I love looking at other crafter's layouts, but I just can't stay on top of it and then I am overwhelmed and it all just sits in a tote in the back of my craft room closet collecting mounds of dust. Thankfully, I have found a happy medium where I can capture memories as a scrapbooker, but have it also serve as home decor (which is my first crafty love)! This fun canvas wall hanging is a great way to capture keepsake moments and have them be timeless story just as a layout in a scrapbook. 

Materials Needed:
  • Globecraft & Piccolo - Embossing Powder Adhesive
  • Globecraft & Piccolo Vintage Copper Embossing Powder
  • Globecraft & Piccolo Real Rust Embossing Powder
  • Globecraft & Piccolo Gilded Rose Gold Embossing Powder
  • Globecraft & Piccolo Deep Blue Embossing Powder
  • Globecraft & Piccolo - Glastique Finishing Glaze Matte
  • Globecraft & Piccolo - Soft Grip Tweezers
  • Globecraft & Piccolo Steampunk Gears & Wind Up Key Chipboard Pieces
  • Hemptique - Hemp Cord
  • Artist's Loft 9x12 inch canvas
  • Americana Buttermilk craft paint
  • Craft Smart Golden Brown craft paint
  • Daubers/foam brushes/foam pieces
  • Close to My Heart Stamp Ink (Chocolate and White Daisy)
  • Pick Your Plum - Rubber Stamps (Chevron/Quarterfoil)
  • Heidi Swapp Color Shine -Mustard
  • Scotch ATG
  • Heat Gun
  • Paper: Glitz - 6x6 Cashmere Dame and MME 6x6 Bright
  • Paper Towel
  • Popsicle stick 

Step 1: Prep canvas base - Prep the canvas by applying a thin layer of buttermilk craft paint, allow to dry, dab golden brown craft paint, distress with a paper towel and then using a dauber ink canvas with white stamp ink. 


Step 2: Stamping and embossing onto canvas - Apply Piccolo Enamel/Embossing Powder Adhesive to the rubber stamps and stamp directly to the canvas.  Dust with Piccolo Gilded Rose Gold Embossing Powder and Piccolo Deep Blue Embossing Powder, remove excess and set with heat. Please note that this stamps  and embosses on canvas in a more "distressed" manner.


Step 3:  Making designer paper embellishments with stamping and embossing - Using the same crafting tools and Piccolo Embossing Powders and technique stamp and emboss images onto designer paper. 


Rip and ink edges of paper.  Using a 6x6 coordinating paper, rip and distress. 


Step 4: Embossing Piccolo Steampunk Gears & Wind Up Key chipboard pieces - Apply Piccolo Embossing Powder Adhesive to chipboard pieces and dust with Piccolo Embossing Powder, remove excess and set with heat using Soft Grip Tweezers.


Step 5: Embossing frame from Steampunk Gears & Wind Up Key chipboard set - Apply Piccolo Embossing Powder Adhesive to chipboard pieces and dust with Piccolo Deep Blue Embossing Powder, remove excess and set with heat.


Step 6 (optional - use of photos or print and hand cutting photos can be another option) - Cutting and prep of memory photos - Using a Silhouette Cameo, print and cut photos to desired size and ink edges.


Step 6 (optional - use any sentiment or print and hand cut sentiment): Cutting and prep of sentiment for embossed chipboard frame - Using a Silhouette Cameo, print and cut sentiment to desired size needed to fit the chipboard frame.  Lightly spray one coat of Heidi Swapp Color Shine to add a distressed feel to the sentiment. Attach sentiment to the back of the chipboard frame with an ATG.  


Step 7: Applying paper and photos to the canvas base - Using Glastique Finishing Glaze Matte, apply to the backs of paper and photos and place onto canvas. Apply a layer of Glastique Finishing Glaze Matte to the top surface of paper and photos and smooth with both a sponge and wooden Popsicle stick with light pressure.  


Step 8: Adding the Finishing Touches - Add the embossed gears randomly to the project using Glastique Finishing Glaze Matte  to secure and preserve and add Hemptique Hemp Cord around one side of canvas and add "Wind Up Key".  


Making memories "Globecraft and Piccolo style" can truly turn a few photos and a sentiment into more than just an account of an event or moment.  It can turn it into a work of art that brings those memories to life!  Having Piccolo Embossing products is a must-have in every memory maker's stash!  Be sure to pop over to my blog and see what I have cooking with more Globecraft & Piccolo Embossing Powders! 


Thursday, May 9, 2013

The magic of Piccolo Embossing Powder


It is Arin here and do I have a fun and easy project for you all by simply pulling together some amazing Globecraft & Piccolo products to make a stunning faux metal keychain! This would make an excellent small personal gift that can dress up any set of keys. 

Materials Needed:
  • Globecraft & Piccolo - Enamel/Embossing Powder Adhesive
  • Globecraft & Piccolo - Vintage Copper Embossing Powder
  • Globecraft & Piccolo - Real Rust Embossing Powder
  • Globecraft & Piccolo - Turquoise Lagoon Powder
  • Globecraft & Piccolo - Glastique Finishing Glaze Gloss
  • Globecraft & Piccolo - Soft Grip Tweezers
  • Globecraft & Piccolo - Beautiful Horse Charm Set 
  • Globecraft & Piccolo - Bookboard Rectangle Tag
  • Hemptique - Hemp Cord
  • Stretch Magic - Beading Cord
  • Bead Gallery Beads
  • Bead Landing - 7mm Jump Rings
  • Q-Tip

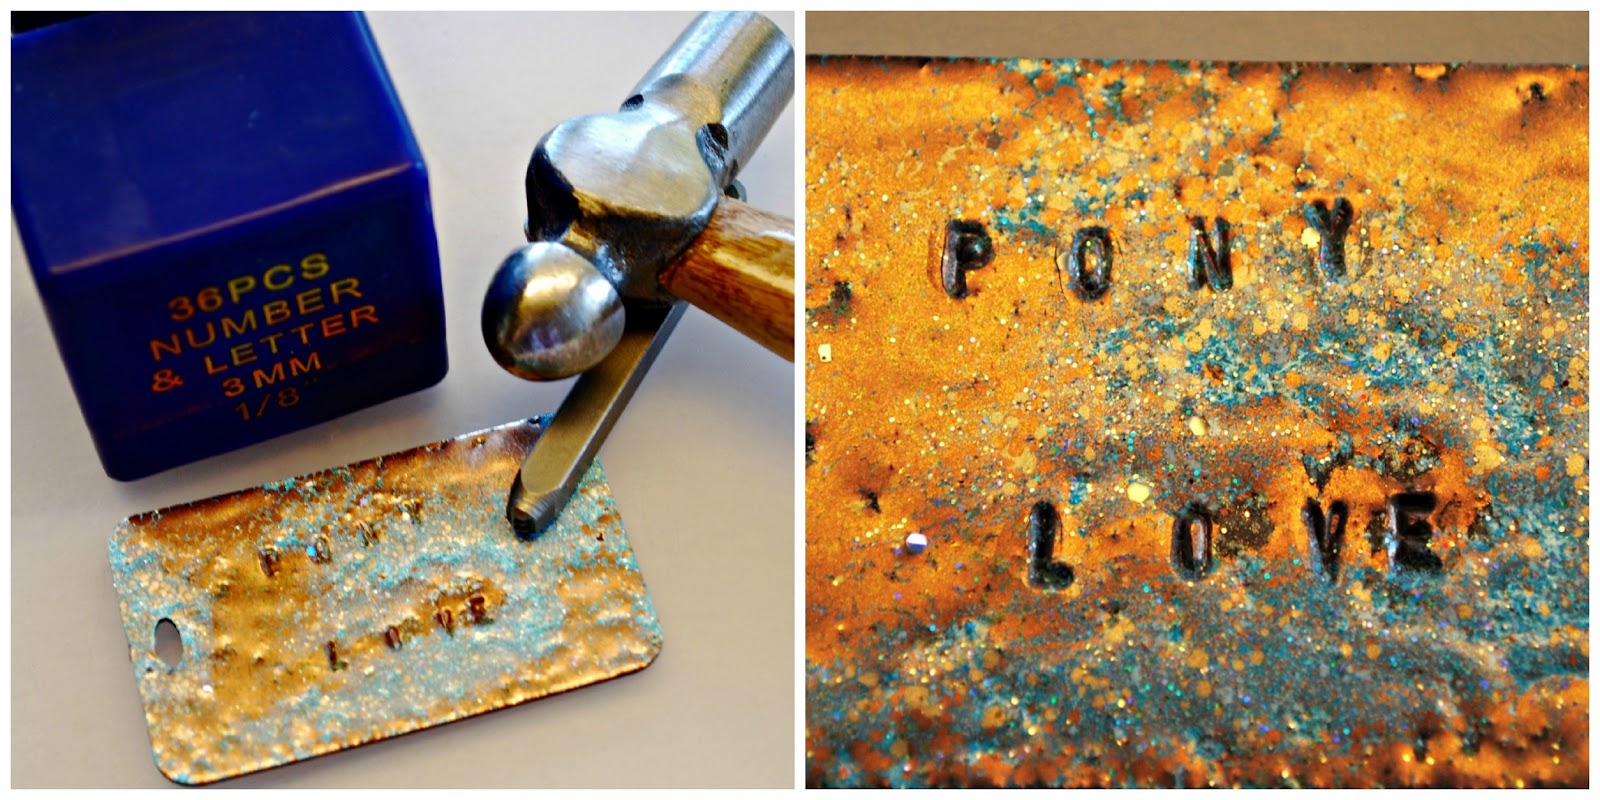
Step 1: Embossing Bookboard Pieces - For the rectangle bookboard tag, apply Piccolo Enamel/Embossing Powder Adhesive and begin to layer Piccolo Turquoise Lagoon and Vintage Copper Embossing Powder by heat setting and cooling in between each layer to create a patina effect. This was only done with two layers starting with the Turquoise Lagoon Embossing Powder. Repeat on opposite side. 
Apply Piccolo Enamel/Embossing Powder to the small bookboard charms and dust with Piccolo Real Rust Embossing Powder, set with heat, allow to cool and repeat on opposite side. 
Step 2: Punching sentiment with metal punches - Using a 1/8 inch capital letter metal punch, punch letters into embossed tag using the tap hammer. 
Step 3: Adding charm and sealing - Once letters are punched, apply a light layer of Glastique Finishing Glaze Gloss using a Q-Tip to the full surface of the tag.  Add charm to the tag and then add additional Glastique to the charm to set and seal.  Allow to dry and add a light layer of Glastique Finishing Glaze on opposite side.
Step 4: Assembling key chain - Run clear beading cord through bookboard charm and tag and tie a secure knot at the top leaving a 5 inch tail for stringing beads and attaching the key ring. Trim off excess beading cord from tied knot. Run a piece of hemp cord through the tag and charm and tie into a bow and trim. Sting desired beads in a 3 inch desired pattern and knot at the end.  Using a jump ring secure and knot tightly the clear beading cord.  Finally run the jump ring through key ring and trim off excess beading cord.
Once again, Globecraft & Piccolo's products deliver a powerful punch when it comes to making projects using their amazing embossing powders. I almost felt like I was a magician using these products! To the naked eye it looks as if all the bookboard pieces are made out of metal and even responded to the metal punches as if they were metal!  Be sure to pop over to my blog and see what I have cooking with more Globecraft & Piccolo Embossing Powders!