Pages

Showing posts with label deep blue sky. Show all posts

Wednesday, December 17, 2014

Snowflake Ornaments


The snowflakes in this post are from Globecraft & Piccolo which is now owned by SweetStamps, I just love this Elegant Snowflake that measures 2 15/16" (not quit 2  7/8") across.

Enamel Embossing Powder Fluid is the adhesive applied to the bookboard avoiding the center where the decoration will be attached.
It's then covered with Micro White Enamel Powder and heat embossed.  I used this simply because it's very fine and give a good white coverage.   
I then apply the adhesive again and cover with Aged White Enamel Powder and heat emboss.  This is very thick embossing powder with gold and glitter added and I must say the photographs do not do it justice.
I repeated the process on the opposite side of the snowflake then added the pearl on metal accent using Aleene's Paper Glaze for adhesive (gifted to me without a company name).
A strand of metallic blue embossing thread was used for the hanger.


This is the Crystal Snowflake (largest snowflake in the set measuring 2 1/2") paired up with the larger stars from Tiny Hearts, Flowers, Stars & Flourishes bookboard set.
I used the same adhesive and powders as described in the description of my first snowflake above.
I also avoided the center as much as possible when applying the adhesive and powder but as you can see in the left photo below I placed the star on the snowflake before pouring on the powder to avoid heavily covering that area. 
For the star I used Enamel Powder Deep Blue Sky. and only on one side, it was also attached to the bookboard center with Aleene's Paper Glaze.

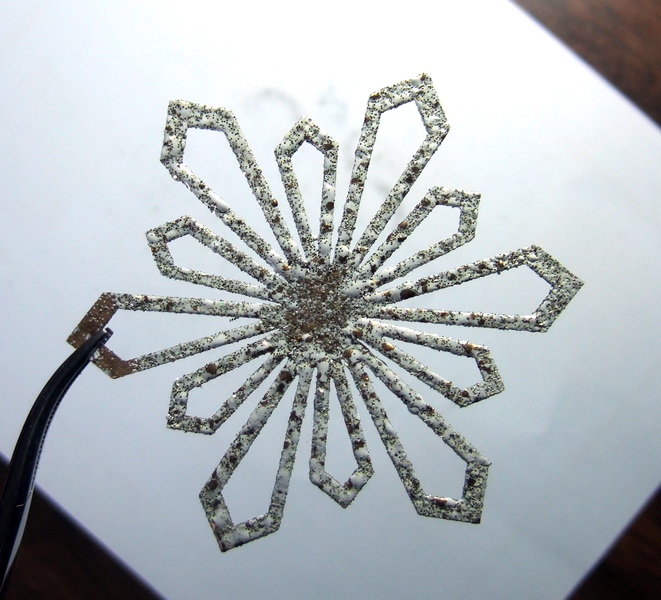

The photo on the right shows how I held the snowflakes to emboss the 2nd side.  Once embossed I went back to cover the area held by the tool and could hold the opposite side of the snowflake with my fingers to heat emboss.  You can't lay it on a surface or it will melt the first coat of powder and stick to whatever surface it's on.

The following items can be found in the SweetStamps store:

Saturday, March 15, 2014

Colorful Butterfly ATC


I am in love with Globecraft & Piccolo’s Embossing Enamel.  The colors are amazingly vibrant, colorful and each one is blended by hand in the USA.  The color combinations are incredible! Trust me when I tell you the pictures cannot capture the true beauty of this powder.  
Plus, you get a huge amount of powder for your money!  In the photo below I used a bottle of Distress Paint to illustrate how large the containers of the Embossing Enamel are:
Lots of yummy color!
I recently got some new colors and I always want to use my new goodies as soon as I get them, so I decided to make an ATC (artist trading card).
What I used to make my Butterfly ATC:
Decorative Paper
ATC blank

The first thing I did was use the Mars Black 3D Enamel Gel on the frame.  I just used it right out of the bottle.  The funny thing is the black comes out looking like a dark gray.
But it turns to a shiny deep black once it dries.  I set my frame out overnight covered with an extra bubble I had so no cats, or cat hair would get into it. I love how these frames are the perfect size for ATC's!

Then I took my butterfly blank and used a paintbrush to paint where I wanted the Embossing Enamel to adhere.  I use a paint brush so often that I actually poured some of the Embossing Fluid out of the bottle into a small, air tight container so I wouldn’t have to keep popping the top off of the applicator.  I brushed the fluid onto the butterfly blank and shook some Deep Blue Sky enamel onto the blank and heated until done.  I only used one layer of Enamel and I still got this awesome result:
Then I edged the butterfly in Royal Sterling Enamel, again using my paintbrush and embossing fluid.  When you use the fluid with a paintbrush you don’t have to re-dip the brush each time you use it- the brush retains a good amount of the fluid.  For the body I used Ruby Red Slippers – the butterfly is SO sparkly, I tried to capture it but it is very difficult.
See that bubble on the body? Popped it with a toothpick - POOF!
For my ATC I used a piece of cardboard from a mailing box.  You can get a lot of ATC’s from one box and they are sturdier than using just paper.  After I covered my cardboard with the decorative paper (I used a handmade paper in navy blue with little silver sparkles in it) I glued my frame and then my butterfly in the center.

I love the look of the multiple embossing enamels and I think the frame sort of holds it all together.  I hope you are getting some warmer weather where you are; I’m keeping an eye out for the real butterflies!
Thank you for stopping by ~
Blessings!
Christi