Pages

Friday, February 7, 2014

Vintage Dress Form Home Decor

Hello my darlings!
Today my shabby chic/vintage loving self came out and I have something
pretty different from what I've shared with ya so far.
I sure hope you like it!


Remember you could create this with the colors that suit you best.

I didn't take many in progress photos of this one,
but it's pretty easy.

Want to make it?
Woohoo! Let's go!!

What you need:
Heart that you saved from the Vintage Bird Cage last week
Enamel Powders: Vintage Black, Aged White, Turquoise Lagoon, Cranberry Wine
Fancy Napkin naked wood plaque, small wood block, gesso, Mod Podge, black pigment ink (I used Mixed Media ink), white paper flowers, fancy flowers, rhinestone chain (or bling), alcohol inks (Ranger), piece of Stampboard or something similar, scrap of card stock, tooth picks, sanding file or sand paper.


What to do:

1. Paint the plaque with a coat of gesso and let dry. Then Mod Podge a fancy napkin onto it. be sure to separate the layers of the napkin and only use the top, pretty layer. Once it's dry, sand around the edges.

2. Get your piece of stamp board (or whatever white, shiny thing you're gonna use. You could sub a piece of chip board with some glossy card stock stuck to it) and coat with the alcohol inks. I used Silver & Aqua with a little bit of Rust.


3. Now, coat one edge of the inked piece with enamel adhesive fluid and coat with the Vintage Black enamel powder. Heat. Continue all the way around, and then do a second coat.

*pretty, isn't it?*


4. Now gather your darling Piccolo pieces. Punch the bits out of the dress form. Coat the dress form with enamel adhesive fluid and Vintage Black powder. Heat well an add a second coat if desired. The swirl was done with Aged White. Two of the flowers are White Micro powder, and the rest of the flowers are Cranberry Wine.


5. Dot the alcohol inked piece with enamel adhesive fluid and sprinkle on some powders. I used a little bit of each color listed in the supplies. Heat it up, baby. Do the same with the white paper flowers.

6. Flip the dress form over and use a toothpick to coat with E600. Stick to a piece of card stock and trim. Add more glue and adhere to the inked/embossed piece.

7. Coat the edges of the plaque with pigment ink and roll in Vintage Black powder. Heat to melt. 


 8. Now time to start assembling. I used the E600 glue to adhere everything!! Place the dress form on first, centered on the plaque, then build up your flowers around it. Add the rhinestone trim (or bling) around the edge. Don't forget to add the heart! :)


9. Your final step: flip the plaque over and use the E600 to glue the wooden block to the back. This will act as a little stand and make your piece stand on its own, no easel required.


Thursday, February 6, 2014

heart of gold (and pink and silver)

Well hello there ---- Happy Thursday all. 
Teresa here with a little bit of sweet love ornament just in time for Valentines' Day.

My taste runs a bit toward the more shabby toned colors so the ornament features some of that. 


So - let's go shopping.

Globecraft and Piccolo products used.
- Embossing Powder Adhesive
- Assorted Embossing Powders
       - Cranberry Wine (on the Heart Piccolo)
       - Mardi Gras 
       - Victorian Bronze
       - Vintage Silver
       - Vintage Black (on the Key Piccolo)
- Delicate Heart Earring Charms 
- Cerchio Key Charm
- Gloss Glastique

Extra goodies.
- three paper hearts (cut identically)
- fine gauge wire
- Assorted beads
- jump rings
- paper glue (I used a glue stick)
- a good glear gel glue.
- a heart stamp of your choice.


First - you can use the enamel adhesive  just like a stamp ink on your stamp.

Then stamp your paper hearts. I used assorted colors of the enamel powders.


On the heart above, I stamped the two Mardi Gras embossed hearts and heat set them. Then came back and stamped the Vintage Bronze heart and embossed it.

TIP ---- These are NOT fine detail powders.  There are assorted particle sizes in each jar. I poured out some of the powder on the hearts and dumped the excess off  for this part. That leaves mostly smaller bits on the paper to emboss.

Cover all three heart shapes as desired. Also notice that I have pre-scored a fold line down the center of the heart.


Now onto the Piccolos -

I covered both sides of the Delicate Heart Charm with the Cranberry Wine powder. Go ahead - click on that picture and just look at the sparkly bits in there.

After embossing the Heart,


I used the Gloss Glastique to protect and strengthen the shape. Cover one side and let it completely dry. then cover the other side as well.


Simply stunning. (I keep all the little punch out bits too. You will see that pretty heart shape from the center of this in a later project.)


Emboss the key charm with the vintage black powder and cover with the Glastique as well.

Now for assembly. Add a jump ring to the key. And tie on a very fine gauge wire.

Add beads to the wire.


Fold the three heart shapes in half and glue halves of one pair together. leave the other side unglued.

Add the third heart in the same way. But glue the two pieces together.

This will leave one flap open. Lay your beaded wire and key in that flap groove and glue with the gel glue. Then glue that flap closed. (let that dry)

Now add a few more beads and jump ring to the bottom of the heart charm. Tie off your wire to that jump ring.


Hang and enjoy. 

Now for the giveaway, each day this week we will chose one person from that day's comments to receive a $10 credit to the Globecraft Piccolo store.  Here are the rules:
  • Leave a comment on daily posts Sunday, February 2nd through Saturday, February 8th
  • You must be a Follower of the Globecraft Piccolo blog
  • You must like us on Facebook (click on the Facebook tab at the top of the blog)
  • Only 1 comment per day per person
  • If you refer a friend and your name is mentioned in their comment, you will get a second entry to the drawing for that day
  • Winners will be chosen by Random.org and announced on Sunday February 9th
  • You can win on multiple days so be sure to visit each day
So to sum it up, we will be awarding 7 people who comment this week; Sunday, February 2nd through Saturday, February 8th a $10 store credit.  Good luck to you all.

Wednesday, February 5, 2014

Heated Up Love with a Valentine Ornament

  Happy Wednesday everyone! leslierahye here with a Valentine Ornament made with the DIY Portrait Ornament kit. These ornaments are not just for winter holidays! Be sure to check out the give away opportunity at the end of the post.  Here's how we get started...
I began by rubbing red pigment ink onto craft card stock. Pigment ink has a slower drying time and will hold onto the Emboss Enamel longer.Sprinkle the Ruby Red Slippers powder onto the moist ink and heat set. I did the Ruby Red Slippers twice. Next rub red pigment ink on the backside and sprinkle Mermaid Tears Emboss Enamel on the back side and heat set. Allow to cool.

With heart punches, cut out your heart confetti. [LOVE the sparkle here!]

On red paper, with your favorite script stamp--I have 3 that i use regularly for a visual texture in my artwork--once again use pigment ink to ink your stamp and then sprinkle with 24K Gold Emboss Enamel. Heat set and punch out more confetti.

Prepare the pieces of your globe frame. For the center piece, rub both sides of the chipboard with the Enamel Powder Adhesive Fluid. Sprinkle with 24K Gold and heat set. When the center piece cools down rub red ink along the edges of the frame.On the globe frames, rub Enamel Powder Adhesive Fluid and sprinkle with Ruby Red Slippers and heat set. Once cooled, with Pigment Ink stamp the script stamp onto the Ruby Red Slippers. Dust text with Micro Black Emboss Enamel, knock off the excess and heat set.
Stack the globes and frames according to the directions, add in confetti and glitter. With Glastique as an adhesive, coat chipboard and globe edges. Hold in place with clothes pins.


 Add a bit of lace and some hemp string for an ornament hanger!

 Voila!
  

I hope you enjoyed my project! Thank you for stopping by today!

*****
Now for the giveaway, each day this week we will chose one person from that day's comments to receive a $10 credit to the Globecraft Piccolo store.  Here are the rules:
  • Leave a comment on daily posts Sunday, February 2nd through Saturday, February 8th
  • You must be a Follower of the Globecraft Piccolo blog
  • You must like us on Facebook (click on the Facebook tab at the top of the blog)
  • Only 1 comment per day per person
  • If you refer a friend and your name is mentioned in their comment, you will get a second entry to the drawing for that day
  • Winners will be chosen by Random.org and announced on Sunday February 9th
  • You can win on multiple days so be sure to visit each day
So to sum it up, we will be awarding 7 people who comment this week; Sunday, February 2nd through Saturday, February 8th a $10 store credit.  Good luck to you all.

Tuesday, February 4, 2014

She flies with her own wings...

Hiya everyone, Tracy here,with it being Tuesday it means it is my day to show you what I have been creating. But first of did you see ? 


Each day this week we will chose one person from that day's comments to receive a $10 credit to the Globecraft Piccolo store.  Here are the rules: 
  • Leave a comment on daily posts Sunday, February 2nd through Saturday, February 8th
  • You must be a Follower of the Globecraft Piccolo blog
  • You must like us on Facebook (click on the Facebook tab at the top of the blog)
  • Only 1 comment per day per person
  • If you refer a friend and your name is mentioned in their comment, you will get a second entry to the drawing for that day
  • Winners will be chosen by Random.org and announced on Sunday February 9th
  • You can win on multiple days so be sure to visit each day
So to sum it up, we will be awarding 7 people who comment this week; Sunday, February 2nd through Saturday, February 8th a $10 store credit.  Good luck to you all.

Now onto what I have been creating. 


I have reallly got into making these these little art cards, they aren't as small as ATC's so you aren't as restricted with size....which I sometimes struggle with when making ATC's. 

Here is what I have used-
Kraft Card
Mount board 
Ink 
Script Stamp 
Sewing Machine 
Cheesecloth 
Spray Adhesive 
Printer
Distress ink

Firstly cut your mount board & Kraft card to size, I tend to stick to 4.5 " x 3.5" , the idea of the mount board is it gives it more strength. 


Cut a heart shape from Kraft card & using your 3D Enamel Gel in Berry Red give a nice thick layer over the heart


Embossing Enamels aren't just for Embossing, Especially ones like Embossing Enamel Ruby Red Slippers that have the glitter and different sized grains. I have used it here to give texture and sparkle. 
Do this whilst wet. 


Whilst your heart is drying take your Kraft card and have some fun with it...I have used some ink and flicked across it, and then used a script stamp...but let your imagination run wild. 


Now you might have guessed I have to have texture, so here I have sprayed some cheesecloth with spray adhesive and wrapped it about the kraft card, I have also stitched around two of the corners and added some of the gorgeous Embossing Enamel Mermaid Tears

I love this set  and used two of the medium, and two of the small wings for this, I gave them a rough layer of Embossing Enamel Black Vintage  which works perfectly against the red of the heart. 

This shows you have fantastic they look when done


 This is a quote has always had special meaning to me, and it seemed so perfect for this, i simply printed the quote off & rough cut the words out, I then decided to use some distress ink to age them. 

Now just stick the Kraft Card to the mount board and stick all your elements together. And there you have your own mini art. 


Don't forget to stop by each day and leave a comment to be in with a chance of winning the Gift Voucher. 
Have fun 

Challenge #155 Pink, Red & White

Hello crafty friends! We're on our way to Florida for STAMPFEST in Clearwater this weekend. Since it's Tuesday, it's time for a NEW challenge! This week's theme is...
PINK, RED & WHITE
We'd love to see your Red, White & Pink creation (cards, scrapbook pages, mixed media, ATCs, etc.), so come and join the fun! You could win a $20 shopping spree for goodies at SweetStamps.com's online store by playing along in our challenge! Click here for our complete Challenge Rules.
 * * * * * * * * * * * * * * * * * *
Our Monthly Technique Challenge is Kissing Technique and runs through February 15th. Step by step directions and link to a video can be found by clicking here. Come join us and check out what our DT Sweeties made! View ALL the monthly challenges here.

***Don't forget to check back later this week for more inspiration from our monthly Guest Designers!***

You may have noticed some "new" items on some of our DT's recent creations from Globecraft & Piccolo {a division of SweetStamps.com}. Over on the G&P blog, we are having a separate contest, click here to jump over there and have a look, they are a great addition to any crafting project!

Next week our theme is LOVE. Happy Stamping! Have a super sweet week!
 

Monday, February 3, 2014

Keep Thy Heart Tag

It's another Happy Monday! And each day this week we will chose one person from that day's comments to receive a $10 credit to the Globecraft Piccolo store.  Here are the rules:
  • Leave a comment on daily posts Sunday, February 2nd through Saturday, February 8th
  • You must be a Follower of the Globecraft Piccolo blog
  • You must like us on Facebook (click on the Facebook tab at the top of the blog)
  • Only 1 comment per day per person
  • If you refer a friend and your name is mentioned in their comment, you will get a second entry to the drawing for that day
  • Winners will be chosen by Random.org and announced on Sunday February 9th
  • You can win on multiple days so be sure to visit each day
So to sum it up, we will be awarding 7 people who comment this week; Sunday, February 2nd through Saturday, February 8th a $10 store credit.  Good luck to you all.

With Valentine's Day just around the corner my crafty thoughts have been about hearts, flowers and lace. I tend to understate the feminine for this holiday, so I decided it was time to treat myself to a girly tag!


Start with a prepared tag base (gesso, spritzed, etc.) and then add a doily, patterned papers, etc. until you like the layers. Use the Enamel Powder Adhesive and randomly dab the tag, then sprinkle on some Aged White Enamel Powder. Gently turn the tag over to release most of the powder. Sprinkle more enamel powder, if necessary to achieve the look you want. Carefully heat from underneath until the powder melts.

Emboss the heart (A1114) with the Aged White Enamel. Next adhere a label holder using brads and adhere the heart inside of the holder to a popped up circle of cardstock using Glastique Gloss Finishing Glaze.


I used the Glastique to adhere the Medium Flourishes Accents (A139) and then using the Fine Line Applicator Tip I covered the flourishes with a thin layer to deepen their natural color and give them a bit of shine. Be sure to let this dry before moving on to the next step.


Use the Glastique to adhere the flowers. Use the Fine Line Applicator tip to apply tiny drops to the flower petals. Let dry.


Using a foam blending tool, distress the edges of the tag using Vintage Photo Distress Ink.

The finishing touch to this tag are the gold accents! Using an old brush paint the edges of the tag and the label holder using the Satin Gold 3D Enamel Gel. The Distress Ink will soften and the tag will look aged and gilded. Gorgeous!

The sentiment I printed and cut up, distressed the edges and glued to the tag. I used Glastique and a brush to paint a thin layer over the words. LOVE how the inked edges soften and the paper wrinkles ever so slightly.

Add some fiber and tulle to the top.

Do you love Globecraft & Piccolo products, too? We would love to see YOUR projects. Like us on Facebook and share your pictures with us!

Inky hugs,
Angi


Sunday, February 2, 2014

Spring Daisies and a Giveaway


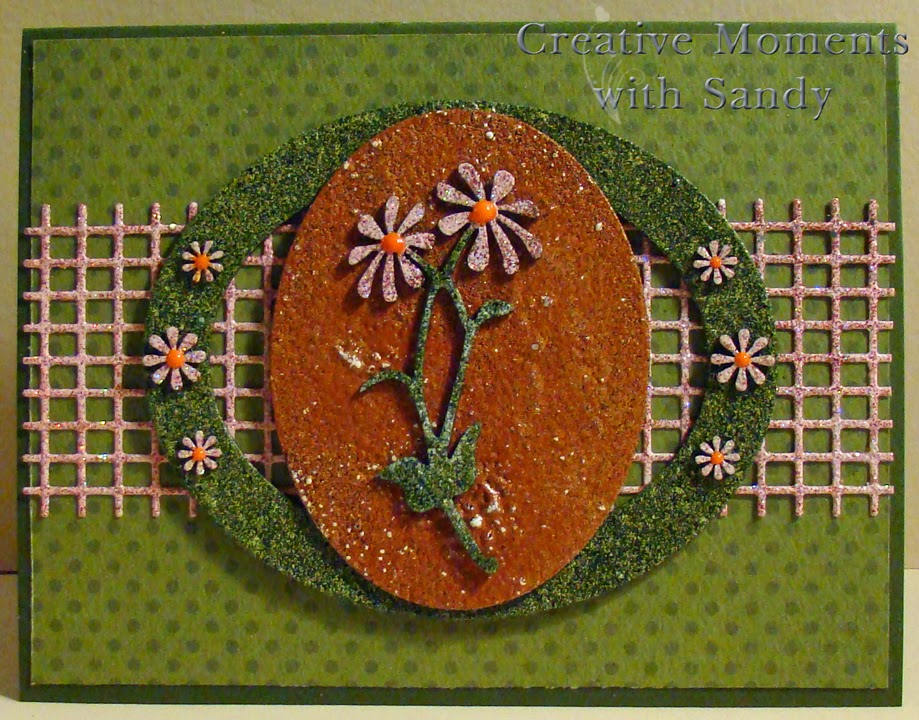
For my project today, I decided to think ahead to warmer climate and created this daisy card.  I began by using the oval drop out from my snowflake ornament from last week.  I embossed it with Brownstone Enamel Powder, lots of great texture to this one.  For the Large Floral Daisy, I embossed the stems with Mossy Glen and the petals with Cranberry Wine Enamel Powder.  I used the same Cranberry Wine on the small daisies from the Daisy Floral Accents set.  I added a dot of Orange 3D Gel to the centers of each of the flowers.  For the outer frame, an extra from an ornament set, I again embossed with Mossy Glen.  Using white card stock, I die cut a Cheery Lynn Designs Burlap Mesh Border and embossed with Cranberry Wine Enamel Powder.  Finished size is 4.25 x 5.5 inches. 


Now for the giveaway, each day this week we will chose one person from that day's comments to receive a $10 credit to the Globecraft Piccolo store.  Here are the rules:
  • Leave a comment on daily posts Sunday, February 2nd through Saturday, February 8th
  • You must be a Follower of the Globecraft Piccolo blog
  • You must like us on Facebook (click on the Facebook tab at the top of the blog)
  • Only 1 comment per day per person
  • If you refer a friend and your name is mentioned in their comment, you will get a second entry to the drawing for that day
  • Winners will be chosen by Random.org and announced on Sunday February 9th
  • You can win on multiple days so be sure to visit each day
So to sum it up, we will be awarding 7 people who comment this week; Sunday, February 2nd through Saturday, February 8th a $10 store credit.  Good luck to you all.