Pages

Showing posts with label DIY Ornament. Show all posts

Saturday, June 21, 2014

Too early for holiday ornaments?


I say NEVER! For this Globecraft & Piccolo post I decided to beat the heat by making a holiday ornament.  Using one of the Ornament Kits (in addition to the kits found on the linked page, there is the DIY Portrait Ornament and the DIY Landscape Ornament) make it SO easy and really fun, but my favorite is using one of the 2 DIY kits, like I did here.  I wanted an icy feel to my ornament, hoping that keeping cool could be a bit of mind over matter!

The final ornament - pretty, but I'm still hot!
What I Used to Make My Project
Fishing Line or Craft Filament (I used jewelry cord, clear)

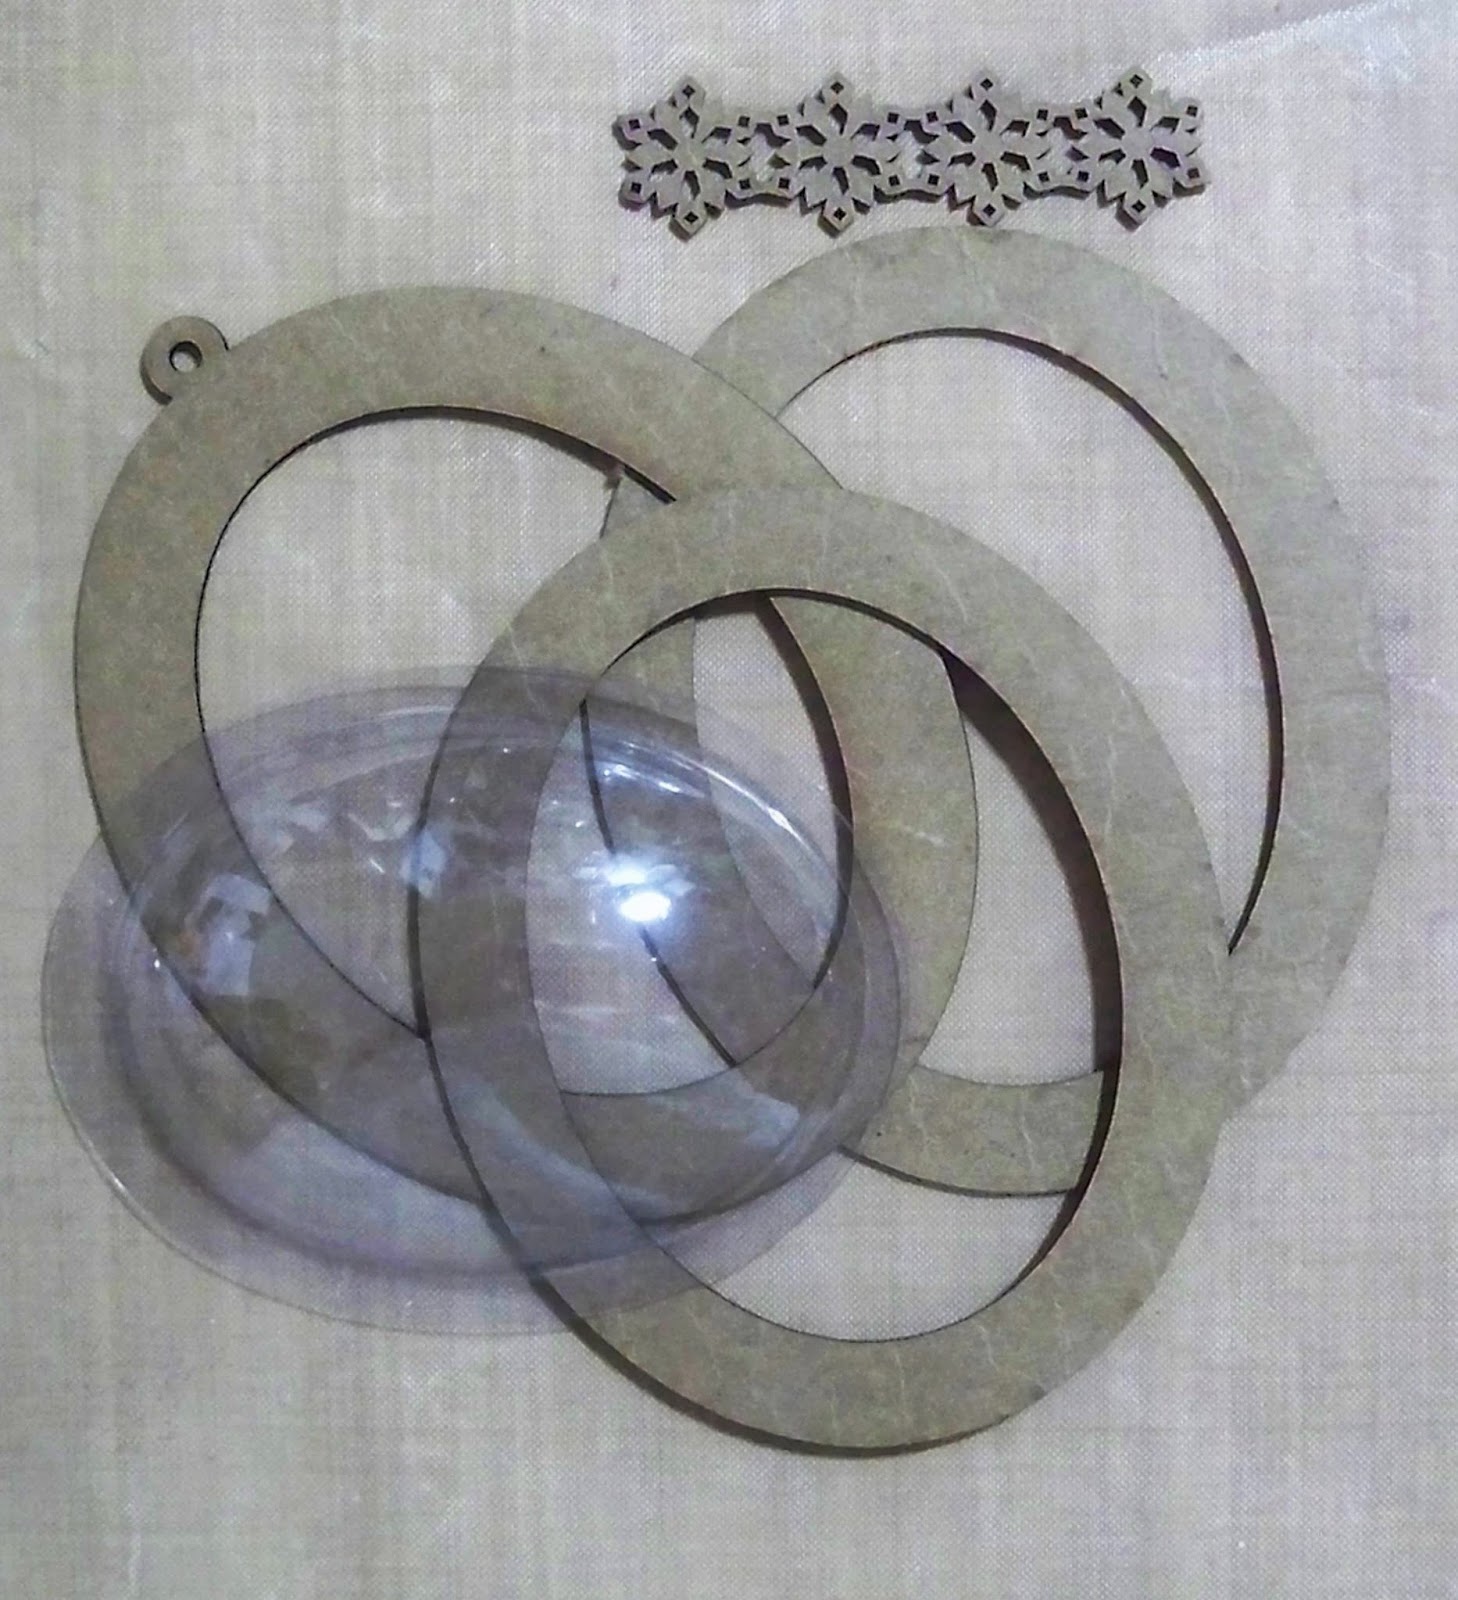
The kit with the piece from Bejeweled Snowflakes
First thing I did was cut my long snowflake border from the Bejeweled Snowflake Set in half – there are 8 little snowflakes on each strip, so I just snipped it into 4.  Then I applied the Embossing Fluid and embossed the strip with Aged White Embossing Enamel, both front and back.

Then I embossed the inner circle of the ornament – the inner piece is the
Inner bezel with snowflake piece
piece in the kit that has the loop on the top to hang the ornament.  I just pounced my Embossing Fluid along the outside of the ring (super easy since the Embossing Fluid uses a dauber on the top of it – you never get too much or too little! Just don’t squeeze your bottle as it will explode – or so I hear - hehehe) since I knew once the ornament is assembled you can only see a small bit of the ring; I embossed the inner ring on both sides.  Then, I threaded the cord through the very top of the snowflake strip that I had cut so that the ends of the cord could be glued to the inner ring and the strip would hang correctly.  For that I used E6000 and I did one piece of string at a time (for me that was easier than trying to line the filament up on both sides, ensure the strip was even, then try to glue both ends of the cord – it became like a game, with me fighting against everything.  So, I surrendered and did each end separately).
All the pieces embossed, attached & ready to assemble (except the globes)
While my hanging piece was drying, I embossed the 2 outer rings with Mermaid Tears, being sure to roll the Embossing Enamel to shake up the enamel.  The Globecraft & Piccolo Embossing Enamel is hand blended in the USA and each color is so unique – the Mermaid Tears is such a pretty mixture of colors!  I did one side of each of the outer rings, but I did emboss each side twice.  Then I glued the globes and the rings to the inner ring, lining it up and clamping them together with bulldog clips.  I let it dry overnight and I was done!

Another look at the final product (hard to get those bubbles to photograph!)
Also, another great use for the bubbles is to use them as "shields" - when you have items drying, perhaps with Glastique Gloss, you can place a bubble over the item and that helps to keep the cat hair, human hair, Embossing Enamel and all the other floaties out of your finish.  Thanks so much for stopping by – I appreciate your comments and sharing of my posts so much! Hope you have a fantastic weekend! Christi

Saturday, March 22, 2014

Spring Flowers. . .


Side 1
I had so much fun using the French Oval Bubble Frame Kit to make my Spring Scene that I made this Spring Flowers ornament using another kit that Globecraft & Piccolo manufactures.  There are actually four different Ornament Kits so you can find one to perfectly suit your needs.  


Spring is in the air and I can't wait for the flowers to start blooming!


Side 2
That is one of my four cats, Junior, in the background.  He is enjoying the window!

What I used:


As you can see, I decorated both sides of this ornament; one side is so full of flowers you can’t see the background and the other side I used Distress Markers in Peeled Paint & Mowed Lawn, on the craft sheet, spritzed them, and placed the ornament “back” on it so the background was a nice springy green.  I am calling the green side of the ornament side 2 just so I can be clear on how I decorated each side.

TONS of Flowers!!

When I was looking at all the flowers I had I decided to see if I could emboss one of them to match my project.  I took a pink mulberry flower and used both Enchanted Aubergine & Girls Night Out Embossing Enamel on it and it came out fabulous! I let that cool while I worked on some other flowers.  I also colored one with a Distress Marker in Dusty Concord.  I took my flowers that I was going to use on side one and dotted the centers with White 3D Gel Enamel.  Once they dried (I let them sit overnight just to be sure the dots dried thoroughly) I put some jewels on some of the centers of the flowers and I left some just white.  I placed the flowers where I wanted them and adhered them to the side 1 of the ornament middle.  


Since I used so many flowers on side 1, I decided to go easier on side 2.  I picked out a few more flowers and leaves, attached gems to the centers of the flowers and glued them to the green background. 

The two outer frames

I used the rim as a guide and cut out paper to cover it using the KaiserCraft Violet Crush paper.  I embossed the outer ring (the one that has the hole for hanging), on both sides, with Enchanted Auberguine Embossing Enamel, pieced the ornament together and let it dry (with the help of some binder clips). It is very simple to put the ornament together; it looks harder than it is!

Another view of side 1


I think it came out really sweet (but I honestly should of used less flowers on side 1) and I hope you enjoyed my little tutorial.  The Bubble Ornaments are SO fun to make and they come in so many sizes; I am already planning my next one!
Another view, side 2, no bubble
I'm not sure why the Aubergine Embossing Enamel came out looking so dark in some of the pictures.  It really is a beautiful color, much more purple than what shows (could just be my monitor. . .).

Thanks for stopping by everyone! I appreciate your comments & thoughts ~
Fondly, Christi

Friday, March 14, 2014

A Little Vintage Love

Howdy folks!
Aimee here with a sweet little project to share with you.
 

Today we will play with the awesome French Oval Classic Bubble frame kit
along with Vintage Dress Form embellishments, flowers, inks, and enamel powders.

Want to make it?
Sweet!

What you'll need:
Enamel powder Adhesive
Enamel Gels: Rose Pearl & Gold
Adirodack inks- Butterscotch, Cranberry, and Ginger
Flowers
Pink Gelato
Paint brush, water, stipple brushes or sponges, heat tool, tooth picks, clamps/clothespins, heavy book, word sticker, scrap of black wire, Ranger's Sticky back canvas (or some good card stock and adhesive)
 
1. Use the oval ad trace the sticky back canvas/paper. Cut out.
Adhere to the oval.


2. Use the stipple brushes or sponges and color the canvas.


3. Add a little pink Gelato and smoosh it around
 a bit with a damp paint brush. Set aside to dry.


4. Use the adhesive fluid and Aged White powder to coat the oval frame. 
I did two coats.

5. Use the adhesive fluid and Gilded Rose Gold powder to coat the lace frame.
I did two coats on it, too.

6. Use a tooth pick to add E600 glue to the back of the lace frame.
Adhere it to the oval frame and stick it under a heavy book for awhile
to make sure it's good and adhered.


7. Use the adhesive fluid and Vintage Black powder to coat the dress form.
I really love the way it looks!!!

8. Now begin assembling your piece.
Use a toothpick to put E600 glue onto the back of the dress form ad adhere it to the canvas oval.
I used E600 to glue everything down on this one.


9. Once the inside is done, place the clear bubble over it,
using E600 glue to adhere it. Clamp it down for awhile to be sure it's
really stuck on! Add the frame using the E600 glue and clamping it down as well.
Add some flowers and it's done.
Isn't it pretty?

Wednesday, February 5, 2014

Heated Up Love with a Valentine Ornament

  Happy Wednesday everyone! leslierahye here with a Valentine Ornament made with the DIY Portrait Ornament kit. These ornaments are not just for winter holidays! Be sure to check out the give away opportunity at the end of the post.  Here's how we get started...
I began by rubbing red pigment ink onto craft card stock. Pigment ink has a slower drying time and will hold onto the Emboss Enamel longer.Sprinkle the Ruby Red Slippers powder onto the moist ink and heat set. I did the Ruby Red Slippers twice. Next rub red pigment ink on the backside and sprinkle Mermaid Tears Emboss Enamel on the back side and heat set. Allow to cool.

With heart punches, cut out your heart confetti. [LOVE the sparkle here!]

On red paper, with your favorite script stamp--I have 3 that i use regularly for a visual texture in my artwork--once again use pigment ink to ink your stamp and then sprinkle with 24K Gold Emboss Enamel. Heat set and punch out more confetti.

Prepare the pieces of your globe frame. For the center piece, rub both sides of the chipboard with the Enamel Powder Adhesive Fluid. Sprinkle with 24K Gold and heat set. When the center piece cools down rub red ink along the edges of the frame.On the globe frames, rub Enamel Powder Adhesive Fluid and sprinkle with Ruby Red Slippers and heat set. Once cooled, with Pigment Ink stamp the script stamp onto the Ruby Red Slippers. Dust text with Micro Black Emboss Enamel, knock off the excess and heat set.
Stack the globes and frames according to the directions, add in confetti and glitter. With Glastique as an adhesive, coat chipboard and globe edges. Hold in place with clothes pins.


 Add a bit of lace and some hemp string for an ornament hanger!

 Voila!
  

I hope you enjoyed my project! Thank you for stopping by today!

*****
Now for the giveaway, each day this week we will chose one person from that day's comments to receive a $10 credit to the Globecraft Piccolo store.  Here are the rules:
  • Leave a comment on daily posts Sunday, February 2nd through Saturday, February 8th
  • You must be a Follower of the Globecraft Piccolo blog
  • You must like us on Facebook (click on the Facebook tab at the top of the blog)
  • Only 1 comment per day per person
  • If you refer a friend and your name is mentioned in their comment, you will get a second entry to the drawing for that day
  • Winners will be chosen by Random.org and announced on Sunday February 9th
  • You can win on multiple days so be sure to visit each day
So to sum it up, we will be awarding 7 people who comment this week; Sunday, February 2nd through Saturday, February 8th a $10 store credit.  Good luck to you all.

Wednesday, May 1, 2013

One product, so many uses

I wanted to share a tip about one of our products that I get a lot of use from — Glastique.

This clear-dry liquid glue comes in one ounce or four ounce bottles. It is also available in a matte or glossy finish.


In addition to performing its job as a liquid adhesive, it also makes a great collage medium and finisher/sealer. It can be easily applied with your finger or a brush. I've used it as both the collage medium and sealer on this canvas.


Here, I've used it as an adhesive to connect the rings on the DIY Ornaments that I assemble so frequently.


If it is added in a thick coat straight from the bottle, it adds a nice bit of dimension and protection to your article like this little pumpkin.


Remember when using liquid adhesive - a little goes a long way. Too much glue and it doesn't have a chance to set up and connect. Less is more. I like to squeeze out a thin line of glue and pinch my pieces together for a few seconds to ensure good contact between the pieces. For larger objects, like the DIY Ornaments, I recommend using clip clothespins or binder clips to hold tight while the glue is setting.

I really appreciate that I can get so many uses from one product. And, it cleans up easily and quickly with water. No special cleaner required.

Saturday, March 23, 2013

A hands-on approach to Enamel Gel

Laura Drahozal
Remembering Life's Moments
Hi! Laura here and I want you to know I just adore the new G&P 3D Enamel Gels! One of my favorite ways to use them is to apply enamels to a textured surface with my fingers. The Globecraft bookboard is a perfect surface. 

First, I apply paint to create light reflection and enhance the transparency of the enamels. White and metallic colors work best for this. Then, I create texture using an embossing folder. To add the color, I simply squeeze the enamel directly onto the project and smear it with my finger.


I suppose I could smear it with a paint brush, but I prefer to actually touch my project. When it is textured, the color goes into all of the nooks and crannies. Because I am rubbing over the top of the raised areas, it leaves just a light, transparent film in those spots.
This is what it looks like done:


Another benefit is the ability to mix colors with my fingers. I just place all the colors where I want them and then blend lightly with my finger.


And the results?


Give the hands-on approach a try! You won't be disappointed. 

Monday, February 25, 2013

Making a heart smile

'You make my heart smile' DIY Ornament
Linda here and I seem to remember that a while back I promised a closer look at the ornaments strung from my altered lamp shade I made in December. The decorated piece traveled all the way to California for CHA and then back to Michigan. I picked it up just before my Mystery Mini Book Retreat and had it on display there.

The students really liked it and thought it would make a great little piece in a little girls room or hanging in a feminine little corner of the home. Me, I just love making these ornaments. Such a nice little gift for someone. A piece they can hang from a drawer pull or door knob. I like to hang mine on lamp pulls so the light shines through them.


So here's how this one started:
  • DIY Ornament
  • Pink Rose 3D Enamel Gel
  • Burnt Umber 3D Enamel Gel
  • Vintage Hearts Charm Set 
  • Glastique Gloss
  • Gesso
  •  Embossing folder and embossing machine
  • Clip Art (this one is from Crafty Secrets)
  • Garden Moss (from a craft store)
  • Ribbon and beads to coordinate
  • thin bead wire
  • printed phrases
Linda Neff
http://linda-neff.com
I started by placing both the DIY Ornament outer rings in an embossing folder and dry embossed them. Depending on the embossing folder size you may be able to fit both rings otherwise emboss them separately. Then I brushed a thin coat of Gesso on all three rings (front and back of center ring and just one side of the outer rings); set it aside to dry. The thin coat will dry fast and the gesso provides the perfect white background to show off the delicate pink color or the Pink Rose 3D Enamel Gel.

When the gesso is dry, I squeezed the Pink Rose 3D Enamel Gel onto the two outer rings (on the gesso side) and spread it around with my finger unevenly. While you're spreading it on the one the other is already dry. Then I squeezed on the Burnt Umber 3D Enamel Gel and worked it into the grooves and crevices made by the embossing. I love spreading the enamel gels around with fingers - makes me feel like a little kid fingerpainting! I let this dry and just repeated the layers allowing them to dry in-between, until I achieved the look that appealed to me.

DIY Ornament painted with Gesso then Piccolo 3D Enamel Gels for color.
I spread a layer of the Pink Rose 3D Enamel Gel on the center ring as well so the color would flow equally on all three pieces.

I chose my clip art to use inside (Crafty Secrets) and distressed the edges and inked them a bit with Walnut Stain Distress Ink. I had to reprint the phrase on white cardstock so I could cut it to fit inside the globe. This ornament can be seen from both sides so I chose another clip art piece the same size and before adhering the two pieces together ran a piece of the thin beading wire up the center to make the clip art appear as though it is floating. I wrapped the wire (that's sticking out the top of the clip art) around a wooden skewer to make some curly ques. The wire is actually long enough that it comes out the top and the bottom of the ornament so I could string some beads and hearts. I treated the Piccolo hearts in the same manner as the DIY Ornament rings to add color and dimension.

Piccolo Vintage Hearts Charm Set with 3D Enamel Gels for color.

I was ready for assembly.
  • Add a thin line of Glastique around the inner edge of the bottom ornament ring (unfinished side and about 1/4 inch from the inner edge). Lay the globe into the ring and use wooden clothespin to clip it together while the Glastique sets up.
  •  Lay the wired clip art across the center of the bottom globe (you can actually do this while the globe is clipped to the ring).
  • Determine placement for your printed phrase for this half of the ornament and adhere into place.
  • Pinch a very small amount of moss into the bottom portion of the globe and determine where your last printed phrase will sit and adhere it into place as well.
  • Add a thin line of Glastique to the backside of the center ring and lay on top of the bottom globe, carefully lining up so it is centered; clip into place with clothespins.
  • Add a thin line of Glastique to the top of the center ring and lay the top globe into it.
  • Add a thin like of Glastique to the unfinished side of the top ring and lay it over the top globe, carefully lining up all pieces and clipping with clothespins. I like to let mine set up really well before adding anything else.
DIY Ornament with 3D Enamel Gels; setting up and drying.
Once it is set really well then I added the beads and Vintage Hearts Charms - one to the top and a smaller one to the bottom. I finished it off with a piece of coordinating organdy ribbon.

Finished DIY Ornament with Piccolo 3D Enamel Gels.
I have another to show you over my personal blog. Come on over and take a gander at it and let me know how you like them.

You can order your DIY Ornament by clicking the link below. They are way too much fun to play with. You can add such a variety of items to make them for any occasion.

Thursday, January 17, 2013

Sharing windows of inspiration


G&P makes these cute little DIY Ornaments that are easy to work with and very simple. They were originally intended for crafters to use in making Christmas ornaments but I immediately thought other purposes. I like to call them my little windows of inspiration.

I recently made several little windows of inspiration to hang from an old lampshade. I'm going to give you a couple ideas for filling them with clip art and other ornamentation.


Linda Neff
linda-neff.com


Supplies:
  • G&P DIY Ornament
  • G&P Glastique Gloss
  • G&P 3D Enamel Gels
  • Small clip art pieces
  • paper flowers
  • ribbons


For this DIY Ornament I started by dry embossing the rings in an embossing folder run through my Vagabond. Then I quickly painted the ornament rings with gesso to provide a white base to work with. Once the gesso dried I spread Piccolo 3D Enamel Gel Pink Rose on the top side of the rings with my finger.

The 3D enamels dry pretty quickly so when the Pink Rose Enamel is dry then I used the same fingering technique to apply the Piccolo Burnt Umber gel rather randomly as to give it an aged, antique look.


I ran a strip of thin wire through the center of the ornament pieces prior to assembly. I used two pieces of clip art that were the same size so the edges matched up. These are glued back-to-back over the wire. I added a tad bit of dried moss to the bottom of the globe, added a printed quote, then assembled the pieces. The pieces are adhered together with Glastique and clamped with clothespins till set. Add a ribbon at the top to hang.


For this DIY Ornament, I stippled G&P Titanium White 3D Enamel Gel to the inside of the back globe and let it dry. While it's drying the rings are embossed using an embossing folder then coated with Glastique Gloss Finishing Glaze. I raided my vintage button container and used Glastique to adhere a layer of vintage white buttons. These provide the base for paper flowers and leaves. When they're all glued in place I add a printed quote.


When the Glastique is dry and the flowers and leaves are set, the pieces are assembled using Glastique to adhere the rings and globes then clipped with clothespins till set.


Swing by my blog to see a banner made from the DIY Ornament and an altered window where Piccolo Embossing Powders, Glastique and 3D Enamel Gels were used to create a vintage look.