Pages

Friday, February 22, 2013

Recycling tip: Creating your own gemstones


Have you ever decided to use one of the Piccolo charm products without the ring on the top? Laura here, and I'm here to tell you I have, plenty of times, and I have a tip: Cut the circle off the top carefully, and don't throw it away. Recycle it!

When you remove the ring, cut it to create a circle. Then, you can use the Enamel Embossing Powder Adhesive and your favorite color of Piccolo Embossing Powders.


You need to emboss the top and sides. A pair of tweezers can keep it in place while you heat it. Use Glastique to attach the bottom of the circle to a piece of acetate. Let it dry.


After the Glastique is dry, fill the holes with your choice of 3D Enamel Gel colors. You may need up to three layers of color to fill your bezels.


Your new "gemstones" will be ready to use before you know it. The best part? Because you created them on acetate, you can hold them over your project to see which one you want to use. After you chose a gem,  simply cut around it and glue it into place with Glastique.


This is the most recent project I used this technique on. The circles were cut from the hearts that make up this Shamrock. If you want to see the rest of this project, check it out on my blog HERE.

Thursday, February 21, 2013

Making a Stand-Up Card


Good morning crafters! Chrissy here to show you a neat little standing "card" you can make for the special honey in your life. You really don't need much and you can even dive into your stash and use up some paper you've been hoarding for the last year. Come on now. Don't lie. We already know you have some because we all hoard it too.


Christina Colón
The Twisted Muse

Isn't this just the cutest little "pop up" card? It's really easy to put together too. Here's what you'll need:

  • Globecraft Memories Fancy Bubble Frame
  • Piccolo Accents Small Flourishes
  • Piccolo Cranberry Wine Embossing Powder
  • Piccolo Embossing Powder Adhesive
  • Piccolo 3D Gel Enamel in Napthol Red
  • Scrapbook Paper (I used Secret Crush by Pink Paislee.)
  • Stickles
  • Sequins
  • Adhesive
  • Heat Tool

Step 1: Heat emboss the decorative frame piece. As this cools and sets, use the 3D gel to add color to the small flourishes you wish to use. 


Step 2: While the gel pieces are drying, cut your scrapbook paper to the appropriate size and shape of the individual pieces of the frame you wish to cover. I also attached the decorative frame as well as highlighted my image with my Stickles glue. You can also attach the bubble piece to its proper layer.


Step 3: Assemble the pieces of your frame.


Step 4: Add the back piece with the image. Don't forget to put the sequins in before you glue the back piece to the rest of the frame. Now is also the time to add your small flourishes.


Step 5: Sit back and admire before you give it to your honey! 


You don't have to use lovey-dovey papers like I did on this project. The great thing with these frames is that you can use any motif you desire! Head over to my blog to check out how I used the ever-popular steampunk theme to dress up a bubbleframe watch!

Thanks for hangin' out with me today!

Wednesday, February 20, 2013

Tips and Tricks: Coating Both Sides


Covering one side of a Piccolo with embossing powder is easy, but when you need both sides covered things can get a little challenging.

Say you want to coat a key with embossing powder ... you heat one side, then turn it over and heat the other. When you pick it up, you will find the first side ruined.

To solve that dilemma, use a set of tweezers with a plastic grip.

Heat and emboss one side like you would normally. Let it cool and then coat the other side with embossing powder. This time, use the tweezers to hold it while you heat it. Then go back and do the front side again for a flawless, double-sided Piccolo.


Tuesday, February 19, 2013

Challenge #105 Sweet & Simple

Hello crafty friends! SweetStamps.com's challenge #105 this week is...
Sweet & Simple
We'd love to see your sweet and simple creation! Remember to use a SweetStamps image on your entry to get an extra chance at winning $20 of rubber stamps from SweetStamps.com. Rules are listed in the sidebar and instructions can be found at the bottom of this post.

Take a look these sweet & simple cards our Design Team sweeties have created this week:


 * * * * * * * * * * * * * * * * * *
WIN FREE STAMPS! 
Join our weekly challenge
You can use any stamp on your challenge entry, but if you use a SweetStamps image, you will get two entries into the giveaway! To enter the challenge, please add the URL to your actual blog post or online gallery to the InLinkz at the end of this post. Please do not link to your main blog; we want to be able to find your post to leave you comments. Also, please link back to our blog.

 * * * * * * * * * * * * * * * * * *
Remember, you can only enter the challenge one time, use a SweetStamps image to get an extra entry in the challenge. Please limit the amount of challenges to 10 (including ours).  You must link back to us in your blog post.

Please turn off word verification so we can leave comments on your challenge entry!

Next Tuesday our challenge theme will be Embossing Folder + Die Cut(s) + Stamps (use all 3). Hope you'll join us for your chance to win some Sweet Stamps!

Happy Stamping! Have a super sweet week!

P.S. Our Monthly Technique Challenge: Triple Stamping runs through March 14th, so come try out this fun technique for another chance to win some Sweet Stamps!

Romance Challenge Winner

The winner of SweetStamps.com's Challenge #104 Romance is...
Sanketi
Congratulations!

Please contact me for your winning prize of a $20 shopping spree for rubber stamps at SweetStamps.com.

Thank you to everyone who joined in on the challenge, we hope you had fun and will join us again — we have a NEW technique challenge every month, along with a weekly challenge each Tuesday!

Monday, February 18, 2013

Guests greeted with unique wreath


A wreath hanging on a front door is not only something that adds a nice element of decor, but it is the welcoming warmth it lends to those who are ready to ring the doorbell. Incorporating Globecraft & Piccolo bookboard charms, embossing powder and 3-D gel enamel to this warm yarn wreath adds a sophisticated vintage charm. 


Arin Flynn
A Piece of Life's Pie

Material List: 
  • G&P Vintage Birdcage Charms
  • G&P Vintage Silver Embossing Powder
  • G&P Embossing Powder Adhesive
  • G&P Glastique Gloss Finishing Glaze
  • G&P Napthol Red 3D Enamel Gel
  • G&P Siam Silver Embossing Powder
  • 14 inch Foam Wreath - FloralCraft
  • Yarn
  • MDF Letter - Michales Craft Store
  • ProMakers (used the fine tip for tracing)
  • Felt fabric 
  • 2 inch red ribbon - Celebrate It
  • 5 inch Doily - AliExpress.com
  • White 12x12 card stock
  • Cricut Die Cut Machine and Cricut Cartrige Flower Shoppe
  • Hot Glue Gun
  • Heat gun
  • Straight Pins
  • Scissors
  • Q-Tip Brush (3)

Step 1: Making the Yarn Wreath
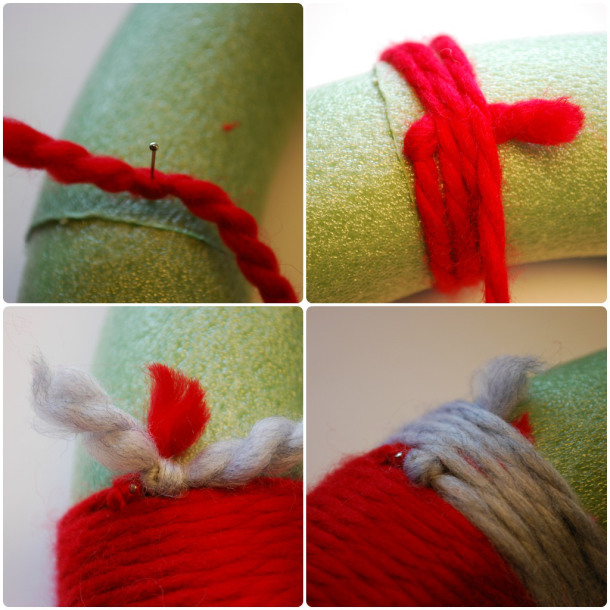
Making the yarn wreath is pretty straight forward. Use a 14-inch foam wreath that can be found at a local craft store, straight pins and yarn of your choice. Tie a knot at the end of the yarn string and then stick a straight pin through the knot attaching it to the back of the foam wreath and begin wrapping the yarn around the wreath (you can also alternate colors and patterns, this wreath is just one solid color). Once complete, tie another knot at the end and run a straight pin through it. A 14-inch wreath usually takes around 1 1/2 hours to complete. 


Step 2: Birdcage Charms:
Apply Napthol Red 3D Enamel Gel to both bases of the birdcage charms and set aside to set and dry. 
 

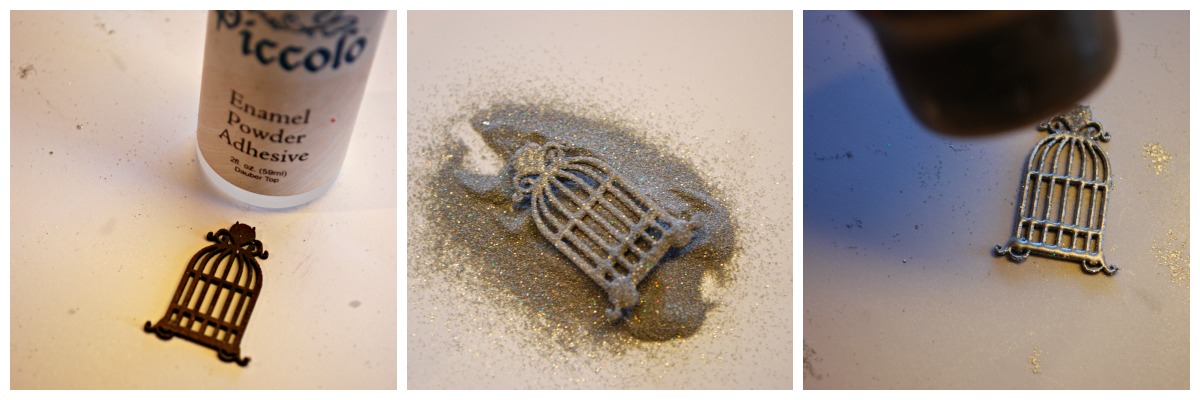
Then apply Piccolo Embossing Powder Adhesive to both the detailed birdcages, dust with Piccolo Siam Silver Embossing Powder, shake off the excess and set with heat gun. Repeat this process three times to add more depth and dimension the birdcages. 


Once both of the bases and detailed charms are dry and set, apply Glastique Gloss Finishing Glaze to the back of the detailed charms and adhear to the base charm. Set aside to dry.


Step 3: Felt Roses
To make these felt roses you can use a Cricut die cut machine and Cricut Cartridge Flower Shoppe (scallop base cut at 4 inches and 6 inches on  12x12 white card stock). You can also use a Silhouette cut or even free-hand these flower stencils. Trace the stencil using a fine tip marker, cut out.  


Begin to tightly roll the end of the fel,t rose toward the middle of the spiral. When you reach the end, hot glue it to the bottom of the felt rose. I made three red roses and three grey roses.


To add a bit of bling to one of the roses apply Piccolo Embossing Powder Adhesive to random sections of the rose with a Q-tip and then dust those areas with Piccolo Siam Silver Embossing Powder. Carefully remove any excess enamel powder with a dry Q-tip brush and then set with a heat gun slowly. Take care in the heating process you only want to set the enamel powder, not melt the felt fabric. 


Step 3: MDF Letter
This step was super easy and fun to do. Apply Piccolo Embossing Powder Adhesive to the front, inside surfaces and outer edge of the letter. Then dust it with Piccolo Vintage Silver Embossing Powder and shake off the excess. Set it with a a heat gun and allow it to cool for five minutes. I only had to do one layer of the powder because the initial application provided total coverage. Then secure the birdcage charms to the letter using hot glue.


Step 4: Putting Together the Wreath
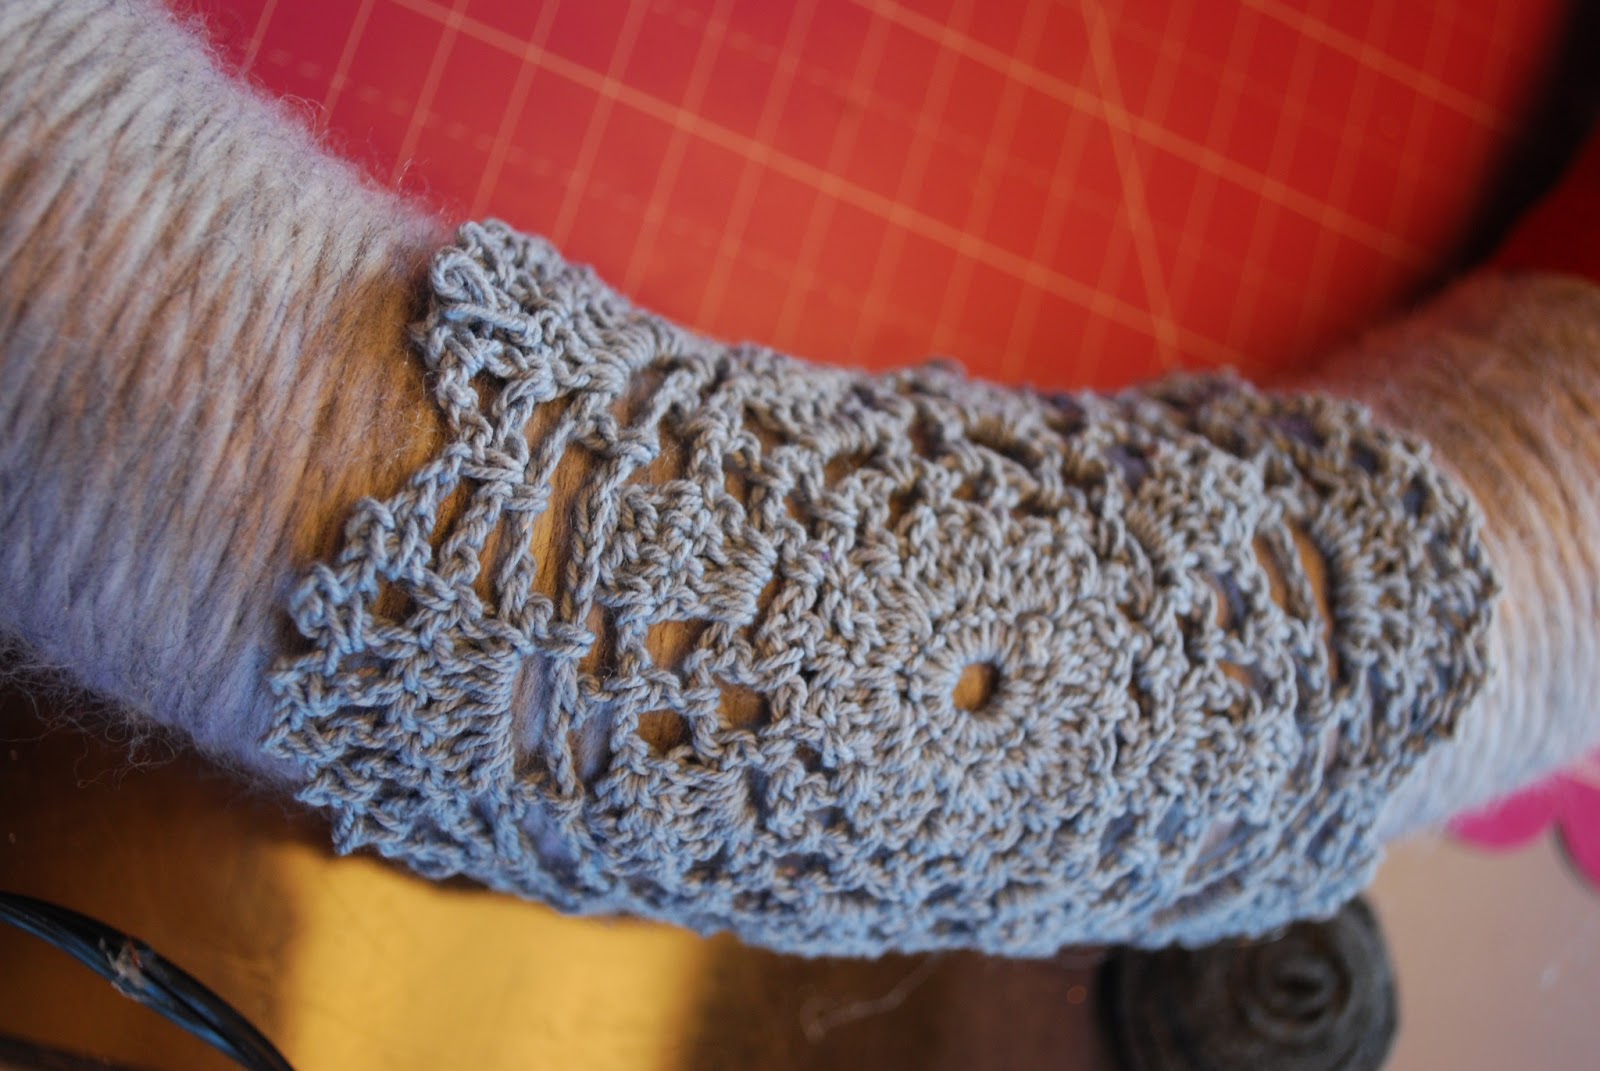
Once all the elements are complete, assemble the wreath by adding a grey doily to one side of the wreath, securing it by wrapping it around the wreath and hot gluing the ends to the back of the wreath.


Hot glue three roses in a row on top of the doily. Then add the letter to the other side of the wreath.


Add the letter and three more roses to the other side of the wreath securing it with hot glue. Loop the 2-inch x 24-inch ribbon at the top of the wreath and tie a knot to hang. 


This wreath was very simple and fun to make.  This is a great gift idea for a house warming or wedding. You can see another one of my simple and fun home decor projects using Globecraft & Piccolo products by visiting my blog HERE

Friday, February 15, 2013

A Celtic Relic Necklace

For today's post, I was inspired by Celtic knots.  I was thinking about these ancient symbols and trying to create something that looked like it could be a relic.
So, here is how it was done:

Materials

Piccolo Square Tag Bezel
Piccolo Embossing Powder Adhesive
Globecraft Mossy Glen Enamel Powder
Globecraft Guilded Rose Gold Enamel Powder
Piccolo Easy Grip Tweezers
Globecraft Vintage Gold Bail
Black Real Silk Cord Necklace With Lobster Claw Clasp
Heat Gun
Dreamweaver Stencil LL381 Celtic Hexagon
Dreamweaver Gold Embossing Paste
Dreamweaver Palette Knife
Removable Scotch Tape
Tim Holtz Alcohol Inks in Cranberry, Espresso, Oregano and Butterscotch
Alcohol Ink Applicator Tool

Directions:
1)  Use Embossing Powder Adhesive on Tag Bezel by simply blotting it on the tag board.
2)  Cover with Mossy Glen Enamel Powder.
3)  Heat embossing powder.
4)  Repeat steps 1-3, alternating sides, until you have about 3 layers on each side.  As you heat, you will need to hold the bezel with tweezers.
This is what it looks like after the enamel.
5) Use the removable tape to tape off a single triangle.
6)  Center the triangle over the bezel.  Use tape under the bezel to attach it to the stencil.


7) Use the palette knife to place embossing paste on the tape above the opening on the stencil.


 8)  Use the palette knife like a squeegee and spread the paste across the opening on the stencil.  Don't push down hard, but run the knife along the stencil.

 9)  If you have any paste that bled under the stencil, use the tip of the tweezers to remove it.
This is what it should look like when it is pasted.
10)  Pour Guilded Rose Embossing Enamel over the top of the paste. The variation in color and texture of the embossing enamel will add to the look.  Let dry for about 15 minutes.

11)  Use tweezers to clear out any excess embossing powder.
12)  Heat the embossing enamel.  Don't get too close.   The embossing paste will not be totally dry yet, and will bubble, adding to the weathered look.  Also, as it heats, the paste will "damage" the green embossing enamel, leaving bluish white areas around parts of the knot.
This is what it looks like completed.
 13)  Use alcohol inks and applicator to "age" the bail.

14)  Attach the bail and cord.

Thanks for stopping by!  Drop by my blog at www.rememberinglifesmoments.blogspot.com for a different take on St. Patrick's Day jewelry with Globecraft.